This article was co-authored by wikiHow staff writer, Christopher M. Osborne, PhD. Christopher Osborne has been a wikiHow Content Creator since 2015. He is also a historian who holds a PhD from The University of Notre Dame and has taught at universities in and around Pittsburgh, PA. His scholarly publications and presentations focus on his research interests in early American history, but Chris also enjoys the challenges and rewards of writing wikiHow articles on a wide range of subjects.
There are 8 references cited in this article, which can be found at the bottom of the page.
This article has been viewed 34,521 times.
Learn more...
Caring for a pet rat starts with setting up a proper cage for it to live in. It’s also a great idea to build a rat-friendly playhouse for it to run around in when it’s outside the cage and under your supervision. You can build a simple rat house out of cardboard boxes or craft sticks, then expand upon the house and make it as fancy as you like!
Steps
Making a Multi-Room House from Cardboard Boxes
-
1Grab 2 cardboard boxes that are roughly 12 × 12 × 8 in (30 × 30 × 20 cm). Online delivery boxes are a great choice here, but really any type of sturdy cardboard box will do. They can be larger or smaller than 12 × 12 × 8 in (30 × 30 × 20 cm), but make sure they’re roomy enough for your rat to move around comfortably in.
- If and when you choose to expand your rat house, you’ll find that many types of cardboard boxes—shoe boxes, cereal boxes, and so on—make useful building materials.
-
2Remove the top flaps, or seal them and cut skylights into them. If you want a clear view of your rat at all times, just cut away the top flaps of both boxes with scissors or a pen-style crafting knife. Your rat might prefer a bit of cover, however, so consider taping the top flaps closed with packing tape and cutting 1-2 skylights into each box.
- To make a skylight, use a ruler to draw a 3–4 in (7.6–10.2 cm) square on one of the top flaps, or trace a round skylight by using the lid from something like an oatmeal can. Then, carefully cut out the skylight with a sharp crafting knife.[1]
- Make sure you can view your rat inside the house at all times.
Advertisement -
3Cut 4 in (10 cm) doorways into one side of each box. Use a ruler and a crafting knife to cut a 4 in (10 cm) square doorway into both boxes. Alternatively, you can use an oatmeal can (or similar) lid to trace round doorways into the sides.
- Whether you make square or round doorways, make both of them the same size. Also make sure each one is aligned with the bottom of the side of the box. This way, they'll line up properly when you stick the boxes together.
-
4Line up the doorways and glue or tape the boxes together. Position the 2 boxes side-by-side so that the doorways line up just right. Either use packing tape to secure the 2 boxes in position, or squeeze some white school glue (PVA glue) between the connecting walls and press them together.
- If you have 2 identical boxes and you want them to line up perfectly, measure carefully when locating your doorways.
-
5Cut windows into the other walls of the boxes, as desired. Measure and cut 3–4 in (7.6–10.2 cm) square (or round) windows into 1-2 of the other sides of each box. These will give you more viewing angles into the boxes, and make them look and feel more home-like![2]
- If you’re particularly crafty, you can create a window out of 4 smaller squares, with thin strips of the cardboard left between them, so that you have a divided light window!
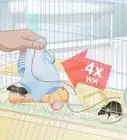
- To make sure your rat can't make an escape attempt out of one of the rat house windows (or doors), always set up the rat house inside an escape-proof rat play area.
-
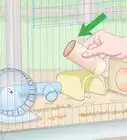
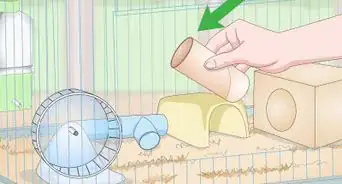
6Connect another box with an oatmeal can tunnel, if you wish. Use your crafting knife to cut the bottom off of a cardboard oatmeal can. Trace the circular shape of the can onto an outer wall of the existing house, as well as on an additional box. Cut out the circles so that they’re about 0.5 in (1.3 cm) smaller in diameter than the tracings. Use packing tape to connect the can to each box, or stick everything together with hot glue.[3]
- Before using a hot glue gun, read all product instructions and follow all safety precautions. Also, keep a close eye on your rats so they don’t try to nibble on any of the dried glue on the house.
-
7Keep expanding your rat house with new boxes and accessories. Once you start adding on to your rat house, you’ll find it hard to stop! Try adding on some smaller rooms made of shoeboxes or cereal boxes. Eventually, you may even want to turn it into a multi-level house with boxes stacked (and secured) on top of each other.
- To create access between levels, make ramps out of sturdy pieces of cardboard, or hot glue craft sticks (that is, Popsicle sticks) together to make an angled ladder.
- You can create a rat neighborhood with multiple houses by gluing them onto a large sheet of cardboard. You can even make sidewalks by hot-gluing down craft sticks!


Building a Small House out of Craft Sticks
-
1Use jumbo craft sticks as your building material. While people tend to call them Popsicle sticks, don’t think you have to eat box after box of frozen treats to collect a bunch of them! Buy jumbo size craft sticks—approximately 5.9 in × 0.7 in (15.0 cm × 1.8 cm) in size—at any crafting supplies retailer or online.
- You’ll likely need around 200 crafting sticks to make even a small rat house, so go ahead and buy the big box!
-
2Glue craft sticks on a piece of cardboard to create a floor. Use crafting scissors to snip the rounded ends off of 30 craft sticks. Hot glue them down in 2 rows of 15 on a thick piece of cardboard that’s at least 12 in × 12 in (30 cm × 30 cm) in size.[4]
- When you’re finished, the floor should be roughly 10.5 in × 10.5 in (27 cm × 27 cm).
- Once the glue dries, trim off any excess cardboard around the craft sticks with a pen-style crafting knife, or just leave it as-is.
- If you want to stagger the joints in your flooring for a fancier appearance, cut 15 of the craft sticks in half. Then alternate your flooring rows (lengthwise) between 2 whole craft sticks and 1 whole craft stick in line between 2 half sticks.
-
3Create 2 side walls out of rows of craft sticks. To make a wall, lay down 15 sticks side-by-side. Cut one rounded end off of each of 4 more craft sticks and glue 2 of them across the tops of the 15 sticks, placing the flat ends of the 2 sticks side-by side. Glue the other 2 craft sticks along the bottom in the same manner.[5]
- Repeat the process to make the other side wall.
- If you want to add windows or doors to the side walls, follow the instructions elsewhere in this Method for making the front and back walls.
- Set the walls aside for now.
-
4Build a back wall with 2 windows cut out of it. Cut 8 craft sticks into 3 equal sections each, and discard the center sections. Line up 2 whole craft sticks, 4 of the tops and bottoms, 3 whole sticks, 4 more of the tops and bottoms, then 2 more whole sticks. Glue on top and bottom supports made from 2 craft sticks each, as you did with the side walls.[6]
- Frame in the 2 windows by cutting craft sticks to size and gluing them around the opening of each window. This gives them greater structural integrity, and it looks nice!
-
5Make the front wall with a door and a window. Lay out the front wall the same way you did the back wall, but use only the top third of 4 craft sticks so that the door opening extends to the floor. Glue 2 craft sticks across the top to secure the wall, then glue one whole and one trimmed stick across the bottom (leaving a gap for the door opening). Frame in the door with trim pieces made of craft sticks cut to size.[7]
- Set this wall aside for now as well.
-
6Create an optional front door for your rat house. If you want to add a swinging door, cut 3 sticks in half and lay them side by side, rounded sides facing down. Cut a stick to length and glue it across the top. Glue a pair of 1 in (2.5 cm) lengths of string to the top front of the door.[8]
- When you assemble the house, glue the other ends of the strings to the top of the frame for the door opening.
-
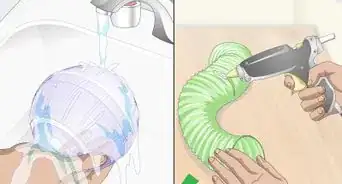
7Put the walls in place and glue them together. Stand one wall upright on the craft stick floor and run hot glue along its base. When the glue dries enough to hold that wall upright, glue an adjacent wall in place in the same way, then glue the 2 walls together where they meet. Repeat the process with the other 2 walls.[9]
- While you can do this part yourself, it is a bit easier with a second set of hands. If you do employ a helper, though, make sure they know how to stay safe around a hot glue gun and glue.
-
8Build a removable flat roof. Trim one rounded edge off of 30 craft sticks. Lay them out in 2 rows of 15, so that the flat ends (that you trimmed off) are touching. Trim one end off of 6 more sticks, and glue 2 each across the top, middle, and bottom of the flat roof to add support. Flip the roof over and glue 2 more trimmed sticks across the middle to add additional support to the area where the 2 rows of 15 sticks meet.
- Just lay this roof on top of the house to give your rats a bit of cover, then lift it off when you want to see what they’re up to in there!
- Eventually, you may want to try your hand at making a removable sloped roof. You can also make fences, walkways, ladders, new rooms and levels, and all kinds of pretty additions—all out of craft sticks![10]


Community Q&A
-
QuestionWill this work with plastic boxes?
 Community AnswerPlastic boxes are great because you can wipe them down quickly. Just make sure there aren't any labels they might eat, and there are no sharp edges.
 -
QuestionCan I use an old doll house?Community AnswerIf there is paint in/on the dollhouse, you cannot use it as a rat's house. There also have to be no windows, doors, or furniture. Rats can get stuck in small doors and windows.
-
QuestionDoes this article work for mice?
 Community AnswerIt can work for mice, as most things that work for rats work for mice. You could make it smaller if you want though.
Warnings
- Supervise your rats at all times while they play in their house. They could choke or get sick by chewing on tape, glue, or other materials.⧼thumbs_response⧽
- Don't use splintered wood for anything in your clubhouse. This can cause serious pain to you, so imagine what it could do to your rats!⧼thumbs_response⧽
Things You’ll Need
Making a Multi-Room House from Cardboard Boxes
- 2 or more cardboard boxes
- Crafting knife
- Ruler
- Hot glue or packing tape
- Oatmeal can (optional)
Building a Small House out of Craft Sticks
- Large pack of jumbo craft sticks
- Crafting scissors
- Hot glue and glue gun
- 12 in × 12 in (30 cm × 30 cm) piece of cardboard
References
- ↑ https://youtu.be/WskR75DtcrI?t=15
- ↑ https://youtu.be/WskR75DtcrI?t=45
- ↑ https://youtu.be/WskR75DtcrI?t=195
- ↑ https://youtu.be/Zg-Cau4_H9Q?t=60
- ↑ https://youtu.be/Zg-Cau4_H9Q?t=300
- ↑ https://youtu.be/6v6RLUb2TQQ?t=95
- ↑ https://youtu.be/6v6RLUb2TQQ?t=105
- ↑ https://youtu.be/6v6RLUb2TQQ?t=105
- ↑ https://youtu.be/Zg-Cau4_H9Q?t=300
About This Article