This article was co-authored by wikiHow staff writer, Amy Bobinger. Amy Bobinger has been a writer and editor at wikiHow since 2017. She especially enjoys writing articles that help people overcome interpersonal hurdles but frequently covers a variety of subjects, including health and wellness, spirituality, gardening, and more. Amy graduated with a B.A. in English Lit from Mississippi College in 2011 and now lives in her hometown with her husband and two young sons.
The wikiHow Video Team also followed the article's instructions and verified that they work.
This article has been viewed 63,078 times.
Learn more...
If you have pet rats, you may be looking for new ways to give them fresh, healthy treats. Many rats love yogurt, both fresh and in the commercially-prepared yogurt drops. However, those drops can get pricey. Luckily, they’re easy to make yourself. Mix up your yogurt with crushed cereal and a few other ingredients, then pipe the mixture into small drops. If you have a dehydrator, you can dry the drops to create the shelf-stable snack, or you can store your drops in the freezer to keep them fresh!
Ingredients
- 2 cups (470 mL) vanilla yogurt
- 2 tablespoons (30 mL) honey
- 3 tbsp (28 g) unflavored gelatin
- 1/2 cup (65 g) skim milk powder
- 3 tbsp (19 g) cornstarch
- 1/2 cup (40 g) crushed cereal
Makes 30-50 drops, depending on size
Steps
Mixing the Yogurt Drops
-
1Line a baking sheet or dehydrator tray with parchment paper. Before you get started mixing your ingredients, it’s best to prepare the surface where you’ll pipe out the drops. If you’re using a dehydrator, line your dehydrator trays with parchment paper. To freeze the drops, line a 9 in × 13 in (23 cm × 33 cm) baking sheet with the parchment paper, instead.[1]
- Place the trays somewhere out of the way for now.
-
2Mix 2 cups (470 mL) of yogurt with the other ingredients in a large bowl. Once you’ve added the yogurt to the bowl, add 2 tablespoons (30 mL) of honey, 3 tbsp (28 g) of unflavored gelatin, 1/2 cup (65 g) of skim milk powder, 3 tbsp (19 g) of cornstarch, and 1/2 cup (40 g) of your choice of crushed cereal. Stir everything together with a wooden spoon until it’s completely combined.[2]
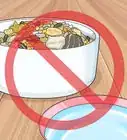
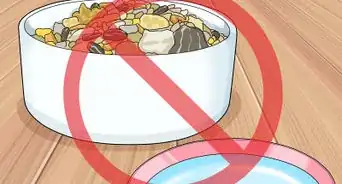
- You can use plain vanilla yogurt, or you can use flavored yogurt if there’s one your rat prefers. Do not use citrus-flavored yogurt, though.
- Low-fat or high-sugar yogurts may not set up as well.
- For the cereal, just use whatever you have on hand. Keep in mind, though, that unsweetened cereal is healthier for your rats. If you have a little stale cereal left in the bottom of a bag, that’s perfect—just crush it with the back of your wooden spoon or the bottom of a glass.
Advertisement -
3Scoop the mixture into a resealable plastic bag. Once everything is mixed together, use your wooden spoon to transfer everything into the bottom of a plastic sandwich bag. If you’re having trouble holding the bag while you fill it, place the bag inside of a glass. Fold the top over the rim of the glass to hold it in place, then add the yogurt mixture.[3]
- If you happen to have a piping bag on hand, that’s perfect! If not, though, resealable sandwich bags work just fine.
-
4Snip the tip off of the plastic bag with scissors. After you fill the bag, hold the top closed with one hand, then use the other hand to push the yogurt mixture away from one of the bottom corners. Tilt the bag sideways so the yogurt doesn’t run back into the corner, and use scissors to snip off the bottom 1⁄2 in (1.3 cm) or so from the corner of the bag.[4]
Tip: It’s better to make too small of a cut than too large. You can always cut more, but if you cut off too much, it will be difficult to create the small drops.
-
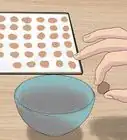
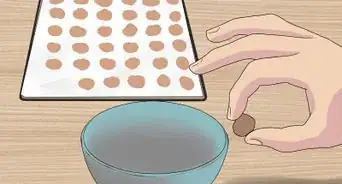
5Pipe small drops of yogurt onto your parchment-lined sheets. Hold the bag so the cut corner is just above the parchment. Gently squeeze the bag until a small drop comes out. Then, move the bag about 1 in (2.5 cm) from the first drop and add another one. Continue until you’ve used all of the mixture.[5]
- It might take a little practice to get the drops just right, but you should get the hang of it in no time!
- The yogurt mixture should come out of the piping bag easily. If it doesn’t, you might need to cut your hole just a little bigger.
- The drops won’t spread very much, but spacing them 1 in (2.5 cm) will make it easier to remove them from the sheet.
Using a Dehydrator
-
1Place the trays of drops in your dehydrator and turn it on. If you want to create a shelf-stable treat, like the yogurt drops that are sold in grocery stores and pet supply shops, you’ll need to dehydrate them. Once you’ve piped out all of your yogurt dots, slide the trays into your dehydrator.[6]
- Be sure to read the user’s manual for your dehydrator if you’re not sure how to use it.
-
2Dry the drops for at least 6 hours or up to overnight. When the yogurt drops are finished dehydrating, they’ll feel dry and firm when you touch them. If they still feel soft, sticky, or wet, they need to stay in the dehydrator longer.[7]
- Drying times can vary widely based on the type of dehydrator you’re using. If you have a dehydrator that uses air to speed up the process, it might only take as little as 2 hours to dry your drops. Check the drops at least once an hour to see how they’re doing if you’re not sure.
-
3Let the drops cool to room temperature. After the yogurt drops have finished dehydrating, they’ll need to cool. Set the trays on a wire rack if you have one, or just place them on the counter. They’ll probably need about 20-30 minutes to cool.[8]
Tip: If you’re not sure whether the yogurt drops are cooled completely, break one open and touch the inside. If it feels warm, let the drops cool a little while longer.
-
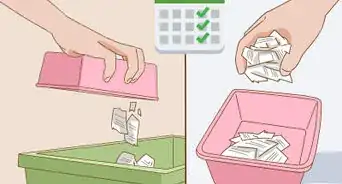
4Store the drops in a resealable plastic bag or air-tight container. Although dehydrated yogurt drops are shelf-stable, they still need to be kept in an air-tight container to preserve their texture and flavor. Pull the sheets off of the parchment paper by hand and place them in a resealable bag or a plastic container with a tight-fitting lid, and keep them in a cool, dry place. You can also keep them in the refrigerator if you’d like.[9]
- These treats will be good for several months if they're in a sealed, airtight container
-
5Give the yogurt drops to your rats as an occasional treat. You don’t want to give your rats sweet treats too often, but you can offer them these treats once a week or so without a problem. If you used unsweetened yogurt and cereal, you can feed them to your rats 2-3 times a week, instead.
Freezing the Drops
-
1Place the baking sheet in the freezer overnight. Even if you don’t have a dehydrator, you can still make these treats for your pet rats! After you pipe out all of the drops, place your baking sheet in the freezer so it’s laying flat. Then, leave it there overnight so the drops can harden completely.[10]
- Make sure the baking sheet is perfectly level. If it’s tilted, the yogurt mixture might run to one side, messing up the work you did piping out the drops.
- When they’re ready, the drops will feel completely hard to the touch.
-
2Move the drops to a resealable bag or plastic container. Once the drops have frozen, you can move them into a more convenient storage container. Pull the drops off of the baking sheet by hand or use a spatula to scrape them off. To prevent freezer burn, place the drops in an airtight, freezer-safe container, like a resealable plastic bag or a plastic container with a tight-fitting lid.[11]
-
3Keep the drops in the freezer until you’re ready to use them. The frozen yogurt drops might not be as portable as the dehydrated version, but they’re still a delicious treat, and freezing them helps increase their shelf life.[12]
- These drops will last in the freezer until 1 month after the "sell by" date on the container.[13]
-
4Give the yogurt drops to your rats either frozen or thawed. If the weather is warm and you’re looking for a cool treat to give your pet rats, you can offer them the frozen drops. However, if it’s chilly and you’re concerned about giving them something cold, you can thaw the drops at room temperature 10-15 minutes first.
- If you thaw the drops, you may need to feed them to your rat with a spoon.
Community Q&A
-
Questioncan we use flavored yogurt?
 Community AnswerYes, you can. Rats love biting into yogurt drops, especially the flavoured ones. Use them as you would with normal ones, and your rat will have a random flavour every time.
 -
QuestionIs it safe to add fresh fruit to the yogurt if I keep them frozen so that they stay fresh?
 Community AnswerYes, you could even freeze fruit to give to any small animal to help help them cool on the summer. Make sure that the fruit you are using is safe for rats (or the animal you are giving it to).
 -
QuestionCan I use something else other than an icing tube?Community AnswerYes. You can use a plastic bag (such as a sandwich or ziplock) instead. Fill it with your icing, then cut off one of the corners. You can use it just like an icing tube.
Things You'll Need
Mixing the Drops
- Baking sheet or dehydrator trays
- Parchment paper
- Mixing bowl
- Wooden spoon
- Glass (optional)
- Plastic bag
- Scissors
Using a Dehydrator
- Dehydrator
- Wire rack
- Airtight container
Freezing the Drops
- Freezer
- Airtight container
Warnings
- Do not use citrus-flavored yogurt, like orange or key lime, as these are unsafe for rats.⧼thumbs_response⧽


References
- ↑ http://www.yummysmells.ca/2013/11/yoghurt-drops-for-rodents.html
- ↑ http://www.yummysmells.ca/2013/11/yoghurt-drops-for-rodents.html
- ↑ https://www.seriouseats.com/2017/01/how-to-fill-a-piping-bag.html
- ↑ https://www.tastingtable.com/cook/national/plastic-zipper-bag-hacks-how-to-make-a-pastry-bag
- ↑ http://www.yummysmells.ca/2013/11/yoghurt-drops-for-rodents.html
- ↑ http://www.yummysmells.ca/2013/11/yoghurt-drops-for-rodents.html
- ↑ http://www.yummysmells.ca/2013/11/yoghurt-drops-for-rodents.html
- ↑ http://www.yummysmells.ca/2013/11/yoghurt-drops-for-rodents.html
- ↑ http://www.yummysmells.ca/2013/11/yoghurt-drops-for-rodents.html
About This Article