This article was co-authored by Gerber Ortiz-Vega. Gerber Ortiz-Vega is a Masonry Specialist and the Founder of GO Masonry LLC, a masonry company based in Northern Virginia. Gerber specializes in providing brick and stone laying services, concrete installations, and masonry repairs. Gerber has over four years of experience running GO Masonry and over ten years of general masonry work experience. He earned a BA in Marketing from the University of Mary Washington in 2017.
There are 11 references cited in this article, which can be found at the bottom of the page.
This article has been viewed 45,487 times.
Fire bricks can withstand more heat than standard masonry bricks, so they’re perfect for making fire pits and fireplaces. Cutting fire bricks yourself can save a lot of money, but it does take some time, dedicated effort, and a bit of skill.[1] Measure and mark out the cut lines before you start cutting. For angled cuts, use a power mitre saw. To make straight cuts, try your hand at cutting the brick with a hammer and chisel. With the right techniques you’ll be able to achieve clean, straight, professional-looking cuts through either method.
Steps
Marking the Cut Lines
-
1Measure your brick against the spot you want to fit it into. Use a tape measure or ruler to measure the length of your fire brick. Then determine the size of its destination. Subtract this from the length of the brick to determine how much you’ll need to cut away.[2]
- If your brick is 9 in (23 cm) long and you’d like to fit it into a 6 in (15 cm) space, you’ll need to cut off 3 in (7.6 cm).
- For an angled cut, use a protractor to determine what angle you’ll need to use in order for your brick to fit in place.
-
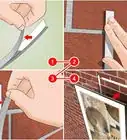
2Draw the cut line onto the brick with chalk. Use a ruler and a piece of white chalk to mark a cut line along one surface of the brick, placing the line at the measurement and angle you determined.[3] If you’ll be hand-cutting the brick, mark the cut lines all around the perimeter of the brick.[4]
- With the aforementioned example, you’d place your ruler 3 in (7.6 cm) away from the edge of the brick and draw a continuous straight line on all 4 sides of the brick.
Advertisement -
3Work in a well-ventilated area. Whether you’re using a power mitre sawing or cutting the brick by hand, you can cut your brick outside or in a well-ventilated workroom.[5]
- Either technique will result in brick dust, so you’ll need good ventilation to protect yourself.


Cutting the Bricks by Hand
-
1Obtain a hammer and a masonry chisel.[6] The right tools will make this process much easier. Choose a masonry chisel with a blade that’s at least as wide as the brick, rather than a narrow blade that you’d have to keep adjusting. Opt for a hammer such as a 2 lb (0.91 kg) sledge.[7]
- These tools can be found at most hardware stores and online.
-
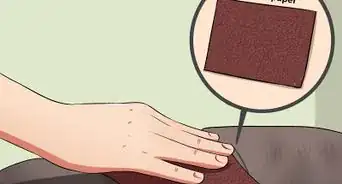
2Put on gloves, a long-sleeved shirt, and eye protection. Work gloves with some grip will help reduce hand fatigue and will prevent your palms from sticking to the chisel. Wear long sleeves as well as eye goggles to protect your hands, arms, and eyes from flying bits of brick.[8]
-
3Place the brick on a sturdy surface near hip-height. The brick should be high enough so that the top of your chisel will be close to hip-height. This will make the hammering easier and will help reduce the strain on your arms and back. Choose a sturdy, level work surface that can hold up to or absorb shock.[9]
- A layer of packed sand can help absorb shock as the brick will sink into it when you make your strikes. But make sure the brick sits level atop the sand so that you can make the cleanest possible cut.
- A wooden workbench may also be suitable, but be aware of the shock transfer. Clear off the surfaces so other items don’t topple over.
-
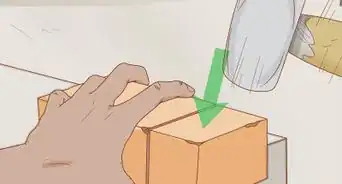
4Hold the chisel blade along the marked line, perpendicular to the brick. Hold the chisel by wrapping your hand around the handle, with your arm positioned parallel to the brick. Maintain a steady, firm grip on the handle and focus on holding the chisel perfectly upright.
- Keep your fingers away from the top of the chisel to avoid striking them with the hammer.
- Don’t squeeze down on the chisel since this will transfer the shock into your arm.[10]
-
5Tap the chisel with the hammer to score lightly along the marked lines. Hold the hammer a few inches above the chisel and let it fall onto the top of the chisel. Make a few gentle blows in this manner until you see a visible dent in the brick. Rotate the brick and repeat this process to lightly score all 4 sides.[11]
- Don’t try to pound down on the brick; just let the hammer’s weight gradually create a dent in the brick with each strike.
-
6Complete another round of scoring to deepen the score lines. Go back to the first side you scored to begin another round. This time, start by holding the hammer higher up, around eye-level, so that it falls with more impact on the chisel. Continue until the score lines are 1⁄16 in (0.16 cm) deep on all 4 sides.[12]
- If it’s your first time using a hammer and chisel to cut brick, this is a good chance to experiment with how the tools work together and how much impact is necessary to dent the brick.
- If you mess up the scoring or cutting, it’s ok! Just make sure you have a few spare bricks handy.
-
7Break the brick by making a series of solid blows with the hammer. Hold the hammer higher up above your head, and bring it down directly so it strikes the top of the chisel. The idea is to transfer the full impact of the hammer to the chisel so the brick cracks evenly and cleanly. Just like with golfing, follow through so you finish with a solid strike and transfer all of the pressure to the chisel and brick. If it doesn’t break along the scored lines during your first attempt, make a few more heavy strikes.[13]
- While this can seem a little daunting if it’s your first time, try to relax your body and build up some confidence. If you’re holding the chisel steadily upright and have scored the brick all the way around, you can feel assured about your preparation to make the final blows successful!
- You don’t need to pound down on the brick, just let gravity and physics work their magic.


Making Angled Cuts with a Mitre Saw
-
1Soak the brick in water for 2 minutes, or until the air bubbles disappear. Fill up a bucket or sink with water and submerge your brick.[14] By soaking the brick first, you’ll reduce the amount of fine brick dust that enters the air upon contact with the saw blade.[15]
- Ordinary, room temperature tap water is fine.
-
2Let the bricks drain for 5 minutes or until the dripping stops. Place the brick on an open or absorbent surface to let the water drain out of it. Wait until it feels damp to the touch but doesn’t let off any drops of water.[16]
- While it’s useful to dampen the brick, you don’t want to try cutting it when it’s sopping wet.
-
3Put on a particle mask, eye protection, and long sleeves. Protect your arms, eyes, and lungs from the brick dust and debris by wearing suitable safety gear. A particle mask, protective eye goggles, and a long-sleeved work shirt will suffice.[17]
- Don’t wear gloves for this technique. They’ll only decrease your ability to safely operate the saw and won’t offer much protection.
-
4Setup your saw with a masonry blade and the correct angle. Use a masonry blade to make the cleanest and safest cut in your brick.[18] Set the mitre adjustment to the desired angle, which should match the angle you marked out on your brick with chalk.
- If you want to cut the side of your brick at a 45-degree angle, line up the mitre adjustment to the 45-degree mark along the saw table.[19]
-
5Align the brick on the saw table with the chalk mark along the cut line. Place the brick on the saw table, chalk-side up. Adjust it so that one edge rests up against the fence, and that the stopper holds it in place from the other side. Make sure the chalk line is directly under the path of the saw blade, so you can cut along the line you drew.[20]
- It’s important to make sure the alignment is perfect before cutting.
- Make sure your saw is free of debris since even the smallest crumbs can throw off your cut.
-
6Bring the rotating blade down against the brick to slowly make your cut. Power up the saw and hold onto the handle on the saw head. Bring it down gradually until it comes into contact with the brick. Once you start the cut, draw the blade deeper into the brick and push it through the entire width of the brick to complete the cut.[21]
- Work slowly and deliberately when operating the saw. Don’t rush or you may get an uneven cut.
- Be careful not to let the blade guard come into contact with the brick itself.
-
7Let the saw blade come to a stop before bringing it up out of the cut brick. Once you’ve completed the cut all the way through the brick, turn off the saw blade and wait until it stops spinning. Then carefully lift it up out of the brick to admire your clean, even cut.[22]


Expert Q&A
Did you know you can get expert answers for this article?
Unlock expert answers by supporting wikiHow
-
QuestionDo I need to wear safety equipment when cutting bricks?
 Gerber Ortiz-VegaGerber Ortiz-Vega is a Masonry Specialist and the Founder of GO Masonry LLC, a masonry company based in Northern Virginia. Gerber specializes in providing brick and stone laying services, concrete installations, and masonry repairs. Gerber has over four years of experience running GO Masonry and over ten years of general masonry work experience. He earned a BA in Marketing from the University of Mary Washington in 2017.
Masonry Specialist & Founder, GO Masonry LLCYes, I recommend wearing safety glasses, gloves, and a mask with ventilation. I also recommend wearing long jeans so you don't get anything on your skin.
Support wikiHow by unlocking this expert answer.
Things You’ll Need
Marking the Cut Lines
- Chalk
- Tape measure or ruler
Making Angled Cuts with a Mitre Saw
- Water
- Bucket or sink
- Particle mask
- Long sleeves
- Eye protection
- Power mitre saw
- Masonry blade
Cutting the Bricks by Hand
- Sledgehammer
- Masonry chisel
- Sturdy work surface
- Eye protection
- Gloves
- Long sleeves


References
- ↑ https://youtu.be/YfhaguSAXuU?t=14
- ↑ https://www.thesawguy.com/how-to-cut-fire-brick/
- ↑ https://www.thesawguy.com/how-to-cut-fire-brick/
- ↑ https://www.grit.com/tools/how-to-cut-bricks-with-hammer-and-chisel
- ↑ https://www.grit.com/tools/how-to-cut-bricks-with-hammer-and-chisel
- ↑ Gerber Ortiz-Vega. Masonry Specialist & Founder, GO Masonry LLC. Expert Interview. 10 March 2020.
- ↑ https://www.grit.com/tools/how-to-cut-bricks-with-hammer-and-chisel
- ↑ https://www.grit.com/tools/how-to-cut-bricks-with-hammer-and-chisel
- ↑ https://www.grit.com/tools/how-to-cut-bricks-with-hammer-and-chisel
- ↑ https://www.grit.com/tools/how-to-cut-bricks-with-hammer-and-chisel
- ↑ https://www.grit.com/tools/how-to-cut-bricks-with-hammer-and-chisel
- ↑ https://www.thisoldhouse.com/more/how-to-hand-cut-brick
- ↑ https://www.grit.com/tools/how-to-cut-bricks-with-hammer-and-chisel
- ↑ https://youtu.be/YfhaguSAXuU?t=28
- ↑ Gerber Ortiz-Vega. Masonry Specialist & Founder, GO Masonry LLC. Expert Interview. 10 March 2020.
- ↑ https://youtu.be/YfhaguSAXuU?t=44
- ↑ https://youtu.be/YfhaguSAXuU?t=69
- ↑ https://www.thesawguy.com/how-to-cut-fire-brick/
- ↑ https://youtu.be/YfhaguSAXuU?t=49
- ↑ https://www.thesawguy.com/how-to-cut-fire-brick/
- ↑ https://youtu.be/YfhaguSAXuU?t=75
- ↑ https://youtu.be/YfhaguSAXuU?t=90
- ↑ Gerber Ortiz-Vega. Masonry Specialist & Founder, GO Masonry LLC. Expert Interview. 10 March 2020.
About This Article