This article was co-authored by wikiHow staff writer, Hannah Madden. Hannah Madden is a writer, editor, and artist currently living in Portland, Oregon. In 2018, she graduated from Portland State University with a B.S. in Environmental Studies. Hannah enjoys writing articles about conservation, sustainability, and eco-friendly products. When she isn’t writing, you can find Hannah working on hand embroidery projects and listening to music.
There are 15 references cited in this article, which can be found at the bottom of the page.
The wikiHow Video Team also followed the article's instructions and verified that they work.
This article has been viewed 20,427 times.
Learn more...
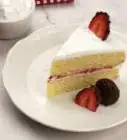
You’ve baked a delicious cake that has it all: flavor, richness, and a moist texture. But now you’re stuck: how do you add chocolate to your cake without just throwing chocolate chips on top? If you want to add chocolate to your cake in a creative way, try frosting it with chocolate and cream, dripping chocolate along the sides of your cake, or creating 3D shapes to stand on top of your cake to make delicious and interesting designs with chocolate.
Ingredients
- 1 cup (175 g) of semi-sweet chocolate chips
- 1⁄2 cup (120 mL) of heavy whipping cream
- ½ cup (87.5 g) of semi-sweet chocolate chips
- 1 cup (175 g) of semi-sweet chocolate chips
- 1⁄2 cup (120 mL) of heavy whipping cream
- 1 cup (150 g) of bittersweet chocolate baking wafers
Steps
Making Simple Chocolate Frosting
-
1Add semi-sweet chocolate chips to a microwave-safe bowl. Use a glass bowl that is able to hold hot liquids. Pour 1 cup (175 g) of semi-sweet chocolate chips into the bowl and set it aside.[1]
- Use semi-sweet chocolate chips to make sure that your frosting isn’t too sweet.
-
2Heat heavy whipping cream in the microwave for 1 minute. Pour 1⁄2 cup (120 mL) of heavy whipping cream into a microwave-safe container, like a glass bowl or measuring cup. Put it in the microwave for about 1 minute. If you see it start to bubble, take it out of the microwave right away.[2]
- You can also heat your cream in a small pot. Take it off the heat right before it starts to boil.
Advertisement -
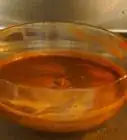
3Combine your cream and chocolate chips with a whisk. Pour your hot cream into the bowl with the semi-sweet chocolate chips. Use a whisk to combine your ingredients until they are smooth. Make sure there are no lumps in your mixture.[3]
- The heat of the cream will melt your chocolate chips enough so that you can mix them.
-
4Refrigerate your chocolate mixture for 30 minutes. The chocolate and cream mixture will be very runny. Put it in the fridge for 30 minutes to thicken it and make it more of a frosting consistency. Leave it uncovered in the fridge.[4]
- Do not leave your chocolate in the fridge for longer than 30 minutes, or it will harden too much.
-
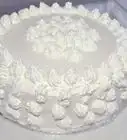
5Use a baking spatula to spread your chocolate onto your cake. Dip a flat spatula into your chocolate mixture. Use the spatula to spread your chocolate onto your cake. Use it to stick layers together or to cover the top and sides of your cake.[5]
Tip: Using chocolate to frost a chocolate cake is great for people with a sweet tooth. Or, add chocolate frosting to a white or yellow cake for more flavor.


Creating 3-D Chocolate Shapes
-
1Melt ½ cup (87.5 g) of semi-sweet chocolate chips in the microwave. Pour your chocolate chips into a microwave-safe bowl. Microwave them on high for 30 seconds. Stir your chocolate with a spoon. Put the bowl back in the microwave in 30 second increments until the mixture is smooth and free of lumps.[6]
- Be sure not to overheat your chocolate chips, or they will dry out.
-
2Pour your melted chocolate into a piping bag. If you don’t have a piping bag, use a plastic bag and cut a small hole in the corner. Transfer all of your chocolate into the piping bag with a spoon or plastic baking spatula.[7]
- You can also make a piping bag out of parchment paper and tape by folding the parchment paper into a cone shape and sealing the edges with tape.
-
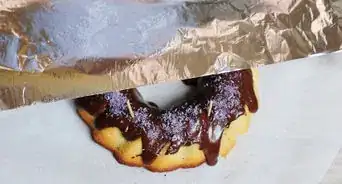
3Pipe chocolate designs onto a sheet of parchment paper. Lay a sheet of parchment paper on a flat surface, like a table or countertop. Use your piping bag to create small designs, like hearts, flowers, or balloons. Connect each line of chocolate in a single design so that it holds together.[8]
- If you want to make more detailed designs, sketch a design on the parchment paper in permanent marker and pipe your chocolate over it.
-
4Put your parchment paper in the freezer for 5 minutes. Transfer your parchment paper to a baking tray or a cutting board and let it sit in your freezer for at least 5 minutes. Make sure you don’t bump or move the chocolate designs, or they could get lumps or imprints in them.[9]
-
5Peel your chocolate designs off of the paper and put them on your cake. Lift your chocolate designs directly off of the parchment paper using your hands. Do not handle them too much, or they could start to melt. Set them on the top or sides of your cake. Do not let your chocolate designs sit once they are out of the freezer, or they could melt and deform.[10]
Tip: If you live in a hot climate, keep your cake with chocolate designs on it in the fridge until you are ready to eat it. This will keep your designs from melting.


Adding Chocolate Drips to Your Cake
-
1Pour your semi-sweet chocolate chips into a microwave-safe bowl. Choose a glass bowl that is microwave-safe. Add 1 cup (175 g) of semi-sweet chocolate chips into the bowl and set it aside. Semi-sweet chocolate chips will make sure your chocolate drip isn’t overly sweet.[11]
- You can find semi-sweet chocolate chips in the baking aisle of most grocery stores.
-
2Heat your heavy whipping cream in the microwave for 1 minute. Pour 1⁄2 cup (120 mL) of whipping cream into a glass bowl or measuring cup. Microwave it on high for about 1 minute. Keep an eye on it in the microwave to make sure it doesn’t boil over. If your whipping cream starts to bubble, take it out of the microwave right away.[12]
Warning: Use oven mitts to take your whipping cream out of the microwave, since it will be hot.
-
3Whisk together the warm cream to the semi-sweet chocolate chips. Carefully pour the hot whipping cream into the bowl of chocolate chips. Use a whisk to combine the cream and chocolate until the mixture is smooth and free of lumps. If your mixture gets hard to stir, heat it in the microwave for 10 seconds to heat it up again.[13]
- Stir carefully so you don’t spill any of your mixture, since it will be hot.
-
4Put your chocolate mixture into a plastic squeeze bottle. Use a funnel to pour your chocolate and cream mixture into a plastic squeeze bottle. Fill the bottle as much as you can with your mixture. Put the top on the squeeze bottle and close it tightly.[14]
- You can buy plastic squeeze bottles at most grocery stores.
- If you don’t have a plastic squeeze bottle, you can use a piping bag instead.
-
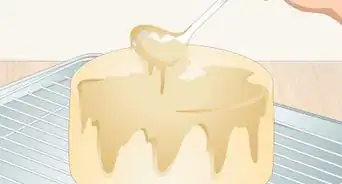
5Squeeze the chocolate over the sides of your cake. Hold your squeeze bottle close to the top of your frosted cake. Gently squeeze the bottle until chocolate drips down the side of the cake. Turn your cake as you squeeze the bottle to cover all sides of the cake until you are satisfied with your chocolate drips.[15]
- You can use the rest of your chocolate in the bottle to squeeze over the top of the cake if you’d like to.

Using Chocolate Wrap
-
1Measure the height of your cake with a ruler. Use a precise measuring tool, like a ruler or a measuring tape, to see how tall your cake is. Add at least 1⁄4 inch (0.64 cm) to your measurement to give yourself room for error. The height of your cake will determine how high you create your chocolate wrap.[16]
- Avoid touching the side of your cake with your measuring too, especially if it is frosted.
-
2Use scissors to cut a piece of parchment paper as tall and as wide as your cake. Wrap the paper around your cake to check if it is about the same size. Your paper does not have to be exact, but it should be the approximate size of your cake.[17]
- Use your measuring tool to cut your paper at the correct height.
-
3Melt bittersweet chocolate baking wafers in the microwave. Pour 1 cup (150 g) of bittersweet chocolate baking wafers into a microwave-safe bowl. Microwave your chocolate on high for 30 seconds, then take it out and stir it with a spoon. Keep microwaving your chocolate until it is smooth and there are no lumps left.[18]
- You can use semi-sweet chocolate chips instead of baking wafers.
-
4Pour the melted chocolate into a piping bag. Use a baking spatula or a spoon to transfer your chocolate into a piping bag. Be cautious since your chocolate will be hot from the microwave. If you don’t have a piping bag, transfer your chocolate into a plastic bag and cut a small hole at the tip.[19]
Tip: Use a piping bag with a round tip to make your lines of chocolate more precise.
-
5Cover your parchment paper in vertical lines with the chocolate. Lay your parchment paper out on a flat surface, like a table or countertop. Hold your piping bag over the paper and move it up and down quickly, creating connected vertical lines in chocolate. Overlap the lines as much as you’d like. Go back over your initial lines with your chocolate to create more layers, or keep it thin with only one layer.[20]
- Your chocolate lines can stray off of your paper slightly. The chocolate will dry and you will be able to pick it all up as 1 piece.
- Make sure your chocolate lines connect at the bottom so that they stick together on your cake.
- Thicker lines will create more of a wall of chocolate, while thinner ones will let your frosting show.
-
6Let the chocolate set for 30 minutes at room temperature. Leave your chocolate on the parchment paper on a flat surface to dry slightly. Do not bump or move your chocolate, or you could wrinkle or rip your design. Do not put your chocolate in the fridge, or it could cool down too much and break when you try to move it.[21]
-
7Lift the paper and the chocolate and wrap it around your cake. Use 2 hands to carefully pick up your chocolate and parchment paper. Wrap it around the entire length of your cake. Push the chocolate gently into the frosting of the cake so that it stays on.[22]
- If your chocolate breaks, stick it into the cake as a separate piece. Or, use heat to melt the chocolate pieces slightly and then push them together until they stick.
-
8Peel the paper off of the chocolate. Carefully remove the parchment paper from the chocolate wrap. Turn the cake slowly as you take off the parchment paper. Pull it slowly toward yourself, wiggling the paper if it starts to stick to the chocolate.[23]
- Store your cake in the fridge if you won’t be eating it right away so that it doesn't melt.


Things You’ll Need
Making Simple Chocolate Frosting
- Microwave-safe bowl
- Whisk
- Baking spatula
Creating 3-D Chocolate Shapes
- Microwave-safe bowl
- Piping bag
- Parchment paper
- Baking tray or cutting board
Adding Chocolate Drips to Your Cake
- Microwave-safe bowl
- Whisk
- Plastic squeeze bottle
Wrapping Your Cake in Chocolate
- Ruler or measuring tape
- Parchment paper
- Piping bag

References
- ↑ https://sallysbakingaddiction.com/chocolate-ganache/#tasty-recipes-72329
- ↑ https://sallysbakingaddiction.com/chocolate-ganache/#tasty-recipes-72329
- ↑ https://sallysbakingaddiction.com/chocolate-ganache/#tasty-recipes-72329
- ↑ https://www.youtube.com/watch?v=6ke3xmGShKA&feature=youtu.be&t=37
- ↑ https://www.youtube.com/watch?v=6ke3xmGShKA&feature=youtu.be&t=57
- ↑ https://natashaskitchen.com/decorating-cakes-with-chocolate/
- ↑ https://natashaskitchen.com/decorating-cakes-with-chocolate/
- ↑ https://www.youtube.com/watch?v=zJFumiQgt64&feature=youtu.be&t=254
- ↑ https://natashaskitchen.com/decorating-cakes-with-chocolate/
- ↑ https://www.youtube.com/watch?v=zJFumiQgt64&feature=youtu.be&t=311
- ↑ https://www.lifeloveandsugar.com/chocolate-ganache/#tasty-recipes-36925
- ↑ https://www.lifeloveandsugar.com/chocolate-ganache/#tasty-recipes-36925
- ↑ https://www.lifeloveandsugar.com/chocolate-ganache/#tasty-recipes-36925
- ↑ https://www.lifeloveandsugar.com/how-to-make-a-chocolate-drip-cake/
- ↑ https://www.lifeloveandsugar.com/how-to-make-a-chocolate-drip-cake/
- ↑ https://www.youtube.com/watch?v=34w_5FoDzIo&feature=youtu.be&t=72
- ↑ https://www.youtube.com/watch?v=34w_5FoDzIo&feature=youtu.be&t=92
- ↑ https://www.sweetandsavorybyshinee.com/chocolate-cage/
- ↑ https://www.youtube.com/watch?v=34w_5FoDzIo&feature=youtu.be&t=139
- ↑ https://www.youtube.com/watch?v=Y3A6syU2AK4&feature=youtu.be&t=16
- ↑ https://www.sweetandsavorybyshinee.com/chocolate-cage/
- ↑ https://www.youtube.com/watch?v=Y3A6syU2AK4&feature=youtu.be&t=67
- ↑ https://www.youtube.com/watch?v=Y3A6syU2AK4&feature=youtu.be&t=89
About This Article