This article was co-authored by wikiHow staff writer, Hunter Rising. Hunter Rising is a wikiHow Staff Writer based in Los Angeles. He has more than three years of experience writing for and working with wikiHow. Hunter holds a BFA in Entertainment Design from the University of Wisconsin - Stout and a Minor in English Writing.
There are 20 references cited in this article, which can be found at the bottom of the page.
This article has been viewed 415,641 times.
Learn more...
Developing film is a less common practice since digital cameras, but you can still create beautiful black and white negatives in your own home. You can buy a developing kit online that has all the essential supplies and chemicals for your pictures. Once the film is spooled in a dark room, just mix the chemicals and pour them in the development tank in order. When you’re finished, you’ll have a film strip of the black and white pictures you’ve taken!
Steps
Spooling the Film
-
1Get a film development kit for black and white photography. A film development kit will come with all the chemicals you need to develop your photos. The kit also comes with a development tank with a spiral loaded inside so you can easily load and unload your film strips. Make sure the kit you buy is meant for black and white photography.
- Development kits can be purchased at photography supply stores and online.
- Development kits for color film will not work for black and white film since they use different chemicals.
-
2Work in a room without visible light so your film doesn’t get exposed. If your undeveloped film comes into contact with light, then it could cloud your negatives.[1] Pick a laundry room or bathroom that doesn’t have any windows. Cover the cracks between the door and its frame with weather stripping, masking tape, or towels.[2]
- Wait a few minutes before working in your darkroom so your eyes can adjust.
- If you don’t have a room that’s lightproof, you can also purchase a film changing bag that you can put your supplies in without exposing them to light.
- Do not use a red light in your darkroom. Even though it’s seen in movies, it could affect how your film develops.
Advertisement -
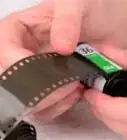
3Open the film with a bottle opener in the darkroom. Make sure all of the lights are out before you start working on your film. Hold the film canister upside down so the flat edge faces up. Hold the edge of the bottle opener to the end of the film canister and pry the cap off. Dump the roll of film into your hand.[3]
- You can also use a film canister opener to access your film. Buy them online or at specialty photography stores.
Tip: Practice opening an old or wasted film canister in the light so you can do it easily in the dark.
-
4Cut the end of the film with a pair of scissors. The leading end of the film is slightly narrower than the rest of it. Pull out 2–3 cm (0.79–1.18 in) from the leading end and use a pair of scissors to cut a straight line across the film.[4]
-
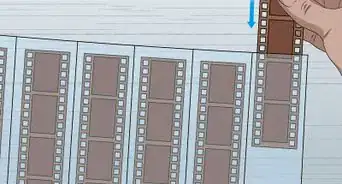
5Feed the film into the slot on the film spiral. The spiral looks like a large spool that sits inside of the development tank. Feel for the protrusions along the edge of the spiral’s interior to locate where the film channel starts. Pinch the end of your film strip and pull 10–15 cm (3.9–5.9 in) of it into the channel directly underneath the protrusions. Rotate the sides of the spiral to feed the rest of the film onto it. When you reach the end of the film, cut the end with a pair of scissors.[5]
- Many film spools can be pushed or pulled apart to adjust for different film sizes.
-
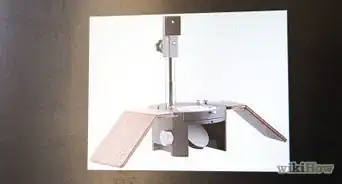
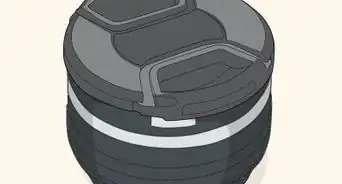
6Seal the film spiral in the development tank. The development tank is a lightproof container where you’ll mix the developing chemicals. Set the spiral on the bottom of the tank so the film is on the side. Place the lid on top of the tank and screw it on to secure it in place.[6]
- Once the film is secure in the development tank, then you can turn the lights on again.


Mixing the Chemicals
-
1Wear safety glasses and latex gloves. Since you’ll be working with chemical developers, make sure to protect yourself. Put on safety glasses so the solutions don’t splash into your eyes. Then, protect your hands with latex or nitrile gloves so your skin doesn’t get irritated if you accidentally spill.[7]
- If you’re worried about the chemicals spilling on your clothes, you can also wear a protective apron.
-
2Combine the developer solution and water. Measure 60 ml (2.0 fl oz) of the developer into a measuring cylinder. After you add the developer, pour in 240 ml (8.1 fl oz) of room temperature water. Mix the solution thoroughly with a stirring spoon.[8]
- The developer makes the image appear on the film.
Warning: Some developer chemicals may have a different ratio for mixing it with water. Follow the instructions on the bottle thoroughly.
-
3Dilute the stop bath solution with water. Pour 15 ml (1.0 US tbsp) of the stop bath into a second measuring cylinder. Then, add 285 ml (9.6 fl oz) of room temperature water to dilute the stop bath. Stir the solution with a spoon until it’s combined.[9]
- The stop bath prevents the pictures on your film from getting overdeveloped.
- Never mix the stop bath and developer together before you develop your film or else it will not work.
-
4Mix water and the fixer solution. Combine 60 ml (2.0 fl oz) and 240 ml (8.1 fl oz) of water that’s room temperature in a third measuring cylinder. Gently stir the solution together with a spoon.[10]
- The fixer solution helps preserve the image on the film.


Developing the Film
-
1Pour the developer into the tank and agitate it for 10 seconds. Remove the top part of the tank’s lid so your tank looks like a funnel. Slowly pour all of the developer into the tank and press the lid back into place. Once it’s sealed, agitate the tank by flipping it upside down and right-side up again repeatedly for 10 seconds.[11]
- The tank is still lightproof when you take off the lid. Just be sure not to unscrew it entirely while you’re developing your film.
-
2Agitate the solution once each minute until the film is developed. Pick up the tank and turn it upside down to mix the developer through the chamber. Agitate the tank every minute throughout the process so the film develops evenly. When there are 15 seconds left of your developing time, pour the developer out.[12]
- The amount of time it takes for your film to develop depends on the type of film and the developer you’re using. Usually, it takes around 10-12 minutes for a standard 35mm film roll. You can find out how long your film takes to develop here: https://www.digitaltruth.com/chart/print.php.
-
3Add the stop bath solution to the tank and agitate it continuously for 30 seconds. Pour the stop bath into the tank and secure the lid on top of it. Flip the tank upside down repeatedly for about 30 seconds so the stop bath coats all of the film evenly. When you’re finished, pour the stop bath out from the tank.[13]
-
4Add the fixer solution to the tank and leave it there for 4-5 minutes. Empty the measuring cylinder with the fixer into the tank and reseal the lid. Agitate the fixer solution for the first 10 seconds the fixer is inside. Then, agitate the solution once every minute for 4-5 total minutes. Pour the fixer out of the tank when you’re finished.[14]
Tip: You can reuse the fixer multiple times if you want. Pour the fixer into a storage bottle if you plan on reusing it.
-
5Rinse the tank out with room temperature water. Pour the water into the tank and invert it 5 times to thoroughly rinse the chemicals. After 5 inversions, pour the water out. Fill the tank again with more water and invert it 10 times. Empty the tank when you’re finished and your film is ready to dry.[15]


Drying the Negatives
-
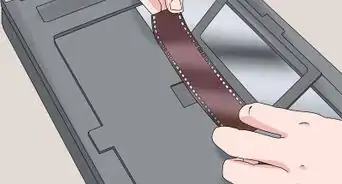
1Attach a clothespin or clip to the end of the film and pull it off the spiral. Take the spiral out from the development tank and lightly pull on the end of the strip. Secure a wooden or plastic clip to the end and use it to gently tug the film. Your film should easily unravel from the spiral.[16]
- There will not be any photographs on the end of the strip so your clip won’t damage any negatives.
- The film is safe to handle in the light after it’s been developed.
-
2Hang the film 2 m (6.6 ft) off the ground. Fasten the clip onto a hook or nail along with your film so it can hang. Make sure the film doesn’t touch anything while it hangs or else you could get dust on your negatives.[17]
- Make sure the room you’re using is clean and dust-free since it could damage your negatives.
- Cut the negatives into smaller strips if you do not have the space to hang the full strip.
-
3Run squeegee tongs down the film to remove any water. Pinch the top of the film between the squeegee tongs and gently squeeze them together. Pull the squeegee down the length of the film strip to remove any water droplets from your negatives.[18]
Tip: If you don’t have a small squeegee, you can also pinch the film between your fingers and gently drag them down the length of the strip to remove water. Make sure you wear vinyl or nitrile gloves if you use your fingers.[19]
-
4Let the film fry for 4 hours. Avoid touching or handling your film during this time so it can dry completely. Leave the film alone for the next 4 hours until it’s dry to the touch. When the film is dry, you can store the negatives or scan them into your computer.[20]


Community Q&A
-
QuestionWhy wasn't photo-flo used?
 Community AnswerPhoto-flo is a wetting agent used to minimize water marks or streaks during film development. It's not a necessary part of photo development, but it is helpful. You can also use ilfotol, Dawn soap, or nothing at all.
Warnings
- Wear safety glasses and gloves while working with chemicals.[21]⧼thumbs_response⧽
- Don’t take out undeveloped film if there is any light in the room. Your negatives will turn cloudy and won’t develop correctly.⧼thumbs_response⧽
Things You’ll Need
- Film development kit
- Bottle opener
- Scissors
- Safety glasses
- Latex or nitrile gloves
- 3 measuring cylinders
- Developer solution
- Stop bath solution
- Fixer solution
- Clothespins
- Squeegee tongs


References
- ↑ https://www.learnfilm.photography/the-proper-way-to-store-film-and-what-happens-when-you-dont/
- ↑ https://photography.tutsplus.com/tutorials/step-by-step-guide-to-developing-black-and-white-t-max-film--photo-2580
- ↑ https://youtu.be/aPQ7OPy8T2w?t=148
- ↑ https://photography.tutsplus.com/tutorials/step-by-step-guide-to-developing-black-and-white-t-max-film--photo-2580
- ↑ https://youtu.be/aPQ7OPy8T2w?t=187
- ↑ https://youtu.be/aPQ7OPy8T2w?t=225
- ↑ https://youtu.be/aPQ7OPy8T2w?t=43
- ↑ https://youtu.be/aPQ7OPy8T2w?t=83
- ↑ https://youtu.be/aPQ7OPy8T2w?t=114
- ↑ https://youtu.be/aPQ7OPy8T2w?t=119
- ↑ https://youtu.be/aPQ7OPy8T2w?t=252
- ↑ https://youtu.be/aPQ7OPy8T2w?t=268
- ↑ https://youtu.be/aPQ7OPy8T2w?t=283
- ↑ https://youtu.be/aPQ7OPy8T2w?t=320
- ↑ https://youtu.be/aPQ7OPy8T2w?t=360
- ↑ https://youtu.be/aPQ7OPy8T2w?t=420
- ↑ https://youtu.be/aPQ7OPy8T2w?t=428
- ↑ https://youtu.be/aPQ7OPy8T2w?t=432
- ↑ https://b4brands.com/blog/latex-vs-nitrile-vs-vinyl-gloves-which-to-choose/
- ↑ http://www.weatherscapes.com/techniques.php?cat=general&page=processing
- ↑ https://www.wcsu.edu/art/health-safety/photography/
About This Article