This article was co-authored by Tanglewood Sue and by wikiHow staff writer, Hunter Rising. Tanglewood Sue is a DIY and Upcycling Specialist and the Owner of Tanglewood Works out of Hyattsville, Maryland. With over nine years of experience, Sue specializes in upcycled painted furniture and other handmade, personalized, and sustainable goods. With her passion for art and reinvention, marketing experience, and Bachelor’s Degree in Broadcast Media, Sue has been able to create a business that not only provides quality pieces but empowers customers to create their works through her library of DIY tutorials and live demos as well as DIY supplies.
There are 9 references cited in this article, which can be found at the bottom of the page.
This article has been viewed 78,854 times.
Distressing is a simple process that makes newer furniture look antique by manually adding wear and tear. You can distress wood, laminate, or metal easily by yourself to make your furniture unique. While the project does require paint with a chalky finish and sealing wax, you can finish the rest with tools and supplies around your own home. Once you’re finished distressing your furniture, you’ll have a brand new piece that looks like it’s been passed down for generations!
Steps
Distressing Wood and Laminate
-
1Use chalky paint for your furniture. Chalky paint has a matte finish, goes on with minimal prep work, and is easier to scrape off while you’re distressing your furniture.[1] Choose a paint color that matches the aesthetic in the rest of your room.[2]
- Chalky paint is not the same as chalkboard paint. Chalkboard paint is meant to be written on with chalk after it dries, while chalky paint just has an ultra-matte finish.
- You can buy chalky paint from any painting supply store.
-
2Add dings and dents to the furniture surface for an extra-distressed look. Adding marks to a table surface or furniture legs can make it seem older than what it actually is. Lightly tap your furniture with the end of a chisel or hammer to make indents in the surface. Make the marks random so it doesn’t look like an intentional pattern.[3]
- Wear safety glasses in case any wood accidentally breaks off your furniture.
- Experiment with different tools around your house to see what kind of marks they make.
Advertisement -
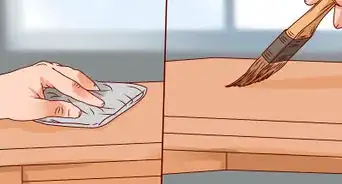
3Sand the furniture if it has a finish on it. Use 120-grit sandpaper to roughen the surfaces on your piece of furniture. This helps the paint adhere better so it’s less likely to peel off or chip. Make sure to sand any surface you plan on painting so you get a nice even coat.[4]
- You do not need to sand unfinished wood furniture.
-
4Wipe the furniture with a damp cloth before painting. Wet a cleaning cloth with warm water and wring it out until it’s damp. Wipe all of the surfaces you plan on painting to get rid of any dust or dirt that’s on them. Use another cloth to dry any areas that are wet before you start.[5]
-
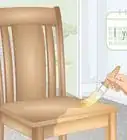
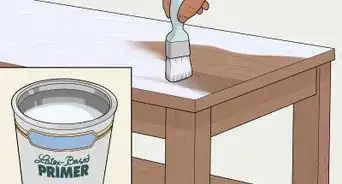
5Apply a coat of paint and let it dry. Dip the ends of the bristles in your paint so there’s only a small amount on your paintbrush. Start from the top of your piece of furniture and work toward the bottom. Apply a thin layer of paint on the surface so it can dry fast and even. When you’re finished with the first coat, leave it to dry overnight.[6]
- It’s okay if you still see the wood or laminate underneath your first coat of paint. This can help add to the distressed look of the final piece.
-
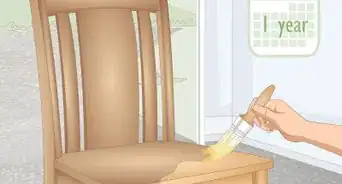
6Paint a second coat onto your furniture and leave it to cure for 3-4 days. Once the first coat of paint has dried completely, put another coat of paint on your piece. Again, work from the top of the furniture down toward the bottom, and paint until it has a smooth matte finish. When you’re done, let it dry for 3-4 days so the paint has time to adhere to the furniture.[7]
Tip: You may choose a different color for your second coat if you want the first coat’s color to show through when you distress it. For example, you may use light blue for your first coat and dark blue as your second coat. When you scrape off the top coat of paint when you’re distressing, the light blue will show through in that area.[8]
-
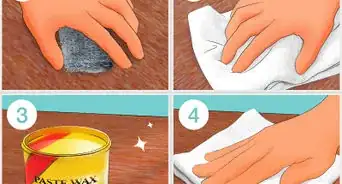
7Sand edges and common places of wear and tear with 120-grit sandpaper. Corners and edges are usually the first parts that wear away over time, so start by distressing them. Use 120-grit sandpaper to rub the dry paint off of the surface to expose the wood or laminate underneath.[9] Apply light pressure so you don’t accidentally remove more than you want.[10]
- Add more distress marks where your furniture touches the floor so it looks like it’s been scratched up after moving around a lot.
- Wipe any dust away with a damp rag so you can easily see where you’ve already distressed the furniture.
- If you accidentally rub off too much of the paint, you may paint over the area again and start over.
-
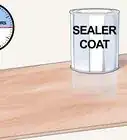
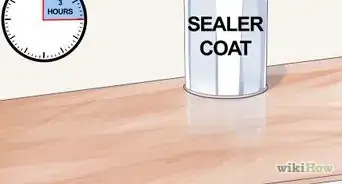
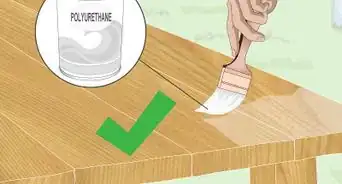
8Seal the wood and paint with finishing wax. Wax acts as a sealant to help protect your furniture from any damage. Dip the end of a cheesecloth in the wax and spread it across the surface of your furniture. Work the wax into the surface in a circular motion until it’s smooth. Continue waxing the entire piece of furniture so it’s sealed.[11]
- Furniture wax can be bought from your local hardware or paint supply stores.
- Wax may take up to 30 days to completely cure, but you can use the furniture after one week.


Aging Metal Furniture
-
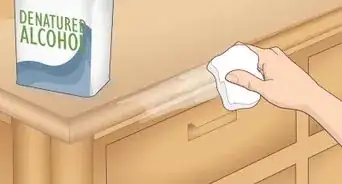
1Wipe any dust and dirt off with a cleaning cloth. Get the end of a cleaning cloth damp with warm water and use it to clean off your metal. Make sure to clean off all of the surfaces that you’re painting so the paint can adhere well to them. Dry off any spots that are still wet.[12]
- Avoid sanding your metal since it will leave noticeable scratches.
-
2Paint 1 coat of chalky paint onto your furniture and let it dry. Buy a container of chalky paint and soft-bristled paintbrush from your local paint supply store. Dip the end of your brush into the paint and apply a thin layer to your metal furniture. Work from the top of the piece down toward the bottom until it’s entirely covered in paint. Leave the paint to dry overnight so it has a chance to cure.
- Make sure not to use chalkboard paint instead of chalky paint. Chalky paint has a matte finish and is usually used for distressing, while chalkboard paint is meant to be written on once it’s dry.
- It’s okay if the first coat doesn’t cover the metal evenly since it will make your piece look more distressed.
-
3Apply a second coat of paint and let it cure for 3-4 days. Once the first layer is completely dry, put on another coat of paint until your furniture has even color. Once all of the exposed metal is covered with paint, let it dry for 3-4 days so the paint has time to settle.
- Don’t try to distress the metal while it’s curing because the more paint may peel off of the metal than you want.
Tip: If you want to get rid of visible brush strokes, try rubbing the paint with 120-grit sandpaper with light pressure after the paint cures. Don’t press too hard or you might scratch the metal underneath.
-
4Wipe areas with a damp cloth to distress them. Get the corner of a cleaning cloth wet and rub any areas where you want to expose the metal underneath the paint. Work around edges and corners since they’re areas where distress naturally happens first. Apply light pressure to lift up the paint.
- If you accidentally remove to much paint, pat the area dry and cover the spot with another coat.
-
5Seal the paint with finishing wax to protect it. Dip the end of a cheesecloth in the finishing wax and pick up a small amount from the container. Rub the wax onto the paint in circular or back and forth motions until it’s clear. Coat the entire piece of furniture so it’s protected and won’t get easily damaged.
- If your furniture feels waxy, keep buffing it out with a cloth until it doesn’t.


Expert Q&A
-
QuestionWhat is the best paint used for distressing?
 Tanglewood SueTanglewood Sue is a DIY and Upcycling Specialist and the Owner of Tanglewood Works out of Hyattsville, Maryland. With over nine years of experience, Sue specializes in upcycled painted furniture and other handmade, personalized, and sustainable goods. With her passion for art and reinvention, marketing experience, and Bachelor’s Degree in Broadcast Media, Sue has been able to create a business that not only provides quality pieces but empowers customers to create their works through her library of DIY tutorials and live demos as well as DIY supplies.
DIY & Upcycling SpecialistYou can use chalk or clay paint since you can easily wipe it away while it dries to make some of the natural finish show through. -
QuestionI'm trying to distress an antique dental cabinet in an aqua/ oak 2 tone (coastal) I've picked two Valspar chalk paints: Beaded Reticule and Walking Boots. My project is ready to paint. What do I do now and which color do I put down first?
 Community AnswerWhich paint to use first depends upon the effect you want. I usually prefer to start with the darker paint and paint over with the lighter paint. It's wise to do a sample of each before you choose.
Warnings
- Wear safety glasses if you try to add your own wear and tear to your furniture.⧼thumbs_response⧽
Things You’ll Need
Distressing Wood and Laminate
- Chisel or hammer
- Safety glasses
- Chalky paint
- Cleaning cloth
- Bristle paintbrush
- 120-grit sandpaper
- Finishing wax
- Cheesecloth
Aging Metal Furniture
- Cleaning cloth
- Bristle paintbrush
- Chalky paint
- Cheesecloth
- Finishing wax


References
- ↑ Tanglewood Sue. DIY & Upcycling Specialist. Expert Interview. 24 March 2021
- ↑ https://www.popularmechanics.com/home/interior-projects/g2773/how-to-use-chalky-paint/
- ↑ https://youtu.be/_JE5T2RKZvo?t=72
- ↑ https://www.popularmechanics.com/home/interior-projects/g2773/how-to-use-chalky-paint/
- ↑ https://www.popularmechanics.com/home/interior-projects/g2773/how-to-use-chalky-paint/
- ↑ https://youtu.be/zaj7yAv5C_g?t=154
- ↑ https://youtu.be/aBdeq70kk0k?t=156
- ↑ https://youtu.be/kpYgfpFtWNw?t=46
- ↑ Tanglewood Sue. DIY & Upcycling Specialist. Expert Interview. 24 March 2021
About This Article

To distress wood and laminate furniture, start by stripping off the finish using 120-grit sandpaper, and wiping the furniture with a damp cloth to remove any dirt and dust. Next, dry the surface with a clean cloth and apply a coat of chalk paint, which has a matte finish and scrapes off easily. Once the paint is dry, brush on a second coat and let it sit for 3 to 4 days so the paint adheres to the furniture. Afterwards, use another piece of 120-grit sandpaper to scrape off the paint from areas where you would normally see wear and tear, like the corners and edges. Finally, rub your furniture with a cheesecloth dipped in finishing wax to seal the wood and paint. To learn more, including how to distress metal furniture, scroll down!