This article was co-authored by Lana Starr, AIFD. Lana Starr is a Certified Floral Designer and the Owner of Dream Flowers, a floral design studio based in the San Francisco Bay Area. Dream Flowers specializes in events, weddings, celebrations, and corporate events. Lana has over 14 years of experience in the floral industry and her work has been featured in floral books and magazines such as International Floral Art, Fusion Flowers, Florist Review, and Nacre. Lana is a member of the American Institute of Floral Designers (AIFD) since 2016 and is a California Certified Floral Designer (CCF) since 2012.
This article has been viewed 39,440 times.
Flowers are beautiful when fresh, but they can look just as beautiful when you dry them. Unfortunately, drying flowers can take a long time. With the right technique, however, you can cut that drying time to a single day, or even a few minutes. The technique you use depends on the type of flowers you want to dry.
Steps
Using a Microwave and Silica Gel
-
1Cut the blooms off of your flowers. This method works with just about any type of flower, but you may find more success with sturdy, robust flowers, such as roses, carnations, zinnias, dahlias, and marigolds. Use garden clippers or scissors to cut the stems off of the flowers, as close to the blooms as possible.
-
2Pour some silica gel into the bottom of a microwave-safe container. Choose a container that's big enough to fit your flowers, then fill the bottom 1 to 2 inches (2.5 to 5.1 cm) with silica gel. You can find silica gel online and in the floral department of an arts and crafts store.[1]
- Make sure that you won't be using this container for food again.[2]
- If you can't find silica gel, you can use clean cat litter, or a mixture of 1 part borax and 1 part cornmeal. Keep in mind that these are not recommended for delicate flowers.
Advertisement -
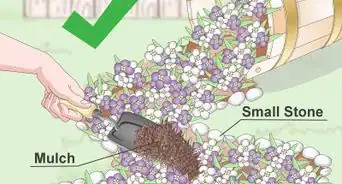
3Set the flowers on top of the gel. Make sure that the stems are facing down and the blooms are facing up. Leave at least 3⁄4 inch (1.9 cm) of space between each flower and the sides of the container. Tap the container's side to help settle the silica gel, then add more silica gel if the flowers start to peek through.[3]
-
4Cover the flowers with more silica gel. How much more silica gel you use depends on how large the flowers are. Tall flowers, such as roses, will require much more silica gel than flat flowers, such as daisies.[4]
- Make sure that the flowers are completely covered by the gel.
- Pour the gel slowly so you don't crush the petals.
-
5Microwave the flowers, uncovered, using a full-heat setting. The exact heating time will depend on the type of flower you are drying. Small or delicate flowers will need less time, while large or sturdy flowers will need more time. Start with 1 minute, then check on the flower. Do not over-cook it. Listed below are the recommended heating times for popular flowers:[5]
- Carnation: 1 minute
- Rose: 1 1/2 to 2 minutes
- Marigold, pansy, poppy: 2 1/2 to 3 minutes
- Chrysanthemum: 3 minutes
- Zinnia: 4 to 5 minutes
- Dahlia: 5 to 7 minutes
-
6Check to see whether or not the flowers are dry. Do this by sifting the silica gel aside with a toothpick and peeking at the petals. If the petals don't look or feel dry and papery, cover them back up, and heat the flowers for another minute.[6]
- Flower petals will turn darker and more vibrant as they dry. They may look wrinkly.
-
7Remove the container, cover it loosely, and let it sit overnight. Use a pot holder to remove the container from the microwave. Cover it tightly with a lid, and wait several hours for the flower to finish drying. How long this takes depends on the size and type of flowers. Unlike microwaving, you don't have to worry about over-drying the flower. Listed below are the recommended drying times for popular flower types:[7]
- Carnation, chrysanthemum, rose, marigold, and zinnia: 10 hours
- Poppy and tulip: 24 hours
- Dahlia and pansy: 36 hours
-
8Use your fingers to scoop the flowers out the gel. Tip the silica gel out to expose the flowers, then lift them out with your fingers. Do not grab the flowers by the petals. Instead, slide your middle and index fingers under the bloom, like a spatula, then lift the flower out of the silica gel.[8]
-
9Dust off excess silica gel with a soft brush, if needed. If there is any silica gel stuck to the petals, you can brush it off with a soft-bristled paintbrush or makeup brush. Look for soft, fluffy brushes made from camel hair; they are less likely to ruin your flowers.[9]
-
10Seal the flowers with a clear, acrylic spray sealer, if desired. A matte finish will look the most natural, but you can use a glossy or satin finish instead if you prefer. This will protect the flowers and help them last longer.[10]
- If you won't use the flowers right away, store them in a box filled with shredded paper. This will help keep them dry and maintain their shape.[11]
- You can find clear, acrylic spray sealers in the spray paint section of art and craft stores.


Using an Oven for Sturdy Flowers
-
1Preheat your oven to the lowest temperature possible. This will vary from oven to oven. Some ovens can go as low as 150 °F (66 °C), while others can only go down to 200 or 250 °F (93 or 121 °C).[12]
- This method may cause the flowers to lose their shape. While they may no longer work for dried flower arrangement, they'll be perfect for potpourri and soap making.
-
2Choose a sturdy flower, then trim the blooms off. Pick a sturdy flower, such as a daisy, rose, marigold, sunflower, or zinnia. Use garden clippers or scissors to cut the stems as close to the bottom of the bloom as possible.[13] You can try this method on more delicate flowers as well, such as poppies or pansies, but you will have to watch them carefully to ensure that they do not burn.
-
3Spread the flowers across a metal cooling rack. Set a metal cooling rack into a baking sheet so that it is easier to move around. Next, spread the flowers evenly across the rack. Leave about a finger-width of space between each flower. Also, make sure that the blooms are facing up.[14]
- Use the same type of cooling rack you'd use for baking cookies and cakes.
-
4Bake the flowers until they dry, checking on them every 30 minutes. How long it takes for the flowers to dry will depend on what temperature you used, how many flowers you are drying, and what type of flowers you are using. The flowers are ready when they start to deepen in color and take on a papery, crinkled texture. Expect to wait 1.5 to 2.5 hours. Remove any flowers that finish drying early.[15]
- Do not get impatient and use a higher temperature. This will increase the chances of the flowers burning.
- It is important to check the flowers every 30 minutes, as some of them may finish drying before the others do.
-
5Let the flowers cool before using them. The flowers are delicate, so be careful when using them. Because of their bright colors, they are perfect for potpourri. You can also pull the petals off and use them in various craft projects, such as soap-making or candle-making.
- If you won't be using the flowers right away, store them in a box filled with crinkled paper. If the flowers came apart and turned to potpourri, store them in a box without paper.


Using an Iron for Delicate Flowers
-
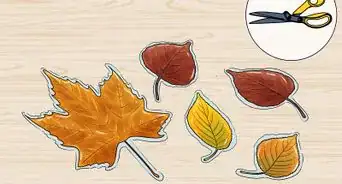
1Cut the flowers down, then pat them dry. You can cut the blooms entirely off of their stems, or you can leave a couple inches/centimeters of the stem on the flowers. Be sure to pat the flowers dry with a paper towel to remove any traces of moisture.[16]
- This method is ideal for delicate or thin flowers. It will press the flowers, making them ideal for decoupaging boxes and cards.
- Great examples of thin, delicate flowers include poppies, pansies, violas, and mini daisies.
-
2Flatten the flowers a heavy book. Place a sheet of paper onto a hard surface, such as a table. Arrange the flowers on top, then cover them with a hardcover book. Press down on the book to flatten the flowers, then lift the book.[17]
-
3Sandwich the flowers between parchment paper and paper towel. Set a paper towel down on your ironing board, then cover it with a sheet of parchment paper. Arrange the flowers on top of the parchment paper, then cover them with another sheet of parchment paper. Finish off with another sheet of paper towel on top.[18]
- If you don't have any paper towels, you can use thin pieces of cotton fabric instead.
-
4Remove any water from the iron and heat it to the lowest setting. If your iron has a dry and steam option, make sure that you have it set to the dry option. Dry heat is essential to this method.[19]
-
5Press the iron against the paper for 10 to 15 seconds. Do not move the iron back and forth across the paper, like ironing a shirt. Doing so can ruin the flowers. Instead, press the iron for 10 to 15 seconds, then lift it away.[20]
-
6Let the paper cool, then press it for another 10 to 15 seconds. Lift the paper to check the flowers. If they are dry and flat, you can move onto the next step. If they are not dry, repeat this step until they are dry. Remember to check the flowers after each pressing.[21]
- If the flowers are not drying, turn the temperature up to medium or medium-high instead.[22]
-
7Let the flowers cool before using them. Peel away the top layer of paper towel and parchment paper first. Let the flowers cool off completely before peeling them off of the bottom sheet of parchment paper. The flowers are now ready to use.[23]
- If you won't be using the flowers right away, store them in a book between sheets of parchment paper or wax paper.


Expert Q&A
Did you know you can get expert answers for this article?
Unlock expert answers by supporting wikiHow
-
QuestionI keep drying flowers and they just fall apart. What am I doing wrong?
 Lana Starr, AIFDLana Starr is a Certified Floral Designer and the Owner of Dream Flowers, a floral design studio based in the San Francisco Bay Area. Dream Flowers specializes in events, weddings, celebrations, and corporate events. Lana has over 14 years of experience in the floral industry and her work has been featured in floral books and magazines such as International Floral Art, Fusion Flowers, Florist Review, and Nacre. Lana is a member of the American Institute of Floral Designers (AIFD) since 2016 and is a California Certified Floral Designer (CCF) since 2012.
Certified Floral Designer & Owner, Dream FlowersIt's likely that you're drying flowers that aren't ideal for drying out. Flowers that bloom in the spring tend to have very thin petals that do not hold up well after you've dried them out. For best results, choose flowers that blossom in the summer or fall. Roses are a great choice!
Support wikiHow by unlocking this expert answer.
-
QuestionHow do I turn flowers artificial?
 Community AnswerPut mod podge over it using a very small brush. Add glitter if you want, or other decoration.
Things You'll Need
Using a Microwave and Silica Gel
- Fresh flowers
- Garden clippers or scissors
- Microwave-safe container
- Silica gel
- Microwave
- Toothpick
- Soft-bristled paintbrush or makeup brush
Using an Oven for Sturdy Flowers
- Fresh flowers
- Garden clippers or scissors
- Metal cooling rack
- Baking sheet
Using an Iron for Delicate Flowers
- Fresh flowers
- Garden clippers or scissors
- Parchment paper
- Paper towels
- Iron


References
- ↑ http://web.extension.illinois.edu/cook/downloads/9206.pdf
- ↑ https://www.proflowers.com/blog/how-to-dry-flowers
- ↑ http://web.extension.illinois.edu/cook/downloads/9206.pdf
- ↑ https://www.proflowers.com/blog/how-to-dry-flowers
- ↑ http://web.extension.illinois.edu/cook/downloads/9206.pdf
- ↑ http://web.extension.illinois.edu/cook/downloads/9206.pdf
- ↑ http://web.extension.illinois.edu/cook/downloads/9206.pdf
- ↑ http://web.extension.illinois.edu/cook/downloads/9206.pdf
- ↑ https://www.proflowers.com/blog/how-to-dry-flowers
- ↑ https://www.proflowers.com/blog/how-to-dry-flowers
- ↑ http://web.extension.illinois.edu/cook/downloads/9206.pdf
- ↑ https://madeinaday.com/oven-dried-flowers/
- ↑ https://madeinaday.com/oven-dried-flowers/
- ↑ https://madeinaday.com/oven-dried-flowers/
- ↑ https://madeinaday.com/oven-dried-flowers/
- ↑ http://www.prettyprudent.com/2014/09/baby-kid/tips-tricks/flower-friday-how-to-press-flowers-in-just-five-minutes/
- ↑ http://www.prettyprudent.com/2014/09/baby-kid/tips-tricks/flower-friday-how-to-press-flowers-in-just-five-minutes/
- ↑ http://www.prettyprudent.com/2014/09/baby-kid/tips-tricks/flower-friday-how-to-press-flowers-in-just-five-minutes/
- ↑ http://www.bhg.com/gardening/design/projects/make-pressed-flowers/
- ↑ http://www.bhg.com/gardening/design/projects/make-pressed-flowers/
- ↑ http://www.bhg.com/gardening/design/projects/make-pressed-flowers/
- ↑ http://www.prettyprudent.com/2014/09/baby-kid/tips-tricks/flower-friday-how-to-press-flowers-in-just-five-minutes/
- ↑ http://www.prettyprudent.com/2014/09/baby-kid/tips-tricks/flower-friday-how-to-press-flowers-in-just-five-minutes/
- ↑ https://www.proflowers.com/blog/how-to-dry-flowers
About This Article

To dry flowers quickly in the oven, set your oven to the lowest temperature possible. Then, trim the blooms off of a sturdy flower, like a rose or a marigold, and carefully place them on a wire rack bloom side up. Rest the rack inside a baking sheet and place the sheet inside the oven. Bake them on the low temperature and check on their progress every 30 minutes until they are dried, which should take about 1 ½ to 2 ½ hours. Let them cool before using them for projects, and store them in a box of tissue paper to keep them safe. For more ways to dry flowers, like in the microwave with silica gel, keep scrolling!