This article was co-authored by wikiHow Staff. Our trained team of editors and researchers validate articles for accuracy and comprehensiveness. wikiHow's Content Management Team carefully monitors the work from our editorial staff to ensure that each article is backed by trusted research and meets our high quality standards.
This article has been viewed 209,093 times.
Learn more...
Fleece blankets are easy to make and they make great gifts! Once you have your fleece fabric cut to the dimensions you want it to be, all you need to do is finish your blanket. You can finish a fleece blanket with a simple folded hem, by adding fringe to the edges and tying it into knots, or by weaving fringe loops around the blanket’s edges to create a braided edge.
Steps
Sewing a Hem on a Fleece Blanket
-
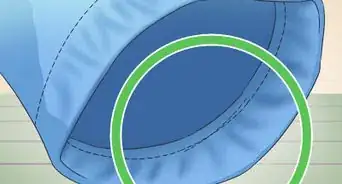
1Fold over and pin the edges of the blanket if desired. You can fold over the edges of the blanket to create a hemmed edge on your blanket, or you can leave the edge unfolded and sew along the raw edge of the blanket. It is up to you. If you decide to fold the blanket over, fold 0.5 inches (1.3 cm) of material over on each of the 4 sides of the blanket and insert pins into the folded fabric to hold it in place.[1]
- Fleece does not fray easily, so having a folded hem is not really necessary unless you like the look of a folded hem.
-
2Set your sewing machine to the zigzag stitch setting. You can use a zigzag stitch to secure a folded hem or you can sew over the raw edges of a fleece blanket to create a finished look. Consult your sewing machine’s manual to find out how to set your sewing machine to the zigzag stitch setting. There should be a dial or digital control where you can select the stitch type.
- Adjust the zigzag stitch settings to a long and wide setting by turning the width and length to the highest settings.[2]
Advertisement -
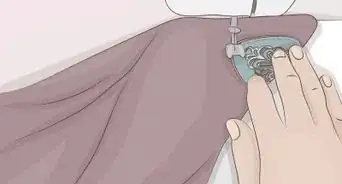
3Sew along the edges of the blanket. Raise your sewing machine’s presser foot, and then place the fleece fabric under it. Lower the presser foot and then begin sewing the zigzag stitch along the raw edges of your fabric. Go slow and hold the fabric taut as you sew.
- If you have folded the fabric over, then position the needle about 0.25 inches (0.64 cm) from the folded edge. This will ensure that the needle will go right up to or just over the raw edge of the folded fabric.[3]
- If you have left the fabric unfolded, then sew about 0.25 inches (0.64 cm) from the raw edges of the fabric.
- If you are having trouble keeping the fabric moving evenly under your presser foot, you can place a piece of tissue paper or wax paper under the fabric and over the feed dogs. This will help to prevent it from getting caught on the feed dogs and you can tear away the paper after you finish sewing.[4]
-
4Backstitch when you reach the end. To secure the last few stitches, press down on the reverse direction lever on the side of your sewing machine while continuing to keep light pressure on the pedal. Sew backwards about 1 inch (2.5 cm) and then release the lever to sew forward again. Sew off the last edge of the blanket and stop the machine.
- Cut the excess thread near the blanket and you are finished!


Securing the Blanket Edges with Fringe
-
1Cut out a 3 to 4 inches (7.6 to 10.2 cm) square of fabric at each corner of the blanket. If you are making a double layer fleece blanket, then you will need to cut out a square of fabric on each of the corners or your blanket will not lay flat. Measure and mark the area with a fabric marker or pen and then cut along the lines.[5]
- You do not need to cut out a square of fabric at the corners if you are only adding fringe to a single layer blanket.
-
2Create a template for cutting the fringe. Creating a fringed blanket edge is easier when you have something to guide you and ensure that all the fringe pieces will be the same size. Use a ruler to draw 2 inches (5.1 cm) lines on a piece of construction paper or cardstock. The lines should be 0.5 inches (1.3 cm) apart.[6]
- Make sure to use a dark pen or marker to draw the lines so that they will be easy to see.
-
3Use the template to cut fringe all the way around the blanket. Tape or pin the template 3 to 4 inches (7.6 to 10.2 cm) from the edge of your blanket. Use the template as your guide to cut the fringe. Align the scissors with 1 of the guidelines when you make each cut in the fleece.[7]
- You can cut fringe on just 2 sides for a single layer blanket, or cut fringe on all 4 sides for a double layer blanket.[8]
-
4Tie the fringe pieces together in knots. When you have finished cutting all the fringe, go around the edges of the blanket and tie together the fringe pieces that are next to each other. Tie 2 pieces of fringe together, then tie the next 2 pieces of fringe together. Do this all the way around the blanket.[9]
- If you are making a double layer blanket, then you will really be tying 4 pieces of fringe together at a time because the fringe will be layered.


Creating a Braided Blanket Edge
-
1Sew 0.5 inches (1.3 cm) from the edges of 2 layers of fleece. Creating a braided edge requires 2 layers of fleece, so you will need to place 2 equally sized pieces of fleece together so that the print sides are facing each other. Then, sew a straight stitch 0.5 inches (1.3 cm) all the way around the edges of the fleece pieces and except for a 6 in (15 cm) gap through which you can invert the pieces.[10]
- Use gentle pressure on the pedal to avoid sewing too quickly. Slow is best when sewing fleece.
- It is very important that you do not sew all the way around the edges of the blanket because you will need an opening to pull the blanket fabric through.
- Hold the fabric taut to help prevent it from getting caught in the machine’s feed dogs. If the fleece still gets caught or is not moving along smoothly, place a piece of tissue paper or wax paper over the feed dogs and then place the fleece fabric over the paper. Sew through both and then tear the paper off of the seam when you are done.[11]
-
2Turn the blanket inside out. Reach in through the gap you have left and begin working the blanket fabric through the opening. Keep going until all of the fabric is inverted and the seam you just sewed along the edges of the fabric is on the inside of the 2 layers.
- Use your fingers to push out the fabric at the corners as needed if it gets bunched up inside the blanket.
-
3Sew the gap closed. After you have inverted the pieces, tuck in the raw edges of the fleece and sew this gap closed. Use the same straight stitch that you used to sew the rest of the blanket edges. Make sure to sew the stitch so that the edge will be as even as possible.
-
4Use a template to cut fringe all around the outside of the fabric. Using a template will help to ensure evenly spaced fringe for braiding the edges of your blanket. Create a lined template on a piece of construction paper or cardstock. The lines should be 2 inches (5.1 cm) long and 0.5 inches (1.3 cm) apart. Place the template about 3 inches (7.6 cm) from the raw edges of the blanket and cut the fringe using the template as your guide. Cut from the edge of the fabric up to the edge of the template.[12]
- It may help to pin or tape the template to the blanket.
-
5Sew a straight stitch around the inner edges of the blanket where the fringe ends. To secure the fringe pieces, set your sewing machine to the straight stitch setting and sew around the edges of the fringe. This is the area where your fringe and solid blanket fabric meet.[13]
-
6Pull 1 loop through its neighbor using a crochet hook or your fingers. To start braiding the fringe, start at a corner of the blanket and pull 1 loop through the loop to the right of it. Then, pull the next loop through the loop you just pulled through the first 1.[14]
- Keep doing this all the way around the blanket until you have interwoven all of the loops on the edge of the blanket and have just 1 loop left.
-
7Sew across the first and last loops to secure the braid. Tuck the last loop into the first loop you pulled through. Set your sewing machine to the zigzag stitch setting and then place the loops under your machine’s presser foot. Sew across the loops and then press the lever on your machine to reverse the direction and sew back over the same area. Then, release the pedal on your sewing machine and remove the fabric from under the presser foot.[15]
- Cut the excess threads near the blanket and your blanket is ready to use!
- If desired, you may hand sew across the loops to secure them. Thread a needle with 18 inches (46 cm) of thread and pull the thread through the eye of the needle until the ends are even. Tie the ends in a knot and then sew through the two loops a few times to secure them. Tie the thread in a knot to secure it when you are finished and cut the excess thread.


Things You’ll Need
Hem Finish
- Pins
- Sewing machine
- Scissors
Fringe Finish
- Piece of cardstock or construction paper
- Ruler
- Pen or marker
- Scissors
Braided Finish
- Piece of cardstock or construction paper
- Ruler
- Pen or marker
- Scissors
- Crochet hook (optional)
- Sewing machine or needle and thread


References
- ↑ https://www.scatteredthoughtsofacraftymom.com/easy-fleece-blanket-tutorial/
- ↑ https://www.scatteredthoughtsofacraftymom.com/easy-fleece-blanket-tutorial/
- ↑ https://www.scatteredthoughtsofacraftymom.com/easy-fleece-blanket-tutorial/
- ↑ http://www.threadsmagazine.com/2007/11/28/tips-for-sewing-with-fleece
- ↑ http://www.linusidaho.org/finish-a-fleece-blanket.html
- ↑ http://www.linusidaho.org/finish-a-fleece-blanket.html
- ↑ http://www.linusidaho.org/finish-a-fleece-blanket.html
- ↑ http://www.linusidaho.org/finish-a-fleece-blanket.html
- ↑ http://www.linusidaho.org/finish-a-fleece-blanket.html
- ↑ http://www.linusidaho.org/finish-a-fleece-blanket.html
- ↑ http://www.threadsmagazine.com/2007/11/28/tips-for-sewing-with-fleece
- ↑ http://www.linusidaho.org/finish-a-fleece-blanket.html
- ↑ http://www.linusidaho.org/finish-a-fleece-blanket.html
- ↑ http://www.linusidaho.org/finish-a-fleece-blanket.html
- ↑ http://www.linusidaho.org/finish-a-fleece-blanket.html
About This Article