This article was co-authored by Chloée Ohayon-Crosby. Chloée Ohayon-Crosby is a Costume Designer and Wardrobe Specialist in Los Angeles, California. With over eight years of experience in fashion consulting, Chloée specializes in personal, film, theater, and commercial styling as well as image consulting and costume design. Chloée has worked as an assistant designer for the distinguished fashion house Chloée and as a freelance stylist with Glamour Italia. Chloée studied Fine/Studio Arts at the Ecole Nationale Supérieure des Beaux-Arts and Fashion Design and Merchandising at the world renowned ESMOD École Supérieure des Arts in Paris, France.
This article has been viewed 161,650 times.
Elastic is most often used to create waistbands in clothing, but you may also want to sew elastic to create fitted cuffs on a shirt, the top for a dress, or to provide a snug fit in other areas of a garment. Sewing elastic into a garment is different from regular sewing because you need to account for the stretchiness the elastic will give the fabric.[1] There are 2 basic methods for sewing elastic. You can sew it to the garment directly or create a casing for the elastic and then insert the elastic through the casing. Sewing elastic directly into a garment may be best if you want the fabric to be gathered, and using a casing to sew elastic may be best if you want the fabric around the elastic to lay flat.
Steps
Sewing Elastic Directly Into a Garment
-
1Measure and cut the elastic. To determine how much elastic you will need for the band in your garment, measure the area of the person’s body that the band will wrap around. This could be the person’s waist, chest, upper arms, wrists, neck or another area that the garment will cover.
- For example, if the elastic is part of a waistband, then measure around the person’s waist. Use this measurement to figure out how much elastic you will need for the waistband, and cut the elastic to this length.
- If the person wants the elastic to fit snugly, then subtract some length from the measurement. For example, if the person wants a somewhat snug waistband, then subtract 2 inches (5.1 cm) to 4 inches (10 cm) from the waist measurement and cut the elastic to this length.
-
2Sew together the ends of your elastic. Overlap the ends of the elastic by about 0.25 inches (0.64 cm) to 0.5 inches (1.3 cm). Use the zigzag stitch setting on your sewing machine and sew across the overlapping elastic 2 or 3 times. This will ensure that the ends of the elastic band are well connected.
- Another option is to sew the ends of the elastic together using a scrap piece of fabric. Line up the edges of the elastic over the scrap piece of fabric and then sew a zigzag stitch across the edges 2 or 3 times. This will eliminate any bulging that may occur from overlapping the elastic.
Advertisement -
3Pin the elastic to your fabric in 4 evenly spaced places. Start by pinning the seam of the elastic (the area you just sewed) to the seam on your fabric. If there is no seam in the fabric, then just choose any spot to place your first pin. Then, pin the opposite side of the elastic to the opposite side of the fabric band, and do the same for the two opposing sides of the elastic. Pinning the elastic this way will divide the elastic band and fabric into quarters and attach it evenly to 4 sections.
- Make sure that the edge of the elastic is about 0.25 inches (0.64 cm) from the edge of the fabric. This will ensure that the elastic will be hidden when you sew the elastic in place.
-
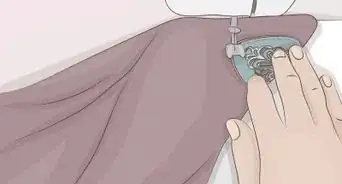
4Sew the elastic to the inside of the fabric. After you have finished pinning the elastic to the fabric, sew the elastic in place using your sewing machine. Set the machine to the zigzag stitch setting and begin sewing along the top edge of the elastic. Make sure to stretch the elastic out as you sew so that it will be the same length as the fabric. Sew all the way around the elastic and overlap the beginning of the stitching slightly when you have sewn all the way around the elastic.
-
5Fold over the fabric to cover the elastic band. To hide the elastic inside of the fabric you are attaching it to, fold over the elastic towards the inside of the fabric. Make sure that the elastic is lying flat and the fold is even all the way across.
-
6Sew along the bottom edges of the folded fabric. Pull the elastic taut again to make it even with the fabric and the begin sewing a zigzag stitch along the bottom edge of the elastic. This stitch should be right along the bottom edge of your fabric. Overlap the stitching by about 1 inch (2.5 cm) to ensure that the elastic is secure.


Using a Casing to Sew Elastic
-
1Measure the width of the elastic. Your casing will need to be slightly wider than your elastic, so start by measuring the width of your elastic. Then, add 0.5 inches (1.3 cm) to this measurement. For example, if your elastic measures 0.5 inches (1.3 cm), then you will need to add another 0.5 inches (1.3 cm) for a total of 1 inch (2.5 cm).
-
2Fold over the required amount of fabric. Use the measurement you determined and fold over this amount of fabric. Fold the fabric into the garment so that the raw (cut) edges will be hidden inside of the garment when you are finished. Make sure to fold the fabric evenly all the way around the waistband or cuff. Pin the fabric in place to secure it until you are ready to sew.
- For example, if you determined that you need 1 inch (2.5 cm) of fabric to create a casing for the elastic, then fold over 1 inch (2.5 cm) of fabric towards the inside of your garment.
-
3Mark the area for an opening wide enough to fit the elastic into. You will need to leave an opening in the casing to slide the elastic into the casing. After the elastic is all the way through and you have connected the ends of the elastic, you will sew this opening closed. Mark the area where you want the leave the opening using a piece of chalk or by placing 2 pins on each side of the opening.
- Make sure the opening is wide enough to easily slide the elastic into. For example, if your elastic is 0.5 inches (1.3 cm), then your opening should be about 0.75 inches (1.9 cm) to 1 inch (2.5 cm) wide.
-
4Sew along the edge of the fabric to secure the casing. When the fabric is folded and secured how you want it to be, use your sewing machine to sew a straight stitch about 0.25 inches (0.64 cm) from the edges of the fabric. This will provide plenty of room for the elastic while also ensuring a secure casing.
- Make sure to avoid sewing over the area where you have marked as the opening for the casing.
-
5Measure and cut the elastic. After you have finished creating the casing, determine how much elastic you will need to insert into the casing. You can do this by taking the measurement of the person who will be wearing this garment. Take the measurement of the area of the person’s body the band will go around. This could be the person’s waist, chest, wrists, or another area that the garment will cover.
- For example, if the elastic is part of a shirt cuff, then measure around the person’s wrist or arm where the elastic will go. Use this measurement to determine how much elastic you will need, and cut the elastic to this length.
- Depending on how tight the person wants the elastic to be, you may need to subtract some length from the measurement. For example, if the person wants to ensure that the cuffs on the garment stay put, then you might subtract 0.5 inches (1.3 cm) from the wrist measurement to ensure a snug fit.
-
6Attach a safety pin to one end of the elastic. A safety pin through the end of the elastic band will make it easier to feed the elastic through the casing. Insert a safety pin through 1 end of the elastic band and then close the safety pin.
- Make sure that you do not insert the safety pin through the elastic too close to the edge of the elastic or it may come out while you are working the safety pin through the casing. Insert the pin about 0.5 inches (1.3 cm) from the end of the elastic.[2]
-
7Insert the safety pin and elastic through the opening in the casing. Take the closed safety pin and insert it through the opening you have left in your casing.
-
8Stretch and pull the fabric to work the safety pin through the casing.[3] After you insert the safety pin, push it into the casing further. Scrunch up the fabric around the safety pin, and then straighten out the fabric while holding the safety pin through the fabric with one hand to move the elastic through the casing. Repeat this until the safety pin comes out the other side of the casing opening.
- Be careful not to twist the elastic as you work it through the casing.
- If the safety pin opens while you are working it through the elastic, try to close it through the fabric. If you cannot get it closed, pull the elastic and safety pin out of the casing and secure the safety pin again. Then, reinsert the safety pin through the casing opening and try to work it through again.[4]
-
9Secure the other end of the elastic. Hold onto the other end of the elastic as you push and pull the safety pin through. Don’t allow the end of the elastic to go all the way through the casing.
- If you are having trouble holding onto the other end of the elastic as you work, then you may also attach this end to the outside of the casing with another safety pin.
-
10Match up the ends of the elastic and sew them together. When you have finished working the safety pin through the casing, remove the safety pin and match up the ends of the elastic. Overlap the ends slightly, by about 0.25 inches (0.64 cm) to 0.5 inches (1.3 cm). Then, use a sewing machine to sew a zigzag stitch over the overlapping elastic. This will secure the ends of the elastic together.
-
11Close the opening in the casing. After you have attached the ends of your elastic band, tug on the elastic to ensure that all parts of the elastic band are under the casing. Then, sew across the edge of the opening in the casing to close it.


Community Q&A
-
QuestionCan you do without an elastic?
 Community AnswerYes, you can. You will need to cut in some of the waist, make darts in the back and insert a zipper.
Things You’ll Need
- Elastic
- Measuring tape
- Chalk
- Scissors
- Pins
- Sewing machine
- Thread


References
- ↑ Chloée Ohayon-Crosby. Costume Designer & Wardrobe Specialist. Expert Interview. 24 July 2020.
- ↑ http://sewaholic.net/how-to-insert-elastic-into-casings-tips-for-making-it-easier/
- ↑ Chloée Ohayon-Crosby. Costume Designer & Wardrobe Specialist. Expert Interview. 24 July 2020.
- ↑ http://sewaholic.net/how-to-insert-elastic-into-casings-tips-for-making-it-easier/
About This Article

To sew elastic into your garment, first measure how long you need the elastic strip to be, and cut it to length. Once you’ve cut the elastic, overlap the ends by about a quarter-inch and sew the ends together with a zigzag stitch. After you’ve sewn the ends together, pin the elastic inside your fabric in 4 evenly spaced places to keep it secure. Then, sew the top edge of the elastic to the inside of your garment using a zigzag stitch. Make sure you stretch the elastic out as you sew to keep it the same length as your fabric. When you’ve sewn the top edge, fold over the elastic towards the inside of the fabric to hide the elastic inside. Hold it in place and sew along the bottom edge of the folded fabric. For more tips, including how to use a casing to sew elastic, read on!