This article was co-authored by wikiHow Staff. Our trained team of editors and researchers validate articles for accuracy and comprehensiveness. wikiHow's Content Management Team carefully monitors the work from our editorial staff to ensure that each article is backed by trusted research and meets our high quality standards.
There are 13 references cited in this article, which can be found at the bottom of the page.
This article has been viewed 9,353 times.
Learn more...
The Ring Floodlight Cam is a hardwired smart security camera featuring ultra-bright motion sensing LED floodlights. Use it to replace any existing wall-mounted floodlight on your property to enhance security and monitor your property from wherever you are using the Ring app. You can also use it in addition to other Ring products like the Ring Doorbell for even more security and monitoring ability. If you don’t have an existing floodlight that you can replace, call a licensed electrician to perform the installation for you so they can put a junction box in the wall and run power to the mounting location according to local codes.
Steps
Replacing Your Existing Floodlight
-
1Shut off the power to your existing floodlight’s circuit at the breaker. Locate your electrical breaker in your garage, basement, or utility closet. Flip the switch that supplies power to your existing floodlight’s circuit to the OFF position.[1]
- The switch might be labeled as something general like “OUTSIDE.”
- If the switch that powers your existing floodlight is not labeled, try flipping different switches off and testing the floodlight until you find the switch that powers it, or just switch off the main power breaker to shut off all your electricity.
- If you’re located outside of North America, installation and wiring of the Ring Floodlight Cam typically must be done by a licensed electrician. Check local codes and regulations before you attempt self installation.
Warning: The Ring Floodlight Cam must be installed on a wall and on a UL-listed junction box. UL listing is a global safety certification provided by the Underwriters Laboratories. If you do not have an existing UL-listed junction box, have a licensed electrician install one and fit the Ring Floodlight Cam for you.
-
2Uninstall your existing floodlight fixture from the wall. Use a Phillips screwdriver to unscrew the fixture, then carefully pull it away from the mounting bracket on the wall. Use your hands to unscrew the plastic wire nuts that connect the wires from the floodlight to the wires coming from the junction box in the wall. Set the existing floodlight aside after you completely disconnect it.[2]
- Double-check that there is no power to the floodlight before you uninstall it. There is a high risk of electrical shock when you disconnect the wires if there is power running through them.
- Wire nuts are little plastic cones that hold 2 wires together.
- If you can’t reach the floodlight, use a ladder and have a helper hold it steady for you at the bottom.
Advertisement -
3Unscrew the existing floodlight bracket from the wall. Hold the bracket in place with your non-dominant hand and use your Phillips screwdriver in the other hand to remove the screws that hold the bracket in place. Pull the plate off the wall and set it aside.[3]
- The Ring Floodlight Cam comes with it’s own mounting bracket that you will replace the existing one with.
-
4Rotate the light fixtures and camera 180 degrees. Take your Ring Floodlight Cam out of the box and loosen the knobs on the sides of the light fixtures, then flip them to the top of the fixture so they are out of the way. Rotate the camera 180 degrees towards the bottom of the fixture to orient it in the right position.[4]
- The Ring Floodlight Cam is packed with the camera upside down on the fixture, which is why you need to rotate it. Don’t take it out of the ball socket on the base when you are reorienting it.
-
5Use a knife to cut a hole in the rubber gasket on the Ring bracket. Carefully poke the tip of a sharp knife through the center of the rubber gasket at the bottom of the Ring Floodlight Cam’s mounting bracket. Push the knife all the way through to make a slit in the gasket large enough to slide the power wires through.[5]
- The power wires are the wires already coming out of your wall that were connected to your old floodlight.
-
6Screw the Ring mounting bracket to the wall where the old bracket was. Orient the bracket so that the rubber gasket is at the bottom and the 2 posts on the sides are level with the ground. Slide the power cables through the hole in the rubber gasket. Screw the provided mounting screws through the holes in the bracket into the wall using your Phillips screwdriver.[6]
- This is the mounting bracket that holds the Ring Floodlight Cam fixture, to which the camera and lights are connected, in place.
- Note that everything you need to mount and wire the Ring Floodlight Cam is included in the box.


Wiring the Floodlight Cam
-
1Hang the Floodlight Cam on the bracket using the provided hook. Insert 1 end of the double-sided hook into 1 of the holes on the backside of the Ring Floodlight Cam. Put the other end of the hook into 1 of the holes on the bracket.[7]
- It doesn’t matter which holes you use, as long as the Floodlight Cam hangs securely in place. This will allow you to connect the wires before permanently mounting the fixture to the bracket.
-
2Connect the Ring Cam’s copper wire to the green screw and the ground wire. Wrap the copper wire tightly around the green screw on the bracket, then use your Phillips screwdriver to tighten the screw. Align the end of the Ring Cam’s copper wire with the end of the copper or green wire coming out of the wall. Twist 1 of the provided plastic wire nuts on top of the ends to hold them together.[8]
- The copper wire and the green nut are the Ring Cam’s ground wire and ground nut. The copper or green wire coming out of your wall is also a ground wire.
Warning: If you don’t see clearly colored wires coming out of the junction box in your wall, consult with a licensed electrician.
-
3Secure the black wires together using a provided wire nut. Align the exposed end of the black wire from the Ring Floodlight Cam with the exposed end of the black wire coming out of your wall. Twist 1 of the provided plastic wire nuts tightly onto the ends to hold them together.[9]
- The black wires are hot wires.
-
4Use a wire nut to connect the white wires. Align the ends of the Ring Cam’s white wire with the end of the white wire coming out of the junction box in your wall. Place the last provided plastic wire nut over top of the ends and twist it on tightly to secure the wires together.[10]
- The white wires are neutral wires.


Mounting the Fixture
-
1Place the Ring Floodlight Cam fixture over the mounting bracket. Line up the holes in the fixture with the posts on the bracket. Push the fixture onto the bracket so that the posts come through the holes, making sure that all the wires are inside between the fixture and the bracket.[11]
- Remember to take out the double-sided hook before you do this.
-
2Attach the screw cap nuts using the Ring screwdriver handle. Place the 2 provided screw cap nuts over the ends of the bracket’s posts. Put the Ring screwdriver handle over top of them and turn them clockwise until they are tightened all the way.[12]
- The provided orange Ring screwdriver handle is designed to fit perfectly over top of the screw cap nuts.
-
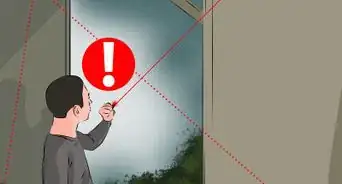
3Adjust the lights so they point at areas you want to illuminate. Loosen the knobs on the arms of the light fixtures and flip them back down 180 degrees. Loosen the lock collars at the base of the light fixtures if you want to rotate the lights. Aim the lights at areas you want to secure, such as a driveway, walkway, or front door, then tighten the knobs again.[13]
- As you adjust the light fixtures, keep in mind that the Ring Floodlight Cam can detect and illuminate human-sized objects up to 30 m (98 ft) away. Point the lights at areas within this distance of the camera.
-
4Turn power back on at the breaker. Flip the switch that supplies power to the floodlight circuit back on. Listen for the Ring Floodlight Cam to start speaking to you once you have restored power, letting you know it is in setup mode.[14]
- Your Ring Floodlight Cam is now fully installed and you can proceed to set it up using the Ring app on your smartphone, tablet, or PC.
Tip: If you have a wall switch that turns power to the floodlight circuit on and off, make sure it stays on by taping it open with the “Do not switch off” sticker that comes with the Ring Floodlight Cam.


Things You’ll Need
- Phillips screwdriver
- Mounting bracket
- Screws
- Wire nuts
- Screw cap nuts
- Hook
- Sharp knife


References
- ↑ https://support.ring.com/hc/en-us/articles/115004804343-Download-the-Manual-Ring-Floodlight-Cam
- ↑ https://www.youtube.com/watch?v=Co9YMhCi_1s&feature=youtu.be&t=59
- ↑ https://www.youtube.com/watch?v=Co9YMhCi_1s&feature=youtu.be&t=74
- ↑ https://www.youtube.com/watch?v=Co9YMhCi_1s&feature=youtu.be&t=5
- ↑ https://www.youtube.com/watch?v=Co9YMhCi_1s&feature=youtu.be&t=102
- ↑ https://www.youtube.com/watch?v=Co9YMhCi_1s&feature=youtu.be&t=107
- ↑ https://support.ring.com/hc/en-us/articles/115001262846
- ↑ https://www.youtube.com/watch?v=8Sj44oN5qUc&feature=youtu.be&t=36
- ↑ https://www.youtube.com/watch?v=8Sj44oN5qUc&feature=youtu.be&t=66
- ↑ https://www.youtube.com/watch?v=8Sj44oN5qUc&feature=youtu.be&t=74
- ↑ https://www.youtube.com/watch?v=7EKN9GzOHdc&feature=youtu.be&t=9
- ↑ https://www.youtube.com/watch?v=7EKN9GzOHdc&feature=youtu.be&t=22
- ↑ https://www.youtube.com/watch?v=7EKN9GzOHdc&feature=youtu.be&t=32
- ↑ https://support.ring.com/hc/en-us/articles/115004804343-Download-the-Manual-Ring-Floodlight-Cam
About This Article