This article was co-authored by James Schuelke. James Schuelke, along with his twin brother David, is the co-owner of the Twin Home Experts, a licensed plumbing, leak detection, and mold inspection company based in Los Angeles, California. James has over 32 years of home service and business plumbing experience and has expanded the Twin Home Experts to Phoenix, Arizona and the Pacific Northwest.
There are 29 references cited in this article, which can be found at the bottom of the page.
This article has been viewed 64,471 times.
All it takes to fix a small leak or break in a household water pipe is a few common materials at the hardware store and a couple hours of work. Of course, some bigger repairs should be left to the plumber, but even then there are some quick fixes that will get you a little more use from your system while waiting for the professional.
Steps
First Steps: Turning Off the Water Supply
-
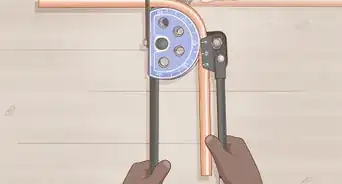
1Shut off the valve closest to the leak. Check the pipes nearest the leak for a handle or tap, or a small metal valve with a flathead screwdriver slot.[1] Turn it clockwise to shut off the water.[2] If there is no local shut-off valve for the appliance or room, turn off the main valve for your entire water supply—usually a wheel attached to a pipe.
- Look for the main water valve under the kitchen sink first. Then check the bathroom, basement, garage, utility room, and airing cupboard.[3] Sometimes it is under the floorboards near the front door.[4]
- As a last resort, look outside near your water meter, against the wall facing the street, and at your property boundary. This is often in a small concrete box or under a small cover.[5] Sometimes this is the only shutoff valve, but in other cases this is a second external shutoff valve that requires permission from your water supplier and/or a special key to use.[6]
-
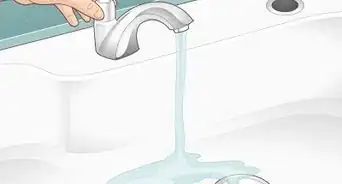
2Drain the affected water line. Turn on any taps connected to the problematic water supply piping and drain them.[7] For example, if your affected piping is in the washroom, turn on the washroom faucet and let it run until no water comes out.


Quick Fixes for a Leaky Pipe
-
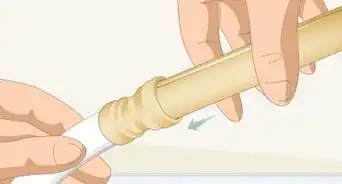
1Wrap active leaks with silicone tape. If you cannot shut off the water supply, your best emergency fix for both metal and plastic pipes is self-fusing silicone tape. Unlike normal adhesive tape, this fuses to itself to make a watertight, pressure-resistant seal.[8] Cut a piece about 6–8 inches (15–20 cm) long, press it to one side of the hole, then wrap it around the hole several times while pulling it taut. Wrap a second piece of tape around it to secure it, this time without stretching it.[9]
- In an emergency, you can use electrical tape or duct tape for a very short-term fix.
-
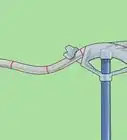
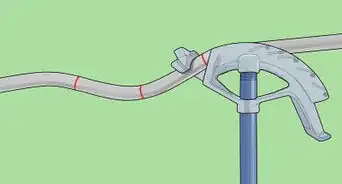
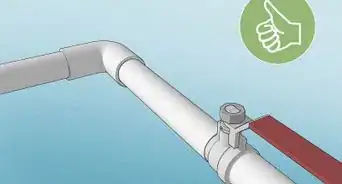
2Seal with a hose clamp and gasket instead. If you can shut the water off, another option is a small piece of rubber gasket, about enough to wrap halfway around the pipe. Place it over the leak, then secure a hose clamp (or multiple hose clamps) around it. Tighten the hose clamp until it is snug, but not excessively tight.[10] This is a good short-term fix if the pipe is starting to split, as clamps help take some stress off the damaged area.
- As with the other solutions, this is appropriate for both metal and plastic pipes.
-
3Choose epoxy putty for a medium-term fix. This is the strongest temporary fix, but you'll need to keep the water off while the putty cures (usually a few hours, but check the label).[11] Wearing gloves, mix the two components of the putty together and push it over cracks and holes until they are completely covered. Although still not a proper repair, this forms an excellent barrier until a professional can have a look.


How do you fix a broken copper pipe?
-
1Remove the damaged piping on each side of the leak. For a pinhole leak, you may only need to remove 1⁄2 inch (1.3 cm) of the pipe. But for more extensive damage, mark the pipe 1 inch (2.5 cm) to either side of the damage.[14] Cut the pipe with one of these tools for the fastest and best results:
- Pipe slice: Just place this around the pipe and turn it. Each tool only cuts one diameter of pipe.[15]
- Pipe cutter: Place the roller wheel against the mark, then tighten the screw until the cutting wheel makes contact. Rotate the tool 360º to cut a light groove confirming the tool is aligned, then make the cut by tightening the screw a quarter turn at a time as you rotate the cutter around the pipe.[16]
-
2Prep the replacement coupling and original pipe. Select an ordinary copper pipe coupling if the gap is no more than 1⁄2 inch (1.3 cm). Otherwise, cut a piece of sweat coupling to a length 1 inch (2.5 cm) longer than the gap. Prep both the old and new pipe as follows to ensure a perfect fit for soldering:[17]
- Remove burs from the inside of the coupling and the outside of the original pipe using sandpaper, or the deburring blade found on the back of some pipe cutters.
- Scrub the interior of the coupling with a wire fitting brush, or emery paper wrapped around your finger.
- Clean the outer surface of the original pipe with emery paper, plumber's abrasive cloth, or fine-grit sandpaper until it shines. Avoid touching this clean surface.
-
3Solder the surfaces together. Apply plumber's flux over all areas where the pipes will touch (but nowhere else). Connect the pipe and coupling. Heat them for about thirty seconds with a gas torch until the copper dulls and the flux sizzles. Place the solder against the seam, starting at the bottom for horizontal joints, and allow the hot copper to melt it.[18] Keep feeding in solder around the joint as the flux draws it in, until the joint is sealed.
- If repairing water supply pipes, never use a solder that contains more than 5% lead. Lead-free solder is ideal.[19]
- Shield wooden ceiling joists, wires, and anything else flammable with a flame protector cloth or a piece of sheet metal before you begin. Keep a bucket of water nearby.
- Let the solder cool for at least a minute before restoring the water supply. Let run for about 5 to 10 minutes to flush out debris before using the water, while checking for leaks.


How do you repair a broken plastic pipe?
-
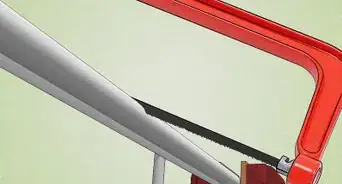
1Cut out the damaged part. Cut the pipe about 1 inch (2.5 cm) to either side of the damage, as straight as possible, using PVC pipe cutters, a ratchet cutter, or a hacksaw.[20] Use a file, sandpaper, or utility knife to clean off the insides and outsides of the cuts until the surfaces are smooth. Clean the edges thoroughly, preferably with degreaser.[21]
- Turn off the water supply and let the water drain through before repairing. Keep the pipes as dry as possible during the repair.
- If you can't reach a PVC pipe with a saw, cut a shallow notch on the back, then loop a piece of nylon string into the notch. Tie each end of the string around an object (to avoid cutting your hands), then saw back and forth to cut the pipe.[22]
-
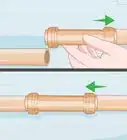
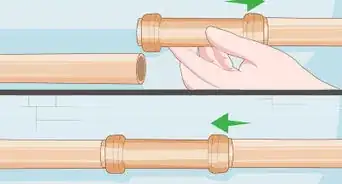
2Use compression couplings for accessible pipes. This is the easiest fix, but not the strongest. Try this only if the pipe is above ground and easy to access for later check-up, and check your local building code for restrictions. Install as follows:[23]
- Place one end cap, then one rubber bushing onto each end of the pipe.
- Fit the coupling over both ends of the pipe, then twist the end caps to form a watertight seal.
- Clamp or anchor it in place to reduce the chance of it coming apart during a high-pressure surge.[24]
-
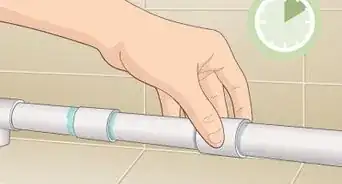
3Attach slip fixes with solvent cement. This telescoping coupling is a stronger solution. You'll need solvent cement designed for your piper's material (PVC, CPVC, or ABS); primer for the same material (skip this for ABS pipe[25] ); one standard coupling (a simple sleeve that fits over one end of the broken pipe); goggles; gloves; and good ventilation. Apply as follows:
- Dry-fit the parts together to confirm a perfect fit.[26]
- Coat primer inside the wide end of the slip fix, and over one pipe end.
- Immediately brush the cement over the primer in an even coat.
- Immediately connect the coupling, hold in place for 30 seconds, then wipe off excess material.
- Repeat this to attach the telescoping end to the standard coupling.[27]
- Repeat this to attach the standard coupling over the other pipe end.[28]
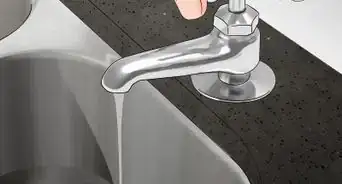
- Let cure according to label instructions, or ideally 24 hours. Then flush out the pipe with running water for 5-10 minutes before using.[29]


How do you access a broken pipe in a wall?
-
1Pinpoint the location with a moisture meter or visual clues. Water often pools somewhere below the actual damage.[30] Trace the signs of water damage (such as damp drywall) upward until you find the highest point where there are stains or wetness. Use a moisture meter if you cannot pinpoint the source visually.
- You'll want a "pin-type" moisture meter to probe the surface of drywall or wood, placing the pins into the material.[31] The exact numbers on the probe are less important than the relative measurements: look for spots that are wetter than their surroundings.
- A "search mode" meter can detect water behind a wall, but it takes some setup to calibrate and is mostly useful for bathrooms with many possible water sources. Some meters come with both modes.[32]
- Alternatively, use a thermal imaging camera to detect cool spots that may indicate pooling water.
-
2Shut off the power. You don't want to risk cutting through active wires when you cut into your wall. Turn off the main circuit for your home and put on non-conductive gloves.
- Locate the wall studs first so you can cut between them instead of into them. Studs sound solid when knocked, and are usually located alongside switches and outlets.
-
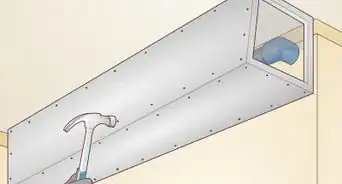
3Cut into the drywall. Score the wall with a utility knife to create the guidelines for a hole large enough to shine a flashlight through. Cut along the scored lines with a keyhole saw, making shallow, careful cuts with the tip of the saw only to avoid hitting pipes or electrical wires.[33] Examine the pipes through this hole until you locate the damage, then cut again to access the pipe.
- Cut at a 45º outward from the hole to create a beveled edge. This makes it much easier to position the drywall back in place once the pipe is fixed.[34]
- If the leak is small and hard to find, try wrapping a cloth around the pipe and moving it until the cloth gets wet.[35]
- If you are forced to remove bathroom tiles to access the pipe, scrape out the grout with a utility knife, then chisel away individual tiles.


Expert Q&A
-
QuestionHow do you temporarily fix a broken pipe?
 James SchuelkeJames Schuelke, along with his twin brother David, is the co-owner of the Twin Home Experts, a licensed plumbing, leak detection, and mold inspection company based in Los Angeles, California. James has over 32 years of home service and business plumbing experience and has expanded the Twin Home Experts to Phoenix, Arizona and the Pacific Northwest.
Professional PlumberIf you are trying to fix a water pipe, I recommend using good pipe clamps made of rubber. These can be a great way to temporarily stop a leak.
Things You'll Need
Locating leaks behind walls
- Drywall saw
- Utility knife
Replacing Copper Piping
- Pipe cutter or pipe slice
- Propane or other gas torch
- Emery cloth
- Plumber's flux and brush
- Solder (<5% lead for water supply pipes)
Repairing plastic piping
- PVC pipe cutters, ratchet cutter, or hacksaw
- Coupling (see instructions)
- Primer
- Solvent cement
- Rags
- Gloves
- Safety goggles

References
- ↑ https://www.southampton.gov.uk/housing/your-tenancy/tenants-magazine/article.aspx?id=tcm:63-403013
- ↑ James Schuelke. Professional Plumber. Expert Interview. 1 October 2019.
- ↑ https://www.thameswater.co.uk/help/emergencies/how-to-turn-your-water-on-and-off/how-to-find-and-use-your-inside-stop-valve
- ↑ https://www.watersafe.org.uk/advice/general_plumbing_advice/turning_off_your_water/how_do_i_turn_the_water_off_to_carry_out_work_in_my_property/
- ↑ https://protectyourpipes.org/frozen-pipes
- ↑ https://www.watersafe.org.uk/advice/general_plumbing_advice/turning_off_your_water/how_do_i_turn_the_water_off_to_carry_out_work_in_my_property/
- ↑ James Schuelke. Professional Plumber. Expert Interview. 1 October 2019.
- ↑ https://piperepair.co.uk/2020/08/28/epoxy-putty-or-repair-tape-which-is-best-for-fixing-a-leaking-pipe-quickly/
- ↑ https://youtu.be/hUDca3o6Onc?t=160
- ↑ https://youtu.be/hUDca3o6Onc?t=125
- ↑ https://piperepair.co.uk/2020/08/28/epoxy-putty-or-repair-tape-which-is-best-for-fixing-a-leaking-pipe-quickly/
- ↑ https://piperepair.co.uk/2020/05/26/epoxy-putty-for-repairing-a-leaking-pipe/
- ↑ https://piperepair.co.uk/2020/07/20/the-difference-between-plumbers-putty-and-epoxy-putty/
- ↑ James Schuelke. Professional Plumber. Expert Interview. 1 October 2019.
- ↑ https://www.diydoctor.org.uk/projects/cuttingcopperpipes.htm
- ↑ https://www.rental-world.com/wp-content/uploads/2015/10/Pipe-Cutter-2.pdf
- ↑ https://www.bobvila.com/articles/how-to-sweat-copper-pipe/
- ↑ https://www.popularmechanics.com/home/how-to/a1478/4213319/
- ↑ https://www.askthebuilder.com/solder-tips-for-copper-tubing/
- ↑ https://www.thisoldhouse.com/plumbing/21312414/pvc-pipe-repair
- ↑ https://www.diydoctor.org.uk/projects/solventweld.htm
- ↑ https://todayshomeowner.com/video/cutting-plastic-pipe-with-string/
- ↑ https://youtu.be/t8A1hCJjgwU?t=187
- ↑ http://www.buildingcode.online/1011.html
- ↑ https://www.plumbingsupply.com/tips-and-tricks-for-working-with-plastic-pipe.html
- ↑ https://www.thisoldhouse.com/plumbing/21019301/aligning-pvc-pipe-parts
- ↑ https://www.youtube.com/watch?v=t8A1hCJjgwU
- ↑ https://www.youtube.com/watch?v=t8A1hCJjgwU
- ↑ https://www.thisoldhouse.com/plumbing/21019301/aligning-pvc-pipe-parts
- ↑ https://www.fantastichandyman.co.uk/blog/how-to-fix-a-broken-pipe-inside-a-wall/
- ↑ https://www.nachi.org/moisture-meters.htm
- ↑ https://www.nachi.org/moisture-meters.htm
- ↑ https://www.thisoldhouse.com/walls/21015934/reciprocating-saw-101-how-to-cut-into-a-wall-safely
- ↑ https://www.youtube.com/watch?v=1_rfpIWYOmU
- ↑ https://www.fantastichandyman.co.uk/blog/how-to-fix-a-broken-pipe-inside-a-wall/
- ↑ https://www.wsscwater.com/customer-service/residential-tips/locating-and-operating-your-main.html
- ↑ https://images-na.ssl-images-amazon.com/images/I/71UackAKDQS.pdf
About This Article