This article was co-authored by wikiHow staff writer, Kyle Hall. Kyle Hall works on the content team at wikiHow. He helps manage our team of editors and creates content for a variety of wikiHow projects. Kyle continually looks for new ways to improve the content at wikiHow and make it more helpful and enjoyable for readers. He graduated from Eckerd College in 2015, where he majored in Political Science.
There are 13 references cited in this article, which can be found at the bottom of the page.
wikiHow marks an article as reader-approved once it receives enough positive feedback. In this case, 89% of readers who voted found the article helpful, earning it our reader-approved status.
This article has been viewed 1,213,527 times.
Learn more...
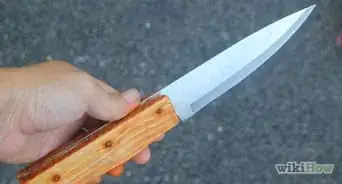
There's nothing worse than being unequipped! Now, that isn't to say that you'll ever be in a situation where you have no choice but to forge your own knife, but who knows? It could happen, and if it does you'll be thankful that you read this! To forge your own knife, you’ll need to heat up some steel, hammer it into the right shape, and harden and temper it to make it stronger.
Steps
Forging the Point
-
1Heat the metal in a forge or your own personal metal working furnace. Proper temperature varies, but a charcoal fire with introduced air is sufficient.[1]
- A piece of 01 steel will work great for this.
- Always wear eye protection and work gloves when you’re working with hot metal.
-
2Check the color when the metal is heated. The steel should be 2,100 to 2,200 °F (1,150 to 1,200 °C), which is a straw or yellow color.[2]
- Use forging tongs whenever you remove the metal from the flames since it will be very hot.
Advertisement -
3Forge the blade to a point. Place one end of the heated steel on an anvil while gripping the other end with forging tongs. Then, use a rounding hammer to beat one of the corners on the end of the hot steel into the shape of a knife point. The flat side will eventually become the cutting edge of the blade and the curved side will become the spine when you’re finished.[3]


Flattening the Blade
-
1Leave room for a tang. The tang is the part of the knife that goes in the handle. Leave about 2 inches (5.1 cm) or more on the end of the steel opposite the point for the tang.[4]
- Use a ruler to measure the end of the metal, then hammer a small indent where the tang will start so you have a reference.[5]
-
2Establish a blade. Heat up the metal again. Then, repeat rows of small taps with your hammer up the blade to narrow the steel and give it a distal taper. Work on both sides of the blade to prevent it from distorting.[6]
- Most knives have a distal taper, which means the blade gets thinner the closer you get to the point.[7]
-
3Hammer out the flat edge to make the bevels. Hammer the flat edge on one side of the blade, then flip the blade over and hammer the flat edge on the other side. Continue doing this as you work so both sides are even. Note that hammering out the bevels will cause the blade to bend back on the spine, which is normal.[8]
- The bevels are the slight inclines on each side of the blade that run to the cutting edge.
-
4Try to keep the blade from mushrooming or bending over itself. Mushrooming and bending will cause inclusions weakening the blade.[9]
- If you notice the metal folding over itself when you hammer along the cutting edge or spine, lay the blade flat on the anvil and hammer the edges back down so they’re flat again.


Strengthening and Sharpening the Knife
-
1Anneal the knife by heating it to a red hot temperature 3 times. Let it air cool in between heatings until all of the red is gone. After the third heating, let it cool in the fire overnight. Cooling it very slowly will make it softer and easier to file.[10]
-
2Sand the blade to shape and even up any uneven spots. Run the edges and sides of the blade back and forth over some sandpaper to smooth them out.[11]
-
3Reheat the steel and dip it in motor oil to harden the blade. Only dip the metal vertically; any angle more than a few degrees off will create bubbles around the metal, causing warping that you’ll have to reforge.[12]
- Leave the steel in the oil for 30-60 seconds.
-
4Put the knife in an oven for an hour or two at 250–350 °F (121–177 °C) to temper it. You can also leave it in a hot covered spot with a few coals, such as a makeshift brick box.[13]
- Dipping the blade in motor oil makes it harder but also more brittle, which is why it’s important to temper the blade afterward. Tempering will make the blade tougher and less brittle.
-
5Put a handle on the knife. You can either drill holes and pin scales of wood to the tang or wrap the tang with cord or wire. You can also make the tang pointy, put it in a block of wood, and file the wood to shape.
-
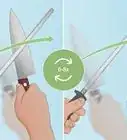
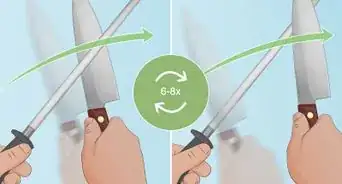
6Sharpen your knife with a fine file, then with a whetstone. Finally, use a leather strop impregnated with polishing paste to remove any burrs and leave a razor sharp edge.[14]
- Start with the coarse-grit side of your whetstone. Hold the cutting edge of the knife against the whetstone at a 22-degree angle and run the blade forward across the whetstone 10 times on each side. Then, repeat on the fine-grit side of the whetstone.


Community Q&A
-
QuestionShould I file the tang and spine before or after I harden the blade?
 Community AnswerDo all your rough work first. The hardening and subsequent tempering process should only be followed with light grinding so you don't lose the temper in the steel. You can always make it softer, but you can't make it harder unless you reharden it all over again.
 -
QuestionWhat kind of oil should I use for hardening?
 Community AnswerYou can use vegetable oil or motor oil.
 -
QuestionWill a regular kitchen oven work for step 11, or does it take a certain kind of oven to heat steel and not blow up?
 Community AnswerA regular kitchen oven works fine, same level of danger as heating up a cast iron skillet or an enameled steel pot (none, except maybe burning yourself if you carelessly touch the hot piece). Don't use a microwave.
Warnings
- Metal working is highly dangerous. Be smart, focused, and cautious when around the forge. If you see a piece of metal that you know you did not cool, use the pliers, not your hands.⧼thumbs_response⧽
- Your knife will be sharp, so don't test it on your thumb!⧼thumbs_response⧽
- When quenching only the edge of your blade (step 9) there is a chance that the blade will warp.⧼thumbs_response⧽
- Do not set tools near or in the forge for more than 10 seconds, and do not touch them with your hands. Let them air cool.⧼thumbs_response⧽
Things You'll Need
- Metal
- A Furnace
- Rounding hammer
- Forging tongs
- Sandpaper
- Motor oil
- Whetstone
- Fine file
- Leather strop
References
- ↑ http://www.stormthecastle.com/blacksmithing/blacksmithing-a-knife/forging-a-knife-part-1.htm
- ↑ http://www.cashenblades.com/forging.html
- ↑ https://www.youtube.com/watch?v=2EXCxCDF6_8&feature=youtu.be&t=43
- ↑ https://healthykitchen101.com/blog/parts-of-a-knife/
- ↑ https://www.youtube.com/watch?v=Wb2GU9HzyJY&feature=youtu.be&t=391
- ↑ https://www.popularmechanics.com/home/how-to-plans/how-to/a19797/forge-your-own-knife-from-a-railroad-spike/
- ↑ https://myarmoury.com/feature_properties.html
- ↑ https://www.youtube.com/watch?v=D6-1EJuJj_E
- ↑ http://www.stormthecastle.com/blacksmithing/blacksmithing-a-knife/forging-a-knife-part-1.htm
About This Article