This article was co-authored by Abyssinia Campbell. Abyssinia Campbell is an Executive Chef and the Owner of Chef Abyssinia, Personal Chef and Catering. With over ten years of experience, she specializes in catering, event planning, menu development, meal planning, and food business operations. When it comes to cooking, Chef Abyssinia enjoys using fruits, vegetables, healthy food alternatives, and local farm-fresh ingredients. She holds a BASc in Culinary Arts and Food Service Management from Johnson and Wales University.
There are 7 references cited in this article, which can be found at the bottom of the page.
This article has been viewed 17,383 times.
Cherry tomatoes are a cinch to freeze, thanks to their small size and high water content. There’s no peeling or blanching involved—just wash and dry them thoroughly, throw them in a freezer-safe container, and find some room for them in your freezer. When you’re ready to use your tomatoes, take as many as you need out of your freezing container and move them to the refrigerator or let them sit out on your countertop until they’ve thawed completely.
Steps
Getting Your Tomatoes Ready for the Freezer
-
1Pick out ripe, unblemished tomatoes for freezing. Separate the tomatoes you want to freeze into a separate bowl or container to keep them together. Freezing has a tendency to cause tomatoes to lose their shape, so it’s best to start with fruits that are nice and plump, with a vibrant, healthy color. These will retain more of their natural flavor and texture after being frozen.[1]
- If you come across tomatoes that look wrinkly, discolored, or otherwise imperfect, discard them or set them aside to use right away.
-
2Remove the stems from your tomatoes. Once you’ve sorted your tomatoes and found a few prime specimens for freezing, inspect them carefully for remnants of stems. When you find them, pinch them between your thumb and forefinger and twist them off, being careful not to damage the tomato in the process.[2]
- While you’re at it, brush off any large pieces of debris, like leaf scraps or clods of dirt, by hand.
- Don’t try to cut the stems off of your cherry tomatoes. Doing so is likely to rupture their skins, letting out all of that flavorful juice.
Advertisement -
3Wash your tomatoes thoroughly in a colander or wire strainer. Run the tomatoes under a stream of cool water. As you wash them, give them an occasional light toss to make sure the water hits them all equally and flushes away as much dirt and debris as possible. Shake off the excess water when you’re done.[3]
- You can also soak your tomatoes in a container of clean water for 5-10 minutes, if you prefer. Be sure to give them a quick rinse afterwards to remove any last traces of the dirty rinsing water.[4]
Tip: Always wash fruits and vegetables before freezing rather than after to get rid of undesirable foreign substances that might impact their potential shelf life.
-
4Dry the tomatoes with a paper towel, or allow them to air dry. Transfer your squeaky-clean tomatoes to a layer of folded paper towels and use another towel to gently pat them dry. Alternatively, you can simply dump them out and wait for them to dry naturally.[5]
- It’s important to make sure that there’s no standing water on your tomatoes once you’re actually ready to freeze them. Excess moisture will become frost, and frost can lead to clumping or even spoil your tomatoes prematurely.

Freezing Your Tomatoes
-
1Lay out your tomatoes in a single layer on a large baking sheet. When your tomatoes are fully dry, move them to an unlined baking sheet and arrange them into neat little rows. Make sure they’re all lying flat and aren’t piling up on one another or competing for space.[6]
- You may need to use a second or even a third baking sheet if you’re freezing large quantities of tomatoes in bulk.
- If you’re only preserving a small amount of tomatoes and have some room left over on your baking sheet, spread them out so that there’s 1⁄4–1⁄2 inch (0.64–1.27 cm) of space between them. This will prevent them from sticking together.
-
2Pop your tomatoes in the freezer for 1-2 hours. Find a spacious area for the baking sheet and make sure it’s lying as flat as possible. You’ll know your tomatoes have successfully completed their first round of freezing when they harden into delicious little globes.[7]
- There’s no need to set a timer or keep too close an eye on your tomatoes' progress. Just give them a squeeze after the first hour. If they still feel squishy, let them cool out for another half hour or so, or until they’re firm to the touch.[8]
- The purpose of this preliminary freeze is just to make them less likely to stick once they’re placed in a smaller container together.
-
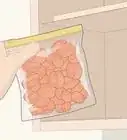
3Transfer your tomatoes to a freezer-safe zipper bag or similar container. Gather up the lightly-frozen fruits one-by-one and place them in their permanent freezing container. By this time, they should be chilled enough for you to not have to worry about sticking, so feel free to pack as many into your container as you can fit without fear.[9]
- Make sure you use a bag that's specifically labelled "freezer-safe." Freezer bags tend to be a bit thicker than ordinary food storage bags, so they'll do a better job of safeguarding your tomatoes against freezer burn.
- Plastic food storage containers are perfect for storing smaller amounts of tomatoes long-term.
Warning: It’s still possible to crush or split frozen tomatoes, so handle them carefully.
-
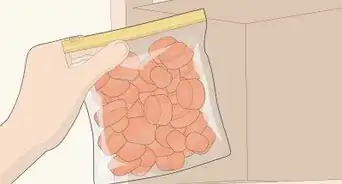
4Freeze your tomatoes for up to 6 months. When properly frozen, cherry tomatoes will stay good for around half a year, or possibly longer. Their exact shelf life could potentially be longer or shorter, so it’s best to keep an eye on them and use them before they begin to show signs of impending expiration, like accumulating frost.[10]
- Be sure to label your container or containers with the current day’s date so you’ll know how long your tomatoes have been in cold storage.[11]
- If a bountiful summer harvest gave you more cherry tomatoes than you know what to do with, freezing them is a great way to make them last and continue enjoying them all year-round.


Thawing Frozen Tomatoes
-
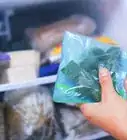
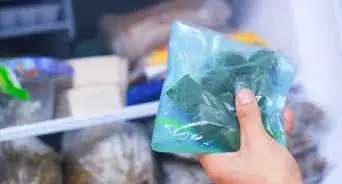
1Place your tomatoes in a large open container suitable for thawing. You can use a baking sheet, a colander or strainer, a serving bowl, or even just a layer of paper towels. All that matters is that you have a way to keep your tomatoes together while they warm up to room temperature. Set your thawing container in your refrigerator or out on your countertop where you can keep an eye on them easily.[12]
- Any frost that’s accumulated on the surface of the tomatoes may drip as it melts, so it's a good idea to place a towel or layer of folded paper towels under colanders and other containers with built-in drainage. That way, you won't have a puddle to wipe up afterwards.
- You can also let your tomatoes thaw in the same container you froze them in if you’re going to use them all up at once.
Tip: Only take out as many tomatoes as you plan on using to avoid thawing and refreezing the rest multiple times. Constant fluctuations in temperature will cause them to spoil faster.[13]
-
2Leave your tomatoes out until they soften up. Exact thawing times will differ depending on the size of your tomatoes, the amount of moisture they contain, the number you’re thawing, and the temperature in your kitchen. In most cases, however, it will take less than an hour at room temperature. Once they regain their suppleness, they’ll be ready to add to your favorite recipes or munch on as-is.
- It may take 2 hours or more for your tomatoes to thaw completely in the refrigerator.
- It’s common for frozen cherry tomatoes to shrivel or wrinkle a bit as they thaw. This is totally normal, and shouldn’t affect their flavor or texture too much. It may make them slightly less presentable when used in raw dishes like salads, though.[14]
-
3Soak your frozen tomatoes in lukewarm water to speed things along. If your tomatoes aren’t going to be part of a hot meal but you don’t want to wait for them to thaw naturally, fill a large bowl or similar container with water that’s just a tad warmer than room temperature and drop in your frozen tomatoes. The warmth of the water will draw the cold out of the tomatoes in as little as 5-6 minutes.[15]
- Avoid using hot water, as this could negatively alter the flavor or texture of your tomatoes.
-
4Use your tomatoes right out of the freezer if you intend to cook with them. If your cherry tomatoes are headed for a stew, sauce, or sauté, you also have the option of adding them in with your other ingredients straight away. They’ll thaw as they cook, and the way they look won’t make any difference.[16]
- Try sautéing your tomatoes in a pan with salt, pepper, and olive oil until they’re nice and blistered. Then, serve them on top of rice, other veggies, or fish.
- Toss still-frozen cherry tomatoes in stir-frys, casseroles, omelettes, and roasted vegetable medleys.[17]
- Frozen fruits and veggies release moisture as they thaw. For this reason, it's wise to use roughly 5-10% less liquid than the recipe calls for in things like soups, stews, and sauces in order to keep them from coming out too watery.


Things You’ll Need
Getting Your Tomatoes Ready for the Freezer
- Colander or wire strainer
- Paper towels
Freezing Your Tomatoes
- Large baking sheet
- Zipper bag, lidded food storage container, or other freezer-safe container
Thawing Frozen Tomatoes
- Large open container
- Lukewarm water (optional)


References
- ↑ http://www.tomatodirt.com/freezing-cherry-tomatoes.html
- ↑ https://thefreerangelife.com/preserve-cherry-tomatoes/
- ↑ https://www.gardenbetty.com/preserving-tomatoes-by-freezing/
- ↑ https://extension.umaine.edu/publications/4336e/
- ↑ http://www.tomatodirt.com/freezing-cherry-tomatoes.html
- ↑ https://thefreerangelife.com/preserve-cherry-tomatoes/
- ↑ http://www.tomatodirt.com/freezing-cherry-tomatoes.html
- ↑ https://www.gardenbetty.com/preserving-tomatoes-by-freezing/
- ↑ https://www.gardenbetty.com/preserving-tomatoes-by-freezing/
- ↑ https://fruitsandveggies.org/expert-advice/shelf-life-frozen-tomatoes/
- ↑ http://www.tomatodirt.com/freezing-cherry-tomatoes.html
- ↑ http://www.tomatodirt.com/freezing-cherry-tomatoes.html
- ↑ https://fruitsandveggies.org/expert-advice/shelf-life-frozen-tomatoes/
- ↑ http://www.tomatodirt.com/freezing-cherry-tomatoes.html
- ↑ http://www.eatrightstore.org/~/media/eatrightstore%20documents/client%20education/homefoodsafetyhandoutsample2.ashx
- ↑ https://premeditatedleftovers.com/recipes-cooking-tips/freezing-cherry-tomatoes/
- ↑ https://thefreerangelife.com/preserve-cherry-tomatoes/
About This Article