This article was co-authored by wikiHow Staff. Our trained team of editors and researchers validate articles for accuracy and comprehensiveness. wikiHow's Content Management Team carefully monitors the work from our editorial staff to ensure that each article is backed by trusted research and meets our high quality standards.
There are 8 references cited in this article, which can be found at the bottom of the page.
The wikiHow Video Team also followed the article's instructions and verified that they work.
This article has been viewed 36,073 times.
Learn more...
Pumpkin is an incredibly versatile ingredient that provides the foundation for a variety of tasty treats including cookies, pies, soups and more. Although it grows during the summer months, freezing fresh pumpkin is a great way to ensure you are able to make delicious pumpkin-based delights year-round![1]
Steps
Freezing Pumpkin Chunks
-
1Slice the pumpkin into fourths. Begin by sticking the tip of your knife into the top of the pumpkin, next to the stem. Push the knife down into the pumpkin and it will begin to split. Continue to move the knife down along the bottom of the pumpkin and all the way around, cutting the pumpkin in half. Then cut each half in half, creating fourths. [2]
-
2Scoop out the pumpkin’s seeds. Using a big spoon, scoop the flesh clean, removing the seeds and any fibrous strings. Throw away or set aside the seeds for roasting—roasted pumpkins seeds are another delicious and nutritious pumpkin-based treat! [3]Advertisement
-
3Bake the pumpkin in a 300 °F (149 °C) oven for at least a 20 minutes. Place the pumpkin flesh-side up on a roasting pan, adding a small amount of water to the bottom of the pan. Cook the pumpkin about one hour for a standard-size pumpkin, 45 minutes for a medium pumpkin, 20-30 minutes for a small pumpkin. Check pumpkin with knife for doneness—it should slice without difficulty.[4]
-
4Cook the pumpkin in the microwave. Place the pumpkin in a microwaveable dish and add a small amount of water to the bottom of the dish. Cover the pumpkin with plastic wrap, poking holes in the top so steam can escape. Cook for about 15 minutes on high for a standard-size pumpkin.[5]
-
5Peel the skin off of the pumpkin. Let it sit until it’s just cool enough to touch. Peel off the skin with a knife or your fingers. [6]
- If the pumpkin is cooked thoroughly, the skin should fall off with little to no effort!
-
6Cut the pumpkin into smaller chunks. Slice the pumpkin fourths up into smaller portions of about 1 to 3 inches (2.5 to 7.6 cm) in length. [7]
-
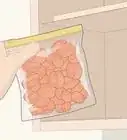
7Place your pumpkin chunks in freezer/sandwich bags. Be sure to pack them loosely in the bags so they don’t freeze together! Push as much air as possible out of the bags. If you know what pumpkin-based recipes you like to make, measure out portions of the specific amounts called for in those recipes for easier and quicker use in the future![8]
-
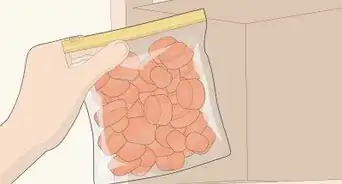
8Label/date the bags. Take a permanent marker and write the date you are freezing the pumpkin, as well as the pre-portioned amount contained in the bag (if applicable). Your pumpkin should keep in the freezer for at least 6-8 months. [9]


Freezing Pumpkin Puree
-
1Blend your pumpkin chunks. Once you’ve cooked your pumpkin and cut it up into chunks, you can make puree by blending the chunks using a food processor, blender, or immersion blender.
-
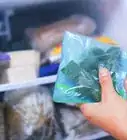
2Place your pumpkin puree in zip-top bags. Push the air out and flatten the bags as much as possible before freezing to save space and allow for a quicker thaw down the road. Place the flattened bags in the freezer. [10]
-
3Freeze your pumpkin puree in muffin tins. Spoon portions of the puree into muffin tins and even out the top. After they’ve frozen, you can transfer the puree portions into zip-top bags for long-term storage so your muffin tins aren’t unnecessarily occupied. [11]
-
4Use ice cube trays to freeze your pumpkin puree. Similarly to the muffin tin method, spoon portions into the tray and smooth out the tops. Then, you can transfer the cubes to bags to free up your ice cube tray. [12]

Thawing Your Pumpkin
-
1Take your desired amount of pumpkin out of the freezer. Refer to the recipe you’re making and cross-reference it with your labeled bags to determine the correct amount of pumpkin.
-
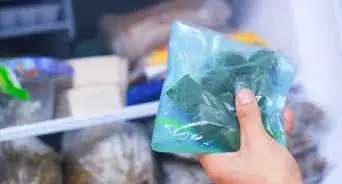
2Thaw your pumpkin in the fridge. If you’re going to use your pumpkin within a few days, you can place it in the fridge to thaw.
-
3Defrost your pumpkin on the counter for same-day use. If you’re going to use your pumpkin that day, you can leave it on the counter for a few hours to thaw.
-
4Run warm tap water over your pumpkin. If you need the pumpkin ASAP, you can run warm water over it (still in its bag) to expedite the thawing process.


References
- ↑ https://www.almanac.com/plant/pumpkins
- ↑ https://www.healthier.qld.gov.au/guide/how-to-chop-a-pumpkin/
- ↑ https://www.farmersalmanac.com/prepare-and-freeze-fresh-pumpkin-easily-2194
- ↑ https://www.farmersalmanac.com/prepare-and-freeze-fresh-pumpkin-easily-2194
- ↑ https://commonsensehome.com/cook-pumpkin-or-winter-squash/
- ↑ https://www.easyanddelish.com/peeling-pumpkin-easily/
- ↑ https://www.farmersalmanac.com/prepare-and-freeze-fresh-pumpkin-easily-2194
- ↑ http://allrecipes.co.uk/how-to/193/how-to-freeze-pumpkin.aspx
- ↑ https://www.eatbydate.com/fruits/fresh/how-long-does-pumpkin-last/
About This Article