This article was co-authored by Jim Price. Jim Price is a Baseball Coach and the Founder of Bash Sports Academy based in Chicago, IL. Jim has over 20 years of baseball coaching experience and specializes in hitting, defense, and mental game management. Prior to founding Bash Sports Academy, Jim served on the Board of Directors of Welles Park Youth Baseball, the largest youth baseball organization in the city of Chicago.
This article has been viewed 23,081 times.
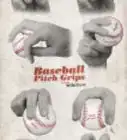
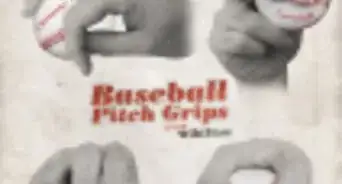
The curveball is one of the most popular pitches in baseball. Curveballs are thrown in a way that causes the ball to dive down as it nears the plate.[1] The major differences between the types of curveballs (basic, index-up, and knuckle curve) are grip and speed.
Steps
Gripping a Basic Curveball
-
1Use a four-seam grip. Hold the ball so two seams are visible in the front and two visible in the back. The four-seam grip is considered by many pitchers as more effective when throwing a curveball than the two-seam grip. It allows the pitcher to throw the ball at any angle, as long as they hold their hand behind the ball and throw it with a snapping motion.
- Two-seam grips are used to throw fastballs. Rather than breaking down (as in a curveball), two-seam pitches break to the right or left.
-
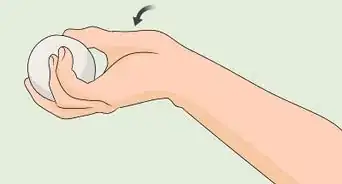
2Hold up your middle and index finger as if making a peace sign. Place the ball in the palm of your hand and flex your middle and index fingers so they grip the top of the ball. Curve your ring finger so the ball rests against its side.
- Dig the fingernail on your index finger into the seam to help get a tighter spin when you throw the pitch.
Advertisement -
3Position your thumb and middle finger. Place your middle finger along the middle seam (on the pinky side) and your thumb on the seam towards the back of the ball.
-
4Separate the tips of your thumb and ring finger. At this point, your thumb should be positioned on the bottom of the ball opposite your middle finger, with these two fingers forming a "C" around the ball.
- Your grip should be firm, but not too tight. You want your thumb to be able to flick up behind the ball when it is released.
- Do not choke the ball. Make sure there is a gap between your thumb and index finger, and small space between thumb and ring finger.
-
5Throw the ball by snapping your thumb and middle finger. When throwing a curveball, extend your wrist back. When you release, "snap" your thumb and middle finger together while flicking your wrist.[2] At this point, your middle finger should rotate downwards and your thumb should rotate upwards to create the centripetal (circular) force needed to spin the ball towards the plate.[3]
- Through a change-up curveball by increasing grip depth.
- Experiment with slight variations in grip depth and finger (thumb and middle) position. Find a grip that is comfortable and works with your throwing style.


Gripping an Index-Up Curveball
-
1Use a modified 4-seam grip. The index-up grip is similar to that for a basic curveball, with the exception that your index finger remains relaxed and pointed up. This grip is good for beginners because your will use your index finger to help guide the ball towards its target.[4]
- Use this pitch to practice your curveball technique, but avoid using it in games. Experienced batters are likely to see the raised index finger and adjust their stance in anticipation of a curveball.[5]
-
2Hold up your middle and index fingers. Bend your middle finger, leaving your index finger pointing upwards. Like in the standard curveball grip, let the bottom of the ball rest against the side of your ring finer.
-
3Position your middle finger and thumb. Place your thumb on the back of the ball so it lies along the bottom seam. Position your middle finger along the top seam opposite your thumb.[6] At this point, your thumb and middle finger should form a "C" while your index finger is pointed up.
-
4Prepare to throw the ball. Make sure your index finger is up and relaxed, and the ball is firmly gripped by your thumb (bottom) and middle finger (top). While your grip should be firm, relax the muscles in your wrist and forearm.
-
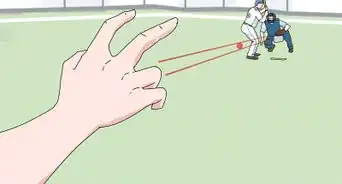
5Throw by snapping your thumb and middle fingers together. When throwing, your thumb rotates up while your middle finger rotates down. Use your index finger to control the trajectory of the ball - the ball will go in the direction in which your index finger is pointing.
- Your index finger is not needed to throw the pitch, with the thumb and middle finger providing all the spin.[7]
- When throwing, your elbow should be at the same height or above your shoulder. Your hand and wrist should form a vertical line with your forearm.[8]
- Keep your forearm and wrist muscles loose until just prior to release. Strongly contract them and quickly snap your wrist forward and inwards, allowing the ball to spin out over the middle finger.


Gripping a Knucklecurve
-
1Use a more advanced 4-seam grip. For this pitch, you will grip the ball with your thumb, middle finger, and knuckle of your index finger. Holding it this way allows the ball to break sharper and later (closer to the batter).[9] While more difficult to grip (and throw), knuckle curves increase speed without sacrificing spin.
- A knucklecurve grip is on average 2.5 mph (4 km/h) faster than a standard curveball.
- Over a quarter of curveballs thrown by major league pitchers in 2013 were classified as knucklecurves.[10]
-
2Make a peace sign with your middle and index fingers. Place the ball in the palm of your hand so the seams curve to the side of the ball. Bend your middle finger over the top of the ball so it rests along the seam. Next, take the index finger and bend it so the knuckle rests on top of the ball next to your middle finger.[11]
- Think of the knuckle of your middle finger "digging" into the top of the ball.[12]
-
3Position your thumb and middle finger. The placement of the thumb and middle finger are identical to other types of curveballs. The thumb should be placed on or along the seam on the bottom of the ball so it forms a "C" with the middle finger. Stabilize the bottom of the ball by curving your ring finger in and resting the ball against the first and second joint.[13]
-
4Use your knuckle as a pivot point to throw the ball. Throw as you would for a regular curveball. As you release the ball, snap your middle finger and thumb together so it pivots against the knuckle of your index finger.[14] This will help generate the speed and spin required for the ball to reach its target and break or curve downwards.


Warnings
- Take and break from throwing curveballs if you start experiencing pain or stiffness in your elbow, wrist, or fingers. Consult a physical therapist or sports physician before continuing practicing.⧼thumbs_response⧽
- Starting pitchers should not practice throws, especially curveballs, for more than 15 minutes to avoid fatigue and injury.⧼thumbs_response⧽
- Actions that can add stress on the wrist and forearm when throwing a curveball include: hands and fingers roll under the ball during release; the pitcher snaps the hand and wrist straight down; the elbow is positioned too low (below the shoulder) or drops too low during the pitch; and the pitcher is inexperienced or not adequately warmed up.⧼thumbs_response⧽
- Curveballs should be avoided until after a pitcher reaches puberty to decrease the risk of chronic injury. The curveball should not be taught until high school.⧼thumbs_response⧽
-Step-8.webp)

References
- ↑ http://www.thecompletepitcher.com/different_baseball_pitches.htm
- ↑ http://www.baseball-pitching-tips.com/curveball.html
- ↑ http://www.baseball-pitching-tips.com/curveball.html
- ↑ http://www.thecompletepitcher.com/pitching_grips.htm#q7
- ↑ http://www.baseball-pitching-tips.com/curveball.html
- ↑ http://www.thecompletepitcher.com/pitching_grips.htm#q7
- ↑ https://www.baseballprospectus.com/news/article/23502/the-knuckle-curveball-how-it-behaves-and-why-its-becoming-so-popular/
- ↑ http://www.baseball-pitching-tips.com/curveball.html
- ↑ http://www.baseball-pitching-tips.com/curveball.html
- ↑ https://www.baseballprospectus.com/news/article/23502/the-knuckle-curveball-how-it-behaves-and-why-its-becoming-so-popular/
- ↑ http://www.baseball-pitching-tips.com/curveball.html
- ↑ http://tufts.uloop.com/news/view.php/116161/How-To-Throw-Baseballs-Nastiest-Pitches
- ↑ http://tufts.uloop.com/news/view.php/116161/How-To-Throw-Baseballs-Nastiest-Pitches
- ↑ http://tufts.uloop.com/news/view.php/116161/How-To-Throw-Baseballs-Nastiest-Pitches
- ↑ http://www.hardballtimes.com/a-close-look-at-tim-hudson/
About This Article