This article was co-authored by Isaac Hess and by wikiHow staff writer, Sophia Latorre. Isaac Hess is a Baseball Coach, Instructor, and the Founder of MADE Baseball Development and Champion Mindset Training Program, a baseball training program based in Los Angeles, California. Isaac has over 14 years of experience coaching baseball and specializes in private lessons and tournaments. He has played baseball for both professional and collegiate leagues including Washington State University and the University of Arizona. Isaac was ranked as one of Baseball America's top 10 prospects for 2007 and 2008. He earned a BS in Regional Development from the University of Arizona in 2007.
This article has been viewed 90,282 times.
A regulation pitcher's mound is a raised section in the middle of a baseball diamond where a pitcher stands to throw a pitch. A pitcher's mound is typically made of clay, sand, and dirt. Measure the distances carefully to ensure your mound will be to regulation, and avoid falling into the common trap of placing the pitcher’s plate in the middle of the pitcher’s mound.
Steps
Measuring Distance, Alignment, and Height
-
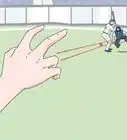
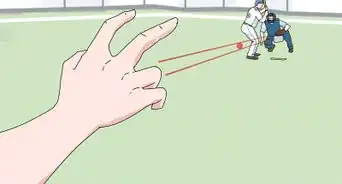
1Situate the pitcher's mound directly in line with home plate. There should be a clear path longer than 60 feet (18.29 meters) between the pitcher’s mound and home plate. The line from home plate through the pitcher’s mound to second base should run east-northeast to keep the sun out of the pitcher’s eyes.
-
2Place the pitcher’s plate 60 ft 6 in (18.44 m) from the back of home plate. Measure the distance from the back of home plate to the front of the pitcher’s plate with a tape measurer. The pitcher’s plate is a rubber rectangle that is 24 in (610 mm) long. Align the middle of the pitcher’s plate with the middle of home plate.[1]Advertisement
-
3Ensure the pitcher’s plate is 10 in (254 mm) taller than home plate. Use a transit level to take a reading from home plate and a reading from the pitcher’s plate. Fill in the area around the pitcher’s plate with a mixture of clay, sand, and dirt until it is 10 in (254 mm) taller than home plate. Then, place the pitcher’s plate firmly on top of the dirt.[2]


Constructing the Pitcher’s Collar
-
1Place a stake 18 in (457 mm) in front of the pitcher’s plate. This will be the center of the mound. It should be 59 ft (17.98 meters) from the back of home plate.
-
2Mark a circle around the stake that’s 18 ft (5.5 m) in diameter. Attach a string to the stake and measure the string to exactly 9 ft (2.75 m). Keep the string taut and walk in a circle around the stake, using chalk or another marker to outline the circle on the ground. This will be the pitching mound.[3]
-
3Remove the turf inside the circle. To create a permanent boundary line for the collar, use a spade to remove the turf or grass inside the 18-ft (5.5-m) diameter. The collar should be dirt rather than grass or turf to give the pitcher more stability.[4]


Building the Pitcher’s Plateau
-
1Mark a 5 ft (1.5 m) by 3 ft (0.92 m) rectangle around the pitcher’s plate. The longer sides of the rectangle should be 6 in (152 mm) in front of the rubber and 24 in (610 mm) behind the rubber. The shorter sides should be 18 in (457 mm) from each side of the rubber.[5]
-
2Dig out the existing soil inside the rectangle. Use a pick and a shovel to remove the existing soil to a depth of about 6 in (152 mm). Take care not to disturb the pitcher’s plate.[6]
-
3Place clay bricks in the rectangle and tamp them down. Add a single layer of clay bricks designed for pitcher’s mounds to provide durability to the plateau and reduce the need for frequent maintenance. You can find them at specialty sports stores and online. Use a tamp to ensure the bricks will stay in place.[7]


Constructing Proper Mound Slope
-
1Place a 1 in by 4 in by 4 ft board on top of the pitcher’s plate. The 4-in (102 mm) side of the board should rest on the pitcher’s plate while the 1 in (25 mm) sides face outward. The entire length of the 4 ft (1.2 m) board should be parallel to the pitcher’s plate.[8]
-
2Rest a 10 ft by 2 in by 4 in board on top of the other board. Rest the 2-in (51-mm) side on top of the other board with the 4 in (102 mm) sides facing outward. The entire length of the 10-ft (3 m) board should be angled down toward one edge of the plateau so that you can use the long board to distribute dirt for the mound.[9]
-
3Dump a wheelbarrow full of dirt and clay in front of the longer board. Spread the mixture out along the length of the board.[10]
-
4Use the long board to spread the dirt out. Situate one person at each end of the long board. Keep one end of the board resting on the pitcher’s plate and use that as your pivot point.The person with the far end of the board (not the pivot point) should slowly move from one end of the plateau to the other, using the board to distribute the dirt over the mound.[11]
-
5Ensure your slope measurements are accurate. The slope from the pitcher’s plate should begin 6 in (152.4 mm) in front of the rubber, and slope toward home plate 1 in (25.4 mm) for every 1 ft (0.3 meters). Measure the height with a transit level, and use the clay and dirt mixture to fill in any low spots.
-
6Tamp and rake the mound. Once the mound has taken shape, pound the surface area of the mound with a tamp to ensure there are no loose areas. Then, use a rake to remove any pebbles or chunks of grass and smooth out the dirt.[12]
-
7Moisten the mound with water. Use a hose to lightly wet the area. The water will soak into the mound and firmly set the clay. Regular watering also will prevent the mound from cracking or eroding.[13]


Expert Q&A
-
QuestionHow high should a pitcher's mound be?
 Isaac HessIsaac Hess is a Baseball Coach, Instructor, and the Founder of MADE Baseball Development and Champion Mindset Training Program, a baseball training program based in Los Angeles, California. Isaac has over 14 years of experience coaching baseball and specializes in private lessons and tournaments. He has played baseball for both professional and collegiate leagues including Washington State University and the University of Arizona. Isaac was ranked as one of Baseball America's top 10 prospects for 2007 and 2008. He earned a BS in Regional Development from the University of Arizona in 2007.
Baseball Coach & InstructorMake the pitcher's mound higher than the home plate. This gives the pitcher somewhat of an advantage since it's harder to pitch from flat ground. -
QuestionHow many bags of clay do I need to construct a junior sized pitching mound?
 Community Answer5 bags of clay are needed to build a junior sized pitching mound.
 -
QuestionWhat is the distance of the pitcher rubber from the home plate?
 DonaganTop Answerer60' 6" at upper levels of the game. Less than that at lower levels; for example, 46' in Little League.
Things You'll Need
- Transit level
- Tape measure
- Stakes
- String
- Chalk or flags
- Pitching rubber
- Home plate
- Clay, sand, and dirt mixture
- Pick
- Shovel
- Spade
- Clay bricks
- Tamp
- Rake
- Water hose
- Tarp
- Wheelbarrow
- 4 foot by (1.2 m) 1 in (25 mm) by 4 in (102 mm) board
- 10 foot by (3 m) 2 in (51 m) by 4 in (102 mm) board


-Step-8.webp)


References
- ↑ http://www.turface.com/resources/article/how-construct-pitchers-mound
- ↑ http://www.turface.com/resources/article/how-construct-pitchers-mound
- ↑ http://www.turface.com/resources/article/how-construct-pitchers-mound
- ↑ http://www.turface.com/resources/article/how-construct-pitchers-mound
- ↑ http://www.turface.com/resources/article/how-construct-pitchers-mound
- ↑ http://www.turface.com/resources/article/how-construct-pitchers-mound
- ↑ http://www.ultimate-baseball-field-renovation-guide.com/baseball-mound-clay-bricks.html
- ↑ http://www.turface.com/resources/article/how-construct-pitchers-mound
- ↑ http://www.turface.com/resources/article/how-construct-pitchers-mound
About This Article