This article was co-authored by Ryan Glynn, CPA. Ryan Glynn is a Plant Specialist, Interiorscaper, and the Founder of Chicago Plants, LLC. He specializes in houseplant care, interior plant-scaping, and gardening. Ryan and Chicago Plants have been featured in several media outlets such as TimeOut Magazine and the Chicago Tribune. Ryan holds a BBA and Master’s degree in Accounting from The University of Wisconsin-Madison.
This article has been viewed 25,321 times.
Gardenias are luscious shrubs that develop white flowers and make a great decorative addition to any property. While you can grow gardenias from seeds, they grow much faster if you use plant cuttings instead. The process is simple. With some care, fertilizing, and watering, you can grow your very own gardenias in no time.
Things You Should Know
- Some time in the spring or summer, take a cutting from your gardenia by snipping a 5-inch section from the tip of a healthy branch.
- Trim all the leaves and flowers off the bottom of the cutting, then dip the end in rooting hormone.
- Push the end of the stick into a mixture of sand and peat moss, then put the pot into a plastic bag to create a humid environment.
- Keep the soil moist but not saturated while your gardenia takes root.
- After 4-6 weeks, move your cutting to a larger pot.
Steps
Collecting Cuttings
-
1Take cuttings in the spring or summer when the plant is blooming. The ideal time to cut is from mid-spring until late summer, when the temperature is consistently warm outside and the flowers are actively blooming. If you take the cuttings during the blooming season, the cuttings are ready to plant and grow.[1]
- The gardenia growing season is usually over by the fall, so cuttings taken then won't grow as well. The branches will be more dried out and hard.
-
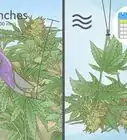
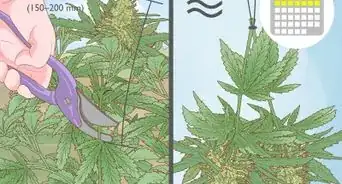
2Cut a 5 in (13 cm) green section from the tip of a branch. Green branches, or softwood, are the healthiest and grow best. Pick a softwood section on the end of a branch and measure back 5 in (13 cm). Snip the branch off at that point.[2]
- Use a sharp pair of gardening scissors so you get a clean cut.
- It doesn’t matter if the cutting has a flower on it or not. If it does have a flower, you’ll remove it later on.
- Make sure the branch is healthy and has no brown spots on it. Totally green branches will grow much better.
Advertisement -
3Trim the leaves off the lower half of the cutting. Use the same scissors and cut off all the leaves from the middle of the cutting down to the end. Snip the leaves off right at the point that they meet the branch. Leave the upper leaves attached.[3]
- Don’t tear the leaves off. This can damage the cutting and make it vulnerable to mold growth.
- If the cutting has a flower, snip this off as well. A flower takes energy away from the cutting and it will have trouble growing a root system.


Potting the Cuttings
-
1Mix equal parts of sand and peat moss in a small pot. This is the best rooting mixture for gardenia cuttings. Pour equal amounts of each ingredient into a pot and mix it together until it’s even.[4]
- You can also use an equal mixture of peat moss and perlite or perlite and vermiculite. Don’t use regular potting soil, because it doesn’t drain as well.
- A small pot, just a few inches deep and wide, is best for a new clipping so the root system develops better. You can transplant the cutting later on when it develops a root system.
-
2Pour water into the rooting mixture to moisten it. Take a watering pot or cup and add tap or hose water evenly until all the soil is wet. Press your finger below the soil surface to make sure it’s wet all the way through.[5]
- Don’t waterlog the plant. Just make the soil moist. If water pools on the top, you added too much.
-
3Dip the end of the cutting in a root hormone. Rooting hormone helps the plant grow better. Pour some rooting hormone into a small cup. Then, dip the cut end into it and cover the lower 1 in (2.5 cm) of the cutting with the root hormone.[6]
- Buy rooting hormone from nurseries or garden centers. If you aren’t sure which product is best, consult an employee.
- Don’t dip the cutting directly into the bottle of hormone. This will contaminate the rest of it.
-
4Plant the cutting 1–2 inches (2.5–5.1 cm) deep into the soil. Pre-poke a hole with your finger or a pencil. Insert the side of the cutting with the hormone on it into the hole. Press the soil around the base of the cutting so it stands upright.[7]
- Don’t push the cutting into the soil without making a hole first. This will rub the hormone off.
- If you're planting multiple cuttings in the same pot, make sure to leave at least 3 inches (7.6 cm) between them so the roots don't get tangled up.
-
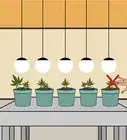
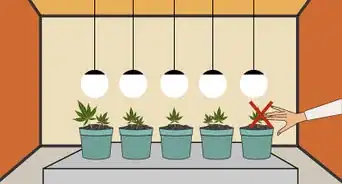
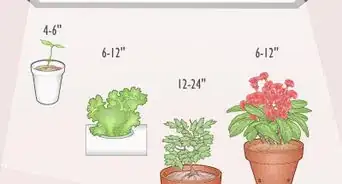
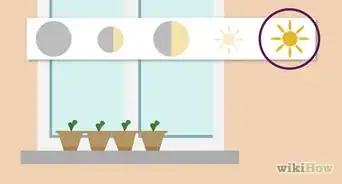
5Leave the pot in a indirect sunlight where it's at least 75 °F (24 °C). Gardenias need a warm climate to grow. If the temperature is consistently above 75 °F (24 °C) outside, then move the plant outdoors into a sunny location and let it grow. Make sure it receives 4-6 hours of indirect sunlight daily.[8]
- If the temperature outside is too cool, you can grow the cutting inside. Leave it by a window in indirect sunlight and make sure you keep the indoor temperature at least 75 °F (24 °C). You can also grow it in a greenhouse.
-
6Place the pot in a large plastic bag to keep the humidity high. Gardenias thrive in humid conditions. If it’s not humid where you live, take a large plastic bag and wrap it around the pot. Blow some air in so the bag expands, then seal it off.[9]
- Don’t let any leaves touch the plastic. This makes them more susceptible to mold. Either blow in more air or use a bigger bag so the leaves have enough room.
- Open the bag to water the plant, then seal it back up.
-
7Keep the soil moist at all times. Water regularly so the soil doesn’t dry out. Check back on the plant every day and press the soil to make sure the soil is moist. Add some water if it feels dry.[10]
- Remember not to waterlog the plant. Don’t let water pool on the soil.
- If the soil dries out too much, the gardenia will lose its ability to flower.


Transplanting the Cuttings
-
1Look for new growth in 4-6 weeks to confirm the plant has developed roots. Continue with your daily care regimen for the cutting, especially watering regularly and keeping it warm. After 4-6 weeks, the root system will start growing in. When the roots are about 1 inch (2.5 cm) long, you can transplant the cutting to a larger pot.[11]
- New growth is a sign that the cutting is developing roots. Look for new leaves or growth on the existing leaves. This indicates that the cutting has a root system and is ready for transplanting.
-
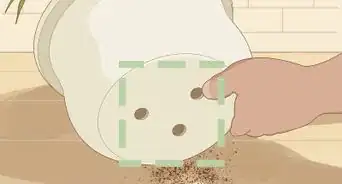
2Move the gardenia into a larger pot with the same soil mixture. Pour the same 1:1 peat moss to sand mixture into a larger pot. Mix them together evenly. Then dig up the gardenia cutting, including its roots, and plant it in the new pot. Press the soil around the plant base so it stays upright.[12]
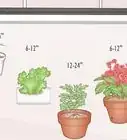
- The pot size depends on how large you plan to grow the gardenia. If you'll be pruning it to keep it small, then a pot less than 12 in (30 cm) will work. If you want to let it grow, then use a large pot at least 15 in (38 cm) in width.
- When the plant reaches this level of maturity, you no longer need the plastic bag.
- If you used a different potting mixture besides peat moss and sand, use the same mixture in the new pot.
-
3Keep the pot in a location with 4-6 hours of sunlight. Gardenia’s need full sunlight to grow well. Either leave it near a window that gets a lot of sun, or place it in the sunniest location on your property.[13]
- You can also move the plant around throughout the day if no spots get consistent sunlight. Move the pot as the sun moves.
-
4Continue watering the plant so the soil is always moist. Keep your gardenia on the same watering schedule after you transplant it. Monitor the soil and water when it starts drying out. Never let it dry out completely.[14]
-
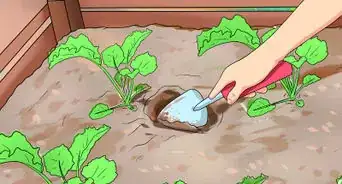
5Fertilize the plant once a month. Gardenias prefer fertilizer mixtures higher in nitrogen and potassium. Try a 15-5-10 fertilizer mixture. Apply a granular fertilizer monthly while the plant is developing.[15]
- Normal fertilizer application is sprinkling some around the base of the plant. Apply it in the morning or evening, when the temperature is cooler. Use a small shovel to avoid getting any on your hands, and wash your hands after handling the chemicals.
- Follow the specific application instructions on the product that you use. Particularly, don’t apply more than directed. Over-fertilization can make the gardenias build up too much salt and damage the root system.
-
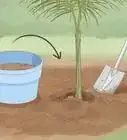
6Plant the mature gardenia into the ground if you want to. When the gardenia starts developing leaves and looking like a small shrub, it’s healthy enough to move into the ground. If you want to, keep it outside permanently, find a sunny location. Dig a hole and plant the gardenia. Continue fertilizing and watering to keep the plant growing.[16]
- Planting in the spring is best so the plant has several months of warm weather.
- You can also continue growing the plant in a pot. Get a bigger pot if you need it, or prune the plant so it doesn’t outgrow the pot.


Things You’ll Need
- Gardenia plant
- Flower pots
- Peat moss
- Sand
- Rooting hormone
- Gardening scissors
- Water
- Plastic bag
- Fertilizer


References
- ↑ https://easttexasgardening.tamu.edu/2014/05/06/gardenia-propagation/
- ↑ https://www.rhs.org.uk/advice/profile?pid=367#section-3
- ↑ https://www.missouribotanicalgarden.org/gardens-gardening/your-garden/help-for-the-home-gardener/advice-tips-resources/visual-guides/propagating-plants-by-cuttings.aspx
- ↑ https://easttexasgardening.tamu.edu/2014/05/06/gardenia-propagation/
- ↑ https://www.ctahr.hawaii.edu/kaufmana/downloads/Common%20Gardenia%20OF-32.pdf
- ↑ https://www.ctahr.hawaii.edu/kaufmana/downloads/Common%20Gardenia%20OF-32.pdf
- ↑ https://www.missouribotanicalgarden.org/gardens-gardening/your-garden/help-for-the-home-gardener/advice-tips-resources/visual-guides/propagating-plants-by-cuttings.aspx
- ↑ https://www.ctahr.hawaii.edu/kaufmana/downloads/Common%20Gardenia%20OF-32.pdf
- ↑ https://www.missouribotanicalgarden.org/gardens-gardening/your-garden/help-for-the-home-gardener/advice-tips-resources/visual-guides/propagating-plants-by-cuttings.aspx
- ↑ https://www.missouribotanicalgarden.org/gardens-gardening/your-garden/help-for-the-home-gardener/advice-tips-resources/visual-guides/propagating-plants-by-cuttings.aspx
- ↑ https://easttexasgardening.tamu.edu/2014/05/06/gardenia-propagation/
- ↑ https://easttexasgardening.tamu.edu/2014/05/06/gardenia-propagation/
- ↑ https://www.gardeningknowhow.com/ornamental/flowers/gardenia/growing-gardenias-indoors.htm
- ↑ https://easttexasgardening.tamu.edu/2014/05/06/gardenia-propagation/
- ↑ https://www.ctahr.hawaii.edu/kaufmana/downloads/Common%20Gardenia%20OF-32.pdf
- ↑ https://www.ctahr.hawaii.edu/kaufmana/downloads/Common%20Gardenia%20OF-32.pdf
About This Article