This article was co-authored by wikiHow staff writer, Hunter Rising. Hunter Rising is a wikiHow Staff Writer based in Los Angeles. He has more than three years of experience writing for and working with wikiHow. Hunter holds a BFA in Entertainment Design from the University of Wisconsin - Stout and a Minor in English Writing.
There are 16 references cited in this article, which can be found at the bottom of the page.
This article has been viewed 30,643 times.
Learn more...
Rudraksha trees are large tropical evergreen trees native to India, and they are known for their bright blue fruits that contain large seeds used to make holy beads. If you live in a tropical climate and want to raise your own rudraksha tree, you can plant the seeds and grow your own. Though your seeds will take a while to germinate, you’ll have a small sapling you can keep in a pot or transplant into the ground. As long as you provide the proper growing conditions, you can expect your tree to produce fruits after about 7 years.
Steps
Planting the Seeds
-
1Soak the seeds in lukewarm water for 48 hours. Fill a bowl with warm water from your sink so it’s deep enough to submerge the seeds you’re planting. Pour the seeds into the water and leave them to soak to help them germinate easier. After about 2 days, drain the water and pat the seeds dry.[1]
- You can buy rudraksha seeds online or you can use fresh seeds from an established tree.
-
2Break the seeds’ outer shells with a hammer to help them germinate. Look on the top or bottom of the seed to find where the lines along the sides intersect. Hold the seed upright and tap where the lines intersect gently with a hammer. Continue hitting the seed until it breaks into multiple pieces to help expose the insides and make them germinate faster. Continue breaking any other seeds you’re planting.[2]
- You do not have to break the seeds apart if you don’t want to, but they will germinate much slower.
Variation: If the seed doesn’t break when you hit it, put the tip of a nail where the lines intersect on the top of the seed and hit the nail with a hammer.
Advertisement -
3Fill a 6 in (15 cm) pot with a peat moss and perlite mix. Create a mixture that’s 60% peat moss and 40% perlite and thoroughly combine them. Pour the potting medium into your pot and level the surface. Leave about 1 inch (2.5 cm) between the top lip of the pot and the surface of the growing medium so the pot doesn’t overflow when you water it.[3]
- You can buy peat moss and perlite from your local gardening center.
- Substitute equal parts soil and gardening sand if you don’t have access to peat moss and perlite.
-
4Push the seeds 1⁄2 in (1.3 cm) into the potting medium. Space the seeds so they’re about 1–2 inches (2.5–5.1 cm) away from one another so they aren’t competing for nutrients. Use your finger to push the seeds down so the broken edges face down. Then, level the surface of the potting medium so it covers the seeds.[4]
- Always plant multiple seeds in the pot even if you only want 1 tree since you’ll be able to pick the healthiest growths.
-
5Dampen the growing medium with water. Fill a watering can with clean, cold water and slowly pour it over the potting medium. Be careful not to disturb the seeds, or else they may come loose and not germinate properly. Allow the water to drain through the potting medium and out of the pot’s drainage holes.[5]
- Rudraksha seeds can develop rot if they’re overwatered, so don’t allow water to puddle on the surface.
-
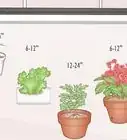
6Keep the pot in a spot that stays over 50 °F (10 °C) and gets 4 hours of shade. If you want to keep the pot inside, place it next to a south-facing window so it receives indirect sunlight and shade throughout the day. Otherwise, place the pot under a shady tree outside if temperatures don’t dip below 50 °F (10 °C). Leave the pot undisturbed during the day so the seeds receive the proper nutrients.[6]
- Rudraksha seeds will not germinate in cold temperatures.
-
7Water the seeds when the potting medium feels dry. Put your finger in the potting medium and check if it feels wet 2 inches (5.1 cm) below the surface. If the potting medium is dry, pour water into the pot until you see water coming out from its drainage holes. Otherwise, avoid watering the seeds for that day.[7]
- Typically, you will have to water the seeds every other day, but it may vary depending on the climate in your area.
-
8Watch for sprouting within 1–2 months. As you check the pot each day, look for small green sprouts or leaves coming out from the potting medium, which will usually appear within 45 days. Continue watering the sprouts as normal as they continue to grow so they stay healthy..[8]
- It can take up to 1 year for seeds to sprout if the temperatures vary in your area.
- Some of your seeds may not produce sprouts.


Transplanting Seedlings to the Ground
-
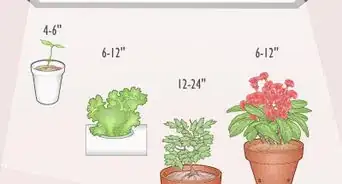
1Let the seedlings grow until they’re 3 ft (0.91 m) tall. Continue watering the seedlings and leaving them in a sunny location throughout the day so they can grow. Once a week, measure the height of the seedlings so you can track their sizes. Once they reach at least 3 feet (0.91 m), you can safely remove them from their pot to transplant them.[9]
- Usually, it will take about 1–2 years for the seedlings to grow large enough to transplant.
-
2Choose an empty 10 ft × 10 ft (3.0 m × 3.0 m) spot in your yard. Leave enough space around the seedling so the tree has room to expand its roots and branches. Make sure there aren’t any other plants in the area since they could absorb nutrients that the tree needs.[10]
- Rudraksha trees can grow up to 80 feet (2,400 cm) tall, so make sure there aren’t any utility lines or other branches in the way.
Variation: If you don’t have space in your yard to plant a rudraksha tree or temperatures drop below 50 °F (10 °C), you can also use a pot that’s twice the diameter and twice the depth of the first pot.
-
3Choose a place that gets 4 hours of shade. Watch the spot where you want to plant the tree throughout the day to make sure it gets at least 4 hours of shade. Try planting in a spot that’s near a larger established tree or near the south side of your home to help provide more shade. If you can’t find an area that receives shade, your tree won’t grow as well since it regularly thrives underneath canopy cover in the wild.[11]
-
4Dig a hole that’s twice the diameter and depth as the seedling’s pot. Place the hole in the middle of the growing area so there’s space for your tree to grow. Use a shovel to make the hole at least twice the depth and twice the width of the original pot, or else the tree won’t have room for the roots to expand.[12]
- If you’re planting more than 1 rudraksha tree, then space them 10 feet (3.0 m) apart.
-
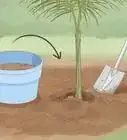
5Work the healthiest seedling out from the pot with a trowel. Look for the seedling that has the straightest trunk and doesn’t have any damaged or yellowed leaves. Carefully dig a circle around the seedling with a trowel to loosen the potting medium around the roots. Hold the base of the trunk and slowly pull the seedling up and out from the pot.[13]
- Be careful not to damage the tree’s roots since it could affect how well it grows when you transplant it into the ground.
-
6Fill in half the hole with a mixture of equal parts of sand and soil. Thoroughly combine the soil from the hole you dug with an equal amount of sand to help improve its drainage. Backfill the hole with the mixture until it’s about halfway full. Level the surface of the soil so the tree’s roots have a firm base to rest on.[14]
- You may also add an equal part of compost to the mixture to help add more nutrients to the soil.
-
7Put the seedling in the hole and fill in around it. Set the seedling in the middle of the hole and hold the trunk so it stays vertical. Use your shovel to add more of your sandy soil mixture around the roots until you completely fill the hole. Form the soil into a small mound around the base of the trunk so water doesn’t pool around the tree and make the roots waterlogged.[15]
- If you don’t keep the trunk vertical, the tree will grow crooked and won’t have as strong of a root system.
-
8Water the soil so the seedling’s roots don’t get stressed. Fill a watering can and slowly pour the water around the base of the trunk. If you notice the water pooling around the tree, allow it to soak into the soil before adding any more. Continue watering the tree until the soil feels wet about 6 inches (15 cm) below the surface.[16]
- If possible, use distilled or filtered water since it doesn’t contain any chemicals that are normally found in tap water.


Caring for the Tree
-
1Water the soil when it feels dry to the touch. Put your finger in the soil and check how it feels 3 inches (7.6 cm) below the surface. If the soil is still wet, allow it to dry out first. Otherwise, fill your watering can and pour it over the soil around the base of the trunk. Continue watering the tree until it feels wet 6 inches (15 cm) down.[17]
- Be careful not to overwater your tree since it could develop root rot and die.
-
2Provide 1⁄3 oz (9.4 g) of NPK fertilizer to the soil each spring. Get a 10-10-10 NPK fertilizer and measure out 1⁄3 ounce (9.4 g) with the provided measuring cup. Sprinkle the fertilizer in the soil around the tree in the early spring, making sure that it doesn’t touch the trunk. Immediately water the soil so the fertilizer soaks in and provides nutrients for the roots.[18]
- If the fertilizer touches the tree trunk, it may leave burn marks or cause the tree to die.
- Be careful not to over-fertilize since it can affect the chemical makeup of the soil and cause your tree to die.
-
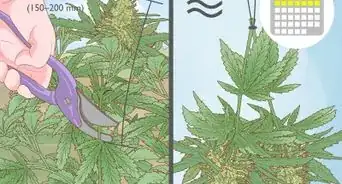
3Prune diseased and damaged branches from the tree. Look for branches that are broken or have yellow or brown leaves growing on them. Position a pair of hand pruners where the branch connects to the main trunk and squeeze the handles together to make a cut that’s flush to the bark. Continue cutting off any other diseased branches you notice.[19]
- Never remove more than a third of the tree’s growth since it could cause the tree to die.
Variation: As the tree grows larger, you may need to cut through the branches with a tree saw instead. Cut as close to where the branch connects to the trunk.
-
4Pull weeds whenever you notice them growing around the tree. Check for weeds at least once a week to see if there are any near the base of the trunk. Grab the weeds as close to the roots as possible and pull them straight out of the ground. If you leave behind any of the roots, carefully dig them out of the soil with a trowel so they don’t grow again.[20]
- You may apply a 2 in (5.1 cm) layer of mulch around the tree to help prevent weed growth and help the soil retain moisture so you don’t have to water as frequently.
-
5Pick fruit from the tree after it’s grown for 7 years. Start looking for round, blue fruits, known as blueberry beads, in the late summer or fall. While the fruits have an unpleasant bitter flavor, many people use the large seeds inside as beads in holy necklaces. If you want the seeds from inside the fruit, peel off the flesh and rinse the seeds in clean water.[21]
- You can either plant the seeds inside the fruit or use them to make rudraksha beads.


Warnings
- Rudraksha trees will not survive in climates that get below 50 °F (10 °C).[22]⧼thumbs_response⧽
Things You’ll Need
- 6 in (15 cm) pot
- Peat moss
- Perlite
- Watering can
- Shovel
- Trowel
- 10-10-10 NPK fertilizer
- Hand pruners


References
- ↑ https://scialert.net/fulltext/?doi=rjmp.2013.23.31
- ↑ https://youtu.be/u-6j2Eh3Bdk?t=72
- ↑ https://journals.ashs.org/hortsci/view/journals/hortsci/50/11/article-p1644.xml
- ↑ https://scialert.net/fulltext/?doi=rjmp.2013.23.31
- ↑ https://youtu.be/u-6j2Eh3Bdk?t=139
- ↑ https://scialert.net/fulltext/?doi=rjmp.2013.23.31
- ↑ https://youtu.be/u-6j2Eh3Bdk?t=182
- ↑ https://scialert.net/fulltext/?doi=rjmp.2013.23.31
- ↑ https://journals.ashs.org/hortsci/view/journals/hortsci/50/11/article-p1644.xml
- ↑ https://www.researchgate.net/publication/236628102_Survival_and_growth_of_seedlings_of_Rudraksh_Elaeocarpus_ganitrus_under_varied_canopy_conditions_after_transplant
- ↑ https://www.researchgate.net/publication/236628102_Survival_and_growth_of_seedlings_of_Rudraksh_Elaeocarpus_ganitrus_under_varied_canopy_conditions_after_transplant
- ↑ https://ufi.ca.uky.edu/treetalk/tree-planting-hole
- ↑ https://youtu.be/5zQHFFXDuZg?t=706
- ↑ https://youtu.be/u-6j2Eh3Bdk?t=105
- ↑ https://youtu.be/f1d-RGHS_LI?t=623
- ↑ https://extension.umn.edu/planting-and-growing-guides/watering-newly-planted-trees-and-shrubs
- ↑ https://assets.publishing.service.gov.uk/media/57a08d62ed915d3cfd0019ce/R6918innovative_forestry_guidebook.pdf
- ↑ https://www.researchgate.net/publication/327882325_Cultivating_Rudraksha_Elaeocarpus_sp_by_Local_People_in_South_Sumatra_Potential_Non-Timber_Forest_Product_for_Community_Forestry
- ↑ https://assets.publishing.service.gov.uk/media/57a08d62ed915d3cfd0019ce/R6918innovative_forestry_guidebook.pdf
- ↑ https://www.researchgate.net/publication/327882325_Cultivating_Rudraksha_Elaeocarpus_sp_by_Local_People_in_South_Sumatra_Potential_Non-Timber_Forest_Product_for_Community_Forestry
- ↑ https://pdfs.semanticscholar.org/7455/35d8337dd38ae3d3590f11ebb60034daf36c.pdf
- ↑ https://scialert.net/fulltext/?doi=rjmp.2013.23.31
About This Article