This article was co-authored by Sarah Fogle and by wikiHow staff writer, Hannah Madden. Sarah Fogle is a DIY Home Improvement Specialist and the creator of Ugly Duckling House. With over a decade of experience, Sarah specializes in beginner-friendly home remodeling projects. Sarah holds an MBA from Georgia State University. She has been featured in multiple publications including Better Homes and Gardens and Make Magazine. She has also partnered with brands such as Lowe's, Home Depot, and Martha Stewart Crafts.
There are 7 references cited in this article, which can be found at the bottom of the page.
This article has been viewed 61,298 times.
Hanging fabric on your wall draws attention to its intricate details and colors. Although it may seem like an easy solution, using nails to hang your fabric can cause damage to both your fabric piece and your walls, so you may be looking for an alternative. Try using velcro strips for a quick fix, clothespins for a more decorative option, or a curtain rod and hooks for heavy-duty fabric pieces. With these simple solutions, your fabric can be up on your wall in a single afternoon.
Steps
Attaching Adhesive Velcro Strips
-
1Lay your fabric face-down on a flat surface. Choose a clean, dry surface that is large enough to hold your fabric. Make sure your fabric lays flat without any creases or wrinkles.[1]
Tip: Consider ironing your fabric before you hang it to get rid of any wrinkles.
-
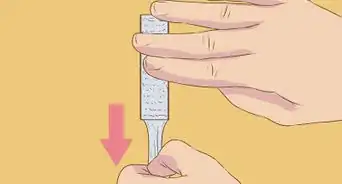
2Peel the back off of 5 to 6 self-adhesive velcro strips. Velcro strips have 2 sticky sides to attach to both the wall and your fabric. Take off the backs of 5 to 6 velcro strips.[2]
- If you have a small piece of fabric, you may only need 3 to 4 pieces of velcro.
Advertisement -
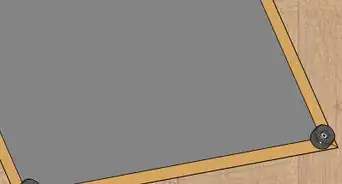
3Attach your velcro strips lengthwise to the top of your fabric. Start from one corner of your fabric and attach the velcro strips horizontally along the top width about 4 inches (10 cm) apart from each other. Make sure the top 2 corners have a velcro strip all the way to the edge.[3]
-
4Stick the velcro strips to your wall to hang your fabric. Peel the second backing off of your velcro strips to make them sticky. Pull your fabric taut and stick one end of it to your wall. Work along the width of the fabric and stick each velcro strip to your wall.[4]
- If your fabric is sagging, attach 1 or 2 more velcro strips in the middle of your fabric.


Hanging Fabric with Clothespins and Velcro Strips
-
1Mark the width of the fabric on your wall. Hold your fabric up to the wall and mark each end of it with a pencil. Make sure the fabric is in a fairly straight line by looking at each side and it is hanging exactly where you’d like it to be.[5]
- Have a friend hold up your fabric to make this easier.
-
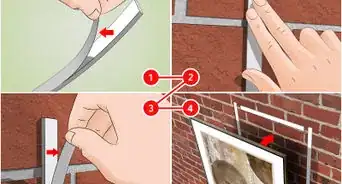
2Attach an adhesive velcro strip to the back of 5 to 6 clothespins. Put down your fabric and remove the backing from an adhesive strip. Attach one strip to the back of each of your clothespins. If the strip is longer than the clothespin, cut off the excess.[6]
- The amount of clothespins you need will vary based on how long your fabric is.
- You can use normal sized clothespins for large pieces of fabric or smaller craft clothespins for smaller pieces of fabric.
-
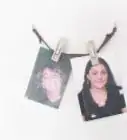
3Stick your clothespins in a line on the wall spanning the width of your fabric. Peel off the other backing from the velcro adhesive so the outer part is sticky. Stick a clothespin to the wall on the first mark you made. Continue down the line until you reach your second mark in a fairly straight line by following the marks you made on the wall. Space your clothespins about 6 inches (15 cm) apart.[7]
- If your fabric is heavy, space your clothespins about 3 inches (7.6 cm) apart.
-
4Clip the top of your fabric into the clothespins. Pick your fabric up and put one corner into the first clothespin. Continue down the line of clothespins until your fabric is secure. Make sure your fabric hangs straight and is tight between the clothespins.[8]
Tip: If your fabric sags low in the middle, add a few more clothespins to hold it up.


Hanging Fabric with a Back Pocket on a Curtain Rod
-
1Measure the width of your curtain rod and mark it on your wall. Use a tape measure to see how wide your curtain rod is. Make 2 marks on your wall to measure out where your curtain rod will hang. Make sure the marks are in line with each other on the wall by looking at each side one at a time.[9]
- You can hang your fabric above your bed for a headboard look if you’d like to.
- Use a thin curtain rod for smaller pieces of fabric or a thicker one for larger, heavier pieces of fabric. Most curtain rods have a weight limit, so if you are hanging a heavy piece of fabric, check on the box to see how much weight your curtain rod can hold.
-
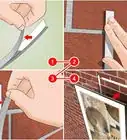
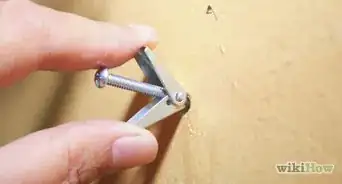
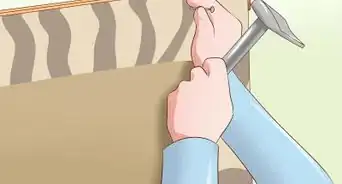
2Attach 2 large adhesive-backed hooks to each mark. Peel the backings off of your adhesive hooks and stick them onto the wall on your pencil marks. Make sure they are lined up with each other and sit straight on the wall.[10]
- You can find adhesive-backed hooks at most home goods or hardware stores.
- If you want a more permanent solution, you can use the hardware that came with your curtain rod to screw it into your wall. However, this will create holes in your walls.
-
3Thread the curtain rod through the back pocket of your fabric. Take one end of the curtain rod and push it through the pocket on your fabric. Push the rod all the way through your fabric until the 2 ends stick out.[11]
- If your fabric has loops on the back, you can also thread your curtain rod through those.
Tip: If your fabric doesn’t have a back pocket, you can hand sew one on by measuring the width of your fabric. Then, use a scrap of fabric that is as wide as your width and about 5 inches (13 cm) tall. Sew the scrap fabric to the top of your fabric piece with stitches on the top and bottom part, leaving the middle open for the curtain rod.
-
4Balance the curtain rod between the 2 hooks. Place each end of the curtain rod on either hook. Make sure the curtain rod is nestled into each hook so that it is secure. Move the fabric around on the rod if you need to so that it is centered.[12]
- If your fabric slides to one side, your hooks may not be in a straight line on the wall.


Things You’ll Need
Attaching Adhesive Velcro Strips
- Velcro strips
Hanging Fabric with Clothespins and Velcro Strips
- Velcro strips
- Clothespins
Hanging Fabric with a Back Pocket on a Curtain Rod
- Curtain rod
- Adhesive-backed hooks

References
- ↑ https://www.architecturaldigest.com/story/how-to-hang-a-tapestry
- ↑ https://www.youtube.com/watch?v=pc7EWrEPap0&feature=youtu.be&t=54
- ↑ https://www.youtube.com/watch?v=TFC0ca_bjgg&feature=youtu.be&t=163
- ↑ https://www.youtube.com/watch?v=TFC0ca_bjgg&feature=youtu.be&t=170
- ↑ https://www.architecturaldigest.com/story/how-to-hang-a-tapestry
- ↑ https://www.youtube.com/watch?v=xRznWOXMjEk&feature=youtu.be&t=29
- ↑ https://www.youtube.com/watch?v=xRznWOXMjEk&feature=youtu.be&t=38
- ↑ https://www.architecturaldigest.com/story/how-to-hang-a-tapestry
- ↑ https://www.remodelaholic.com/hang-art-renting/
About This Article