This article was co-authored by wikiHow Staff. Our trained team of editors and researchers validate articles for accuracy and comprehensiveness. wikiHow's Content Management Team carefully monitors the work from our editorial staff to ensure that each article is backed by trusted research and meets our high quality standards.
There are 12 references cited in this article, which can be found at the bottom of the page.
This article has been viewed 10,695 times.
Learn more...
Stucco is a cement-type siding used in homes around the world. It’s a strong, tough material, which also makes mounting signs or other attachments difficult.[1] While you could hang things on stucco without drilling, they won't be as secure as they would be if you used screws. Luckily, if you have the right tools, the process is much easier. With a masonry drill bit and masonry screws, you can hang your sign in no time.
Steps
Marking the Right Position
-
1Tape a piece of paper to the wall where you’re installing the sign. This is the easiest way to mark your drill holes for the sign. Go to the spot where you want to hang the sign and press a piece of plain paper at the correct height. Make sure the paper is level, then tape it down to hold it in place.[2]
- If you have a large sign with multiple brackets, place a piece of paper for each bracket.
-
2Hang the sign template if it comes with one. Some signs designed for stucco come with pre-made templates to show you where to drill. Take this template to the spot that you want to hang the sign and tape it onto the wall just like a plain piece of paper.[3]
- You might also be able to print a template at home. Try contacting the company that made the sign to see if they provide a template.
- Double check to make sure that the template is facing right-side up. If it’s the wrong way, your sign will be upside down.
- Use a level and confirm that the template is straight. If either it's crooked, your sign might be crooked as well.
Advertisement -
3Press the sign against the paper and hold it level. If you’re using plain paper as a guide, then you’ll need to figure out where to make the screw holes. Hold the sign up to the paper and press the brackets against the paper. Adjust the sign so it’s level.[4]
- If you work with a partner, this step will be easier. One person can adjust the sign while the other watches from further back to give directions.
- A template will already have marks for screw holes, so you can skip this step if you’re using one.
-
4Poke through the screw holes on the mount to mark the paper. With the sign pressed against the paper, either poke a sharp object through the screw holes or use a marker to make dots in the correct locations. These markings indicate where to drill.[5]
- If the sign already has studs attached on the back, then press them into the paper to make small holes. This shows you where to drill.
- If you’re using a template, then you can skip this step. You could also poke small holes through the markings to make drilling easier.


Drilling and Mounting the Sign
-
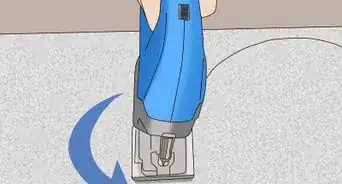
1Drill holes through the marks on the paper with a masonry drill bit. Attach a masonry drill bit to your power drill, which is designed to penetrate hard materials like stucco. Make sure the drill bit is smaller than the screws and anchors you’re using, about 90% of the size. Set your drill to a high power and drill into every mark you made on the paper to make pilot holes.[6]
- If you use anchors, the anchor packaging should indicate what size drill bit you should use for the pilot holes.
- Stucco is a tough material, so you may have to press hard to make the pilot holes. Be prepared to lean into the drill.
-
2Remove the paper or template from the wall. Once you make the screw holes in the wall, you don’t need the paper as a guide anymore. Peel off the tape and remove all the paper before moving on.[7]
- If you forget this step, you could always peel the paper off after you mount the sign.
-
3Fill each hole with caulk. Use a caulk gun and insert the tip into the drill hole. Squeeze the trigger gently and fill it entirely with caulk. This helps the anchors and screws adhere better. Repeat this for every screw hole you made.[8]
- Caulk comes in clear or white varieties. The appearance is the only difference. If the holes will be visible after the sign is mounted, then you might want to use a clear type. If the sign covers the holes, then white is fine.
-
4Insert an expansion anchor into the holes. Anchors provide extra support for the screws. Take an anchor and press it into each hole as far as you can. Then gently tap each anchor with a hammer until it’s flush with the wall.[9]
- Anchors aren’t required, but they’ll hold the sign much better than plain screws. Builders recommend using them whenever you mount something on stucco.
- Anchors are available at hardware stores or online. Get a size that matches the screws you’re using.
-
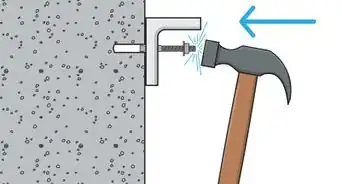
5Line up the sign’s mounting bracket with the screw holes. Hold the sign back up to the wall and line up its screw holes with the ones in the wall. Press it down and hold it in place over the holes.[10]
-
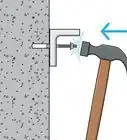
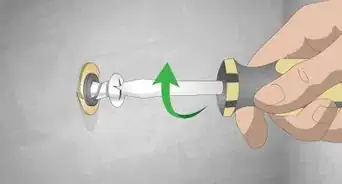
6Drill masonry screws through the bracket on a low drill setting. Keep the sign pressed against the wall. Drill masonry screws into each hole. Use a low drill setting for this step so you don’t crack the stucco.[11]
- Don’t over-tighten the screws either. This could damage the holes or stucco and loosen the grip on the sign.
- This part is much easier with 2 people. One can hold the sign while the other drills.
-
7Push the sign’s studs into the holes if it has them already. Some signs, especially ones designed for stucco, already have studs attached to them. In this case, you don’t need screws to attach the sign. Just line the studs up with the drill holes and press the sign in as far as it goes. Make sure all the studs are inserted the same amount so the sign is even and flat.[12]
- Some signs have spacers already installed on the studs to show how far to push. If the sign doesn’t have spacers, you might have to screw them on yourself, so check the packaging to make sure.
-
8Double-check to confirm that the sign is straight before the caulk dries. Once the caulk dries, it’ll be much harder to remove the screws and start over. As soon as you mount the sign, double-check with a level to make sure the sign is straight. Then take a step back and confirm that the sign is where you want it.[13]


Things You’ll Need
- Power drill
- Masonry drill bit
- Level
- Hammer
- Caulk and caulk gun
- Masonry screws
- Paper or template
- Tape
Warnings
- Always use caution when operating power tools. Wear gloves and goggles, and keep your fingers away from the moving parts.⧼thumbs_response⧽


References
- ↑ https://www.bobvila.com/articles/stucco-homes/
- ↑ https://youtu.be/yjWJbLyN8y4?t=19
- ↑ https://youtu.be/ocJOpoFNWjU?t=15
- ↑ https://youtu.be/yjWJbLyN8y4?t=38
- ↑ https://youtu.be/ocJOpoFNWjU?t=17
- ↑ https://www.onthehouse.com/ap227q/
- ↑ https://youtu.be/yjWJbLyN8y4?t=105
- ↑ https://www.onthehouse.com/ap227q/
- ↑ https://thestuccoguy.com/install-hose-reel-stucco-wall/#tab-con-6
About This Article