This article was medically reviewed by Jennifer Boidy, RN. Jennifer Boidy is a Registered Nurse in Maryland. She received her Associate of Science in Nursing from Carroll Community College in 2012.
There are 7 references cited in this article, which can be found at the bottom of the page.
wikiHow marks an article as reader-approved once it receives enough positive feedback. In this case, 89% of readers who voted found the article helpful, earning it our reader-approved status.
This article has been viewed 190,488 times.
Intravenous (IV) cannulation, also known as insertion of a peripheral venous catheter (PVC), is a fairly straightforward medical procedure. However, it does take some technique and preparation to complete safely. While different professionals may adapt the technique a bit to their own preferences, the basic procedure involves gathering appropriate materials and properly preparing the insertion site, inserting the needle, and performing appropriate maintenance and cleanup after the catheter is inserted.
Steps
Preparing to Insert a Cannula
-
1Gather materials. Cannulation requires some basic preparation and precaution. You will need to protect yourself from contact with a patient's body fluids and you need to protect the patient from injury or infection. In order to do this you will need:[1]
- Non-sterile gloves
- Tourniquet
- Antiseptic solution or alcohol wipes
- Local anesthetic solution (optional)
- Syringe with needle of appropriate gauge
- Venous access device
- Transparent dressing
- Paper tape
- Sharps container
-
2Choose the size of the cannula you will use. In general, the larger gauge needle you use, the higher the maximum flow rate of the fluid entering into the vein. Larger sized needles actually have a smaller number, so a 14 gauge is large, while a 22 gauge is small. Choose a size that can easily fulfill the purpose of the procedure but is not oversized.[2]
- The smallest needles are used in children. The largest are used for rapid blood transfusion.
Advertisement -
3Have a discussion with your patient. Get informed consent from the patient before you begin the procedure. This is usually done verbally. This builds up a rapport with the patient and allows for a less traumatic experience.[3]
- Introduce yourself to your patient.
- Verify your patient’s identity before starting any procedures.
- Explain the procedure to the patient and answer any questions they may have.
- Also take a quick history, primarily to exclude any allergy or sensitivity that the patient may have. This is particularly true for latex allergy. Should an allergy to latex be confirmed, then the tourniquet, gloves, and the cannula must be latex-free.
-
4Wash your hands and put on gloves. All medical professionals should follow thorough and proper hygiene practices before coming into contact with a patient. It is important to keep the risk of the patient getting infection to a minimum while inserting a cannula by washing your hands thoroughly and putting on gloves.
-
5Use proper personal protective equipment. Using gloves will not only protect your patient, but will also protect you from exposure to bodily fluids and potentially infectious material. A single pair of non-sterile gloves will probably be sufficient for this task.[4]
- Depending on your facility’s requirements, you may also wish to wear protective eyewear when inserting or removing an IV catheter.
-
6Apply the tourniquet around the patient's arm. In most cases, the patient’s non-dominant arm is preferable. The tourniquet should be placed on the arm just above the cannulation site. Tighten it appropriately, so that the patient's veins are highlighted.[5] Other methods for locating a good vein include:[6]
- Tapping on the vein to make it dilate.
- Asking the patient to open and close their fist.
- Using gravity to highlight the vein by holding the patient’s arm down.
- Applying mild heat to the site of the vein.
- If you have a difficult time finding a good vein on the arm you have selected, inspect the opposite arm. In some cases (e.g. if the patient has diabetes or a history of IV drug abuse), you may need to use an ultrasound to help you locate a good vein.[7]
-
7Clean the skin. Using an alcohol wipe or antiseptic solution, clear away pathogens on the skin around the vein used for cannulation. Apply the antiseptic to the site with friction for 30-60 seconds, and then allow the site to air dry for up to one minute. This will help prevent the risk of infection and reduce stinging.[8]
- If the area is really covered in hair, you may need to shave it. This will help you to identify the vein, get a clear aim at it, and it will help when cleaning the area.


Inserting the Needle
-
1Insert the cannula needle at an appropriate angle. The correct angle will depend on the size of the device and the depth of the vein.[9]
- If you are trying to access a small, superficial vein, you should use a small catheter (with a gauge of 22-24) and insert at an angle of 10°-25°.
- For a deeper vein, use a larger catheter and insert at an angle of 30°-45°.
- Make sure you insert the needle bevel up (with its eye is facing upwards). This means that the point of the needle is down against the skin.
-
2Advance the cannula until you achieve flashback. Hold the cannula in the front of its wings with your pointer and middle finger and in the back with your thumb. Advance it slowly into the skin until blood enters the base of the cannula. This is called a flashback, and it signals that you have entered a vein.[10]
- Once flashback occurs, reduce the angle of the needle to avoid puncturing the posterior wall of the vein.
-
3Advance the plastic piece of the cannula. The needle should now be held stationary while the plastic component of the cannula is advanced another 2-3 mm into the vein. The goal is to get the plastic sheath into the vein, and keep it there, while the needle is removed.[11]
- Keep advancing the plastic component of the cannula until the plastic tube is fully inserted. The "hub" of the plastic component will hit the skin when it is all the way in.
-
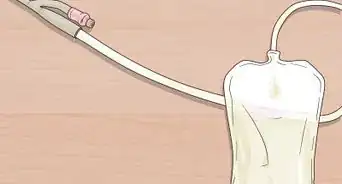
4Allow blood to flow into an attachment. Remove the tourniquet from the patient's arm. Remove the needle from the base of the cannula, leaving the plastic component in sight. Allow blood to flow into the base of the cannula, so there is less risk of air going into the vein if something is injected through the cannula, called an air embolism.
- Then cap the cannula or attach test tubes or other supplies.
-
5Find another vein, if your catheterization is unsuccessful. If you are unable to catheterize a vein successfully, never attempt to reinsert the needle. This could result in fragmentation of the catheter and embolism in the patient.[12]


Finishing the Procedure
-
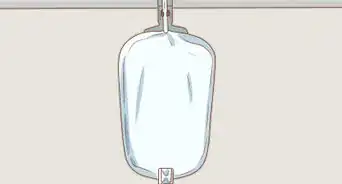
1Secure the cannula with an appropriate dressing. If the cannula needs to stay in the vein, you will need to secure it. Using transparent dressing and tape, or a specialized dressing that comes with the cannula, secure the venous access device to the skin. Attach the cannula to the skin so that it is comfortable for the patient but stays in place in the vein. You may need to tape attachments to the skin as well, for example a tube leading to another attachment point.[13]
- Place a label over the transparent dressing with the date, time, and any other information required by your facility.
- If you are simply using the cannula to get several samples of blood, for example, extensive securing is not required. However, you do need to be sure that it stays in place long enough to get your sample, so you may want to tape it down a bit.
-
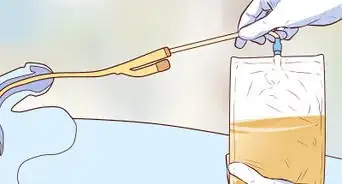
2Inspect and clean the cannula. First, pull back on the syringe to withdraw a little blood. This will confirm that the cannula is still in place inside the vein. Then flush the cannula with a flushing solution, usually normal saline or heparin. This will assure that the site is clean and will check for adequate positioning within the vein.[14]
- To flush the cannula you will need 5-10ml of saline in a syringe. This may come in a pre-filled syringe or you may need to fill it yourself. Flush the cannula by attaching the syringe of saline onto the cannula port, inject the saline into the port, detach the syringe, and then close the port.[15]
- If you are returning to put an injection into a cannula, flush the it with saline solution again. This will assure that the cannula is still in place.
-
3Recatheterize, if necessary. If you do not observe blood in the flashback chamber when you inspect the cannula, you will need to recatheterize the vein. If there is no flashback, this may mean that the catheter has punctured the posterior wall of the vein. It can also occur in patients with severe hypotension (low blood pressure).[16]
- Withdraw the device until it is just below skin level, and attempt to recatheterize.
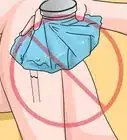
- If swelling develops at the site, remove the device and release the tourniquet. Apply direct pressure to the site for 5 minutes.
-
4Clean up after the procedure. Dispose of the needle in a sharps container to reduce the risk of a needle stick. Dispose of any other waste appropriately.[17]
- Document the procedure in the appropriate set of notes.
- If removing the cannula, place a piece of gauze on the injection site and keep it in place with medical tape or a bandage. This will assure that the patient is not bleeding after the procedure.


Warnings
- Never perform this procedure unless you are trained. This article is intended for reference only and should not be used by untrained persons to perform this procedure.⧼thumbs_response⧽
- In the case of needle stick injury, contact appropriate occupational health professional for advice.⧼thumbs_response⧽
- This procedure uses sharp objects, so care should be taken while working with them.⧼thumbs_response⧽


References
- ↑ https://emedicine.medscape.com/article/1998177-periprocedure
- ↑ http://www.cetl.org.uk/learning/print/cannulation-venepuncture-print.pdf
- ↑ https://www.youtube.com/watch?v=vE99rZ7JT3Q
- ↑ https://emedicine.medscape.com/article/1998177-technique
- ↑ http://www.cetl.org.uk/learning/print/cannulation-venepuncture-print.pdf
- ↑ https://emedicine.medscape.com/article/1998177-technique#c2
- ↑ https://emedicine.medscape.com/article/1998177-technique#c2
- ↑ http://www.cetl.org.uk/learning/print/cannulation-venepuncture-print.pdf
- ↑ https://emedicine.medscape.com/article/1998177-technique#c2
- ↑ http://www.cetl.org.uk/learning/print/cannulation-venepuncture-print.pdf
- ↑ https://www.bettersafercare.vic.gov.au/clinical-guidance/neonatal/peripheral-intravenous-iv-catheter-insertion-for-neonates#goto-procedure
- ↑ https://emedicine.medscape.com/article/1998177-technique#c2
- ↑ https://emedicine.medscape.com/article/1998177-technique#c2
- ↑ https://emedicine.medscape.com/article/1998177-technique#c2
- ↑ http://geekymedics.com/how-to-perform-cannulation-osce-guide/
- ↑ https://emedicine.medscape.com/article/1998177-technique#c2
- ↑ http://www.cetl.org.uk/learning/print/cannulation-venepuncture-print.pdf
About This Article
To insert a cannula, first locate a suitable vein, using a tourniquet on the patient's arm if necessary. Then, insert the needle at an angle of 10-25 degrees for a superficial vein or 30-45 degrees for a deeper one. Next, advance the cannula until you have entered a vein and blood enters the base. Now, advance the plastic component another 2-3 millimeters while holding the needle stationery. Once you've done that, remove the tourniquet if you used one, and remove the needle from the base. Allow blood to flow in to avoid the risk of air going into the vein first. Finally, secure the cannula with an appropriate dressing. For more tips from our Medical co-author, including how to hygienically prepare for the procedure, read on!


Medical Disclaimer
The content of this article is not intended to be a substitute for professional medical advice, examination, diagnosis, or treatment. You should always contact your doctor or other qualified healthcare professional before starting, changing, or stopping any kind of health treatment.
Read More...