This article was co-authored by wikiHow Staff. Our trained team of editors and researchers validate articles for accuracy and comprehensiveness. wikiHow's Content Management Team carefully monitors the work from our editorial staff to ensure that each article is backed by trusted research and meets our high quality standards.
This article has been viewed 39,299 times.
Learn more...
Fender flares are unique extension accessories for trucks and SUVs—some snap directly onto the fender, while others require you to drill holes through the body of your vehicle. They fit over the fender directly above the wheels to cover rust, add some style, and—in some areas—meet legal requirements. As long as you choose the right fit you can install flares of various colors, styles, and textures to give your vehicle a fresh new look.
Steps
Positioning the Fender Flares
-
1Remove existing flares from your vehicle. If your vehicle already has fender flares in place, remove them by unscrewing the bolts that attach them to the body. These bolts are typically located on the backside of the fender—reach behind the fender to access them. After removing them, peel off the flare, starting from the frontmost part of the fender and move backward to the rear of the vehicle.[1]
- Most fender flare bolts are 10 millimetres (0.39 in) and can be removed with an Allen tool. If you don't have an Allen tool, head to a home hardware store and find one that aligns with the bolts that fasten your existing flares.
-
2Purchase fender flares designed for your vehicle. Always read the manufacturer's listing for the flare set you purchase to determine that they are compatible with your vehicle and the fenders you plan to use them on. Always align your flares against the fenders of your vehicle before installing them.[2]
- Stick with material that can withstand UV ray exposure for the most longevity.
- Make sure the bottom edge of each flare aligns with the bottom of the fender and the front of the flare fits flush against the bumper.
- If you're purchasing flares for debris protection, make sure they extend past the edge of the fender. For aesthetic flares, you don't have to worry about size.
- Select flares designed for painting if you plan to change their colors. You can also select pre-painted products.
Advertisement -
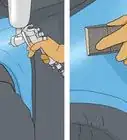
3Attach the flare trim to the flares via its adhesive backing. Start removing about 1 inch (2.5 cm) of the adhesive tape from the bottom of the trim and attach the trim to the outer edge of the flare. Continue removing the tape and pressing the trim over the flare until it's completely adhered to it.[3]
- Repeat this process for all of your flares.
-
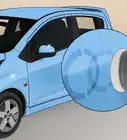
4Connect the outer bolts to the fender flares. Insert the bolts into the holes that connect the flares to the fender. Place the washers on top of the bolts so that the smooth edge touches the paint. Now, place the nut on top of the bolt and tighten it with an Allen tool.[4]
- Fender flares typically come with an Allen tool to attach the bolt. If you don't have one, head to the home hardware store and purchase one that matches your bolt size.
-
5Remove the screws from the bottom of the fender. These screws are located on the bottom-most part of the fender well closest to the wheel well, which is the space that holds the wheel. Use a screwdriver to turn them counterclockwise until they come loose.[5]
- Make sure the screwdriver matches the screw size. For example, 7⁄32 inch (0.56 cm) screws require a 7⁄32 inch (0.56 cm) screwdriver.
- If you're unsure of screw size, check your car manufacturer's manual.
-
6Remove support beam bolts from rear wheel wells. When you're installing fender flares onto rear fenders, you need to remove the support beam bolts first. Now, use an Allen tool to remove the bolts. Afterward, place the flare onto the fender and loosely reinsert the bolts to hold it in place.[6]
- Always use the corresponding Allen tool—for example, a 10 millimetre (1.0 cm) tool for 10 millimetre (1.0 cm) bolts—to remove the bolts.


Drilling Fender Flare Holes
-
1Mark the bottom fender flare hole location onto the plastic bumper. Place the fender flare against your vehicle's body and hold it steady. Now, mark the point where the bottom hole on the flare aligns with your plastic bumper with a small circle.[7]
- Use an erasable marker to mark the hole location.
- If your vehicle body already has fender flare holes, skip this part and install the fender flare.
-
2Draw a mark onto the position where the frame hole touches the fender flare. While holding the fender flare in place over your vehicle's frame, locate the hole in the frame that touches your fender flare. Now, use your erasable marker to mark this location.[8]
- Be sure that you mark the flare with a circle to ensure you drill through the centermost point.
-
3Drill holes in the fender flare that align with your vehicle's frame holes. Attach a 1⁄4 inch (0.64 cm) drill bit to your electric drill. Now, create 1⁄4 inch (0.64 cm) holes through the fender flare and bumper at each of the marks, taking care to drill directly through the center of each mark.
- Always use your marks as a guide for the holes.


Attaching Your Fender Flares
-
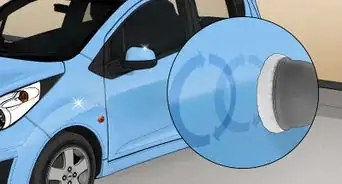
1Attach the fender flare bracket with the provided hardware. Align your fender flare with the vehicle and attach the provided hardware into the holes to attach it to your vehicle's frame. The exact hardware varies by product—be sure to follow the manufacturer's instructions.[9]
- If your fender flares come with plastic fasteners, press them into the flare at the locations designated by the manufacturer.
- If your fender flare comes with a U-clip, attach it to the flare bracket to hold it in place.
-
2Reinstall the fender screws with a screwdriver. Insert any screws you removed from the bottom of the fender close to the wheel well and retighten them by turning them counterclockwise. Typically, there will be 2 screws to reattach, but this amount varies by vehicle.[10]
- Be sure to tighten the screws so they're flush with the fender
-
3Install plastic fasteners onto your flare if they are provided. If your fender flare model comes with plastic fasteners, attach them to their appropriate locations by pushing them into place. Check your manufacturer's manual if you're having trouble finding the locations to snap the fasteners on.[11]
- Some plastic fasteners must be installed using a #2 Phillips screwdriver.


Things You'll Need
- Fender flares
- Allen tool
- Screwdriver
- Erasable marker
- Electric drill
- 1⁄4 inch (0.64 cm) drill bit


References
- ↑ https://www.smittybilt.com/docs/installation/17191.pdf
- ↑ https://www.smittybilt.com/docs/installation/17191.pdf
- ↑ https://youtu.be/XOdcrwtexQ0?t=164
- ↑ https://youtu.be/XOdcrwtexQ0?t=186
- ↑ https://www.realtruck.com/blog/how-to-install-true-edge-fender-flares/
- ↑ https://www.realtruck.com/blog/how-to-install-true-edge-fender-flares/
- ↑ https://www.realtruck.com/blog/how-to-install-true-edge-fender-flares/
- ↑ https://www.realtruck.com/blog/how-to-install-true-edge-fender-flares
- ↑ https://www.smittybilt.com/docs/installation/17191.pdf
About This Article