This article was co-authored by Allen Lee and by wikiHow staff writer, Hunter Rising. Allen Lee is a Home Improvement Specialist and the Owner of Honest Lee Handyman Services, a licensed and insured handyman business servicing Sacramento, California, and surrounding areas. Working with homeowners and businesses to get their small repairs done in a timely and efficient manner, Honest Lee Handyman Services provides gutter and dryer vent cleaning along with fixture, fence, drywall, and toilet repairs.
There are 14 references cited in this article, which can be found at the bottom of the page.
This article has been viewed 67,767 times.
If you want a new faucet in your kitchen, you don’t need to call a plumber to do the job. Installing a kitchen faucet can be done easily in a single afternoon as long as you have a few wrenches. After removing the existing faucet, all you need to do is put the new one in its place. Once you’re done, you’ll have a new faucet that will make your kitchen sink pop!
Steps
Removing the Existing Faucet
-
1Close the water valves and unplug your garbage disposal underneath the sink. Open the cabinets under your sink and find the knobs that control the water valves attached to your pipes.[1] Turn the knobs so they’re perpendicular to the pipes to close them. If you have a garbage disposal or P-trap under your sink, unplug it or disconnect the power before moving on.[2]
- Depending on your sink, you may have 1 or 2 water valves.
- If the valves haven't been turned off in some time, they have a potential to start leaking when you turn them off. If this happens, you may need to call a professional to replace them.[3]
-
2Turn on your existing faucet to relieve any water pressure. After turning off the valves, lift or turn the handles to your existing faucet to clear out any water that may still be trapped in the pipes.[4]
- Keep the faucet on so there isn’t a buildup of pressure in your valves.
Advertisement -
3Loosen the nuts attached to the water lines. Your water lines are hoses connected together with hexagonal nuts. Use an adjustable wrench to unscrew the nuts from the hoses until you can start turning them in your fingers. Detach all the hoses from your current faucet.[5]
- Place a bucket or towel underneath your valves in case any water still leaks out.
-
4Use a basin wrench to remove the nuts from the faucet. A basin wrench is a long-handled tool that makes it easier to reach underneath your sink. Adjust the length of the wrench handle and place the jaws of the wrench around the nut underneath your faucet. Grab the nut from the left side and turn the wrench counterclockwise to loosen it completely.[6]
- Basin wrenches can be purchased from your local hardware store.
Tip: Have someone help you hold the faucet from above so it doesn’t spin while you loosen the nut.
-
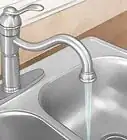
5Pull the faucet out of the sink and clean any grime or residue. Once you remove the nuts from the water lines and the faucet, simply pull the faucet up and out of the hole in your sink. Use a multipurpose cleaner and an old washcloth to lift up any grime that may have developed around the old faucet.[7]
- If you’re having trouble removing any grime, let the cleaner sit on it for 1 minute before trying to scrub it off again.


Putting in the New Faucet
-
1Assemble the new faucet if needed. Choose a new faucet that matches the style of your old faucet. Wrap 3 layers of Teflon tape around the threading of the supply tubes that came with your faucet. Then screw the supply tubes onto the faucet fixture using an adjustable wrench. Don’t use any excessive force when you attach the tubes.[8]
- Find a faucet that matches the color of your other hardware, such as your appliances or cabinet handles.
- Each faucet is different. Carefully follow the instructions inside the packaging to make sure you’re assembling it correctly.
-
2Cover any additional holes in your sink with trim rings or a deck plate. Some sinks will have multiple holes to accommodate different types of faucets. If you’re not using all of the holes, set trim rings or a deck plate over the top of them. Align the deck plate so it isn’t crooked before securing it underneath your sink with the nuts provided in the packaging. Tighten the nuts under your sink using an adjustable or basin wrench.[9]
- Deck plates and trim rings can be purchased at your local home improvement store.
- You can’t use a faucet that requires more holes than what your sink already has. For example, a faucet that requires 3 holes cannot be put into a sink with 1 hole.
Tip: If you have additional holes left in your sink, you can use them for a built-in soap dispenser or a sink sprayer.
-
3Feed the supply tubes into the hole and position the new faucet. Align the faucet over the holes in your sink. Feed the tubes through the center hole one at a time so they’re easier to manage. After the tubes are in, lower the faucet onto the sink and hold it in the position where you want to secure it.[10]
- Put the tubes through the hole slowly in case there are any sharp edges that could cut through them.
- Faucets with 2 handles usually have a 3-hole setup, while those with a single handle only require 1 hole.
-
4Secure the faucet by tightening the nuts with your basin wrench. Have a helper hold the faucet from above the sink so it doesn’t shift or move around. Screw on the nut with your fingers first, and then use your basin wrench from the right side to turn it clockwise. Don’t use too much force while tightening the nuts.[11]
-
5Connect the sink sprayer to the faucet if you have one. Set the sprayer base in one of the holes in your sink and screw on the mounting nut to secure it in place. Feed the sprayer hose through the base and attach the end of the hose to the bottom port on your faucet. Depending on the type of sprayer, you may just have to push the hose in place or screw it together.
- Your faucet needs to come with a sprayer in order to attach one to your sink.
-
6Attach the water lines to the faucet supply hoses and reconnect your disposal. Hold the supply hoses from the faucet up to the water lines with the nuts attached to them. Screw the nuts onto the supply lines until they’re finger-tight. If you had to disconnect a garbage disposal earlier, plug it back in.[12]
- Wrap 3 layers of Teflon tape around the threading of each supply line if you want additional protection from leaks.
- For faucets with 2 handles, make sure the hot water line is connected to the side that controls hot water, and the cold water line is attached to the cold handle.


Cleaning out Debris
-
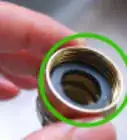
1Unscrew the aerator from the end of the faucet. The aerator is a thin layer of metal mesh used to help control the water flow, and is located on the end of the faucet. Turn the aerator counterclockwise to remove it from the end of your faucet.[13]
- Check the instruction manual for your faucet to see how to remove it from your exact model.
-
2Turn the water valves back on. Rotate the valve so they’re in line with the supply tubes again. Check if there are any leaks coming out where the supply lines and valves connect. If so, turn the valve off and tighten the nuts with your wrench again.[14]
- Keep a towel or bucket underneath your valves until you’re sure they don’t leak anymore.
-
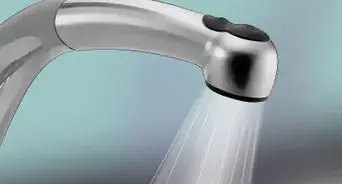
3Turn on your faucet and let the water run for 2-3 minutes. Lift or turn the handles on your faucet so the water runs out. Keep the faucet on for a few minutes so any debris or dust inside gets flushed out.[15]
- If your faucet has 2 handles, turn both of them on to clear out all of the lines.
Tip: Check underneath your sink while the water is running to see if you notice any leaks. If so, tighten the nuts on the water lines.
-
4Replace the aerator. Turn off your faucet and screw the aerator clockwise back into place. Once it’s reattached, you can use your new faucet![16]


Expert Q&A
Did you know you can get expert answers for this article?
Unlock expert answers by supporting wikiHow
-
QuestionDo I have to install a kitchen faucet myself?
 Allen LeeAllen Lee is a Home Improvement Specialist and the Owner of Honest Lee Handyman Services, a licensed and insured handyman business servicing Sacramento, California, and surrounding areas. Working with homeowners and businesses to get their small repairs done in a timely and efficient manner, Honest Lee Handyman Services provides gutter and dryer vent cleaning along with fixture, fence, drywall, and toilet repairs.
Home Improvement SpecialistIf you don’t feel comfortable replacing a faucet or are confused by any of the pipes under your sink, contact a plumber to come do the job for you.
Support wikiHow by unlocking this expert answer.
-
QuestionWhat do I do if my angle stops are leaking?Allen LeeAllen Lee is a Home Improvement Specialist and the Owner of Honest Lee Handyman Services, a licensed and insured handyman business servicing Sacramento, California, and surrounding areas. Working with homeowners and businesses to get their small repairs done in a timely and efficient manner, Honest Lee Handyman Services provides gutter and dryer vent cleaning along with fixture, fence, drywall, and toilet repairs.
Home Improvement SpecialistUnfortunately, this is a common issue with older valves. I suggest you hire a professional to replace the angle stops before you continue doing any work.Support wikiHow by unlocking this expert answer.
Things You’ll Need
- Bucket
- Towel
- Adjustable wrench
- Basin wrench
- Multipurpose cleaner
- Cleaning cloth


References
- ↑ Allen Lee. Home Improvement Specialist. Expert Interview. 10 July 2020.
- ↑ https://youtu.be/TEB_QoXJS1k?t=47
- ↑ Allen Lee. Home Improvement Specialist. Expert Interview. 10 July 2020.
- ↑ https://youtu.be/TEB_QoXJS1k?t=50
- ↑ https://youtu.be/TEB_QoXJS1k?t=58
- ↑ https://youtu.be/ZEXI9Gehcvo?t=13
- ↑ https://www.todayshomeowner.com/video/how-to-replace-a-kitchen-faucet/
- ↑ https://youtu.be/Hj8f0oTEyZY?t=249
- ↑ https://youtu.be/TEB_QoXJS1k?t=87
- ↑ https://youtu.be/TEB_QoXJS1k?t=91
- ↑ https://youtu.be/Hj8f0oTEyZY?t=286
- ↑ https://youtu.be/Hj8f0oTEyZY?t=291
- ↑ https://www.familyhandyman.com/plumbing/faucet-repair/tips-for-installing-a-faucet-the-easy-way/view-all/
- ↑ https://www.todayshomeowner.com/video/how-to-replace-a-kitchen-faucet/
- ↑ https://youtu.be/TEB_QoXJS1k?t=122
- ↑ https://youtu.be/TEB_QoXJS1k?t=132
About This Article

To install a kitchen faucet, start by closing the water valves on your old faucet and unplugging the garbage disposal if you have one. Then, use a basin wrench to remove the nuts from the faucet and pull the faucet out from the sink. Once you've removed your old faucet, assemble the new faucet you purchased and cover up any holes in your sink that you won't be using with trim rings or deck plates. Next, align your new faucet with the holes in the sink and feed the supply tubes through the center hole. Finally, secure the faucet by tightening the nuts and attaching the water lines to the faucet supply tubes. To learn how to clean out debris when you're replacing a kitchen faucet, scroll down!