This article was co-authored by wikiHow Staff. Our trained team of editors and researchers validate articles for accuracy and comprehensiveness. wikiHow's Content Management Team carefully monitors the work from our editorial staff to ensure that each article is backed by trusted research and meets our high quality standards.
There are 8 references cited in this article, which can be found at the bottom of the page.
This article has been viewed 137,279 times.
Learn more...
Over time, the hose that connects the water supply to the faucet in your kitchen may leak or wear out, and if this happens, you'll need to replace it. Depending on your setup, there may be as many as 3 hoses under your sink: 1 for the cold water, 1 for the hot water, and 1 for the pull-out hose. Over time, these hoses can break or start to leak, and replacing them with new ones can be a great DIY project for you. By doing it yourself, you'll save money because you won’t need to call a plumber, and you'll cut back on your water bill.
Steps
Getting Your Work Area Ready
-
1Clean out your work area. Remove everything from under the sink, including soaps, garbage cans, cleaners, and anything else you might be storing under there. When the area has been cleared, lay down an old towel to protect the shelf from water damage in case any of the pipes, hoses, fittings, or other components happen to leak.[1]
- Clearing out the area will give you an easier area to work in, and protect items from water.
-
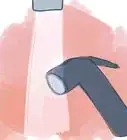
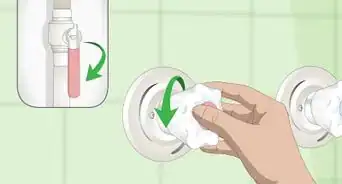
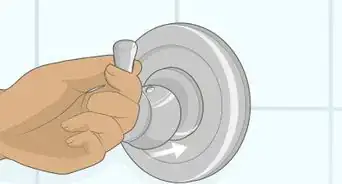
2Shut off the water. This should always be the first thing you do before starting any plumbing work, and you won’t be able to replace the hoses unless the water is off.[2] Turn the water shutoff valve to the right (clockwise) to turn off the water.
- To find the shutoff valve, simply follow the pipes attaching the faucets to the supply line. Near where they connect, there should be a shutoff valve for the hot and cold water.
Advertisement -
3Drain excess water from the pipes. This will prevent water from leaking everywhere when you remove the hoses. To drain out the excess water, simply turn on the taps for the hot, cold, and pull-out faucets until the water runs dry.
- This will get standing water out of the hoses and pipes and relieve pressure from the line.[3]
- If water still comes out of the faucet after turning off the valve, you’ll need to replace the shutoff valve before disconnecting the supply line(s). Test the temperature of the water to determine which valve isn’t working if you have 2 faucet handles. Be sure to turn off the main water supply before replacing the shutoff valve.


Replacing a Supply Line Hose
-
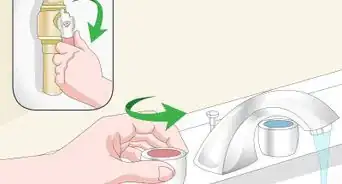
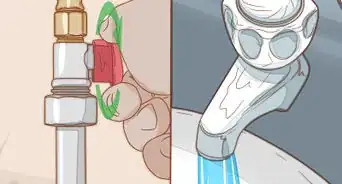
1Detach the supply hose from the water supply. The supply line hose is the hose that connects the faucet to the main water supply. This could be a plastic hose, a coiled metal hose, or it could even be a solid metal tube. There will be separate hoses for the hot and cold, so make sure you disconnect the one that you need to replace.
- It’s common for some water to drip when the hoses are disconnected. Place a pan under the sink to catch drips.
- To disconnect the hose, start by loosening the lock nut attaching the hose to the water supply. You'll probably need to loosen it with the adjustable wrench first.[4]
- To loosen the nut, turn it to the left (counterclockwise).
- Once you’ve loosened the nut with the wrench, you can twist it off the rest of the way by hand.
- If you're not sure which hose is for which supply, the hot water is typically on the left, and cold on the right.
-
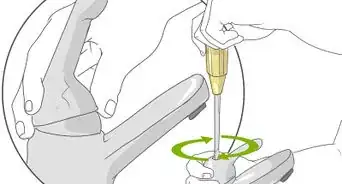
2Detach the hose from the faucet. Follow the supply hose from the water supply up to where it’s attached to the faucet. When you find the lock nut, use the basin wrench to access the nut and loosen it off. If the supply line connects to copper tubing, hold the tubing in 1 hand while loosening the nut with the other to prevent the copper from twisting or breaking.[5] Loosen the nut by turning it to the left (counterclockwise).
- When you’ve loosened the nut, you can twist it off the rest of the way by hand.
- Once the second nut is disconnected, you'll be able to remove the old hose.
- The basin wrench is necessary here because it allows you to access the hard-to-reach nut under the sink. Because the handle of the wrench can pivot, it lets you turn the wrench and loosen the nut from a more comfortable position.
-
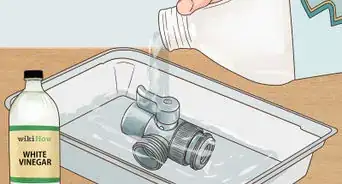
3Purchase a new hose with the same measurements. It’s actually best to purchase a replacement hose after you’ve removed the original one. Take the original hose to the hardware store and buy a replacement that will be a perfect match.[6]
- If you’re replacing more than 1 line, be sure to mark which one goes where on the valve and faucet connector.
- You don’t have to buy the same style of hose, but it does have to be the same length as the original, and the diameter of the hose and fittings must also be the same.
-
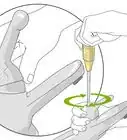
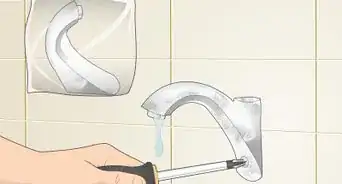
4Dry and tape the threads. Use the rag to dry off the threaded pipe ends where the supply line hose attaches to the water supply and faucet. When the threads are clean and dry, wrap them with thread sealing tape. Make sure the tape doesn’t extend beyond the end of the pipe.[7]
- Thread sealing tape lubricates threads and helps to form a stronger seal between joints. This will make your new hose easier to attach, and help prevent leaks.
-
5Attach the hose to the faucet. Reach up with the hose and attach the faucet end of the hose to the same connection you removed the original from.[8] With your hand, tighten the nut by turning it to the right (clockwise) just until it’s snug. Be careful not to kink the hose!
- When you’ve tightened it by hand as much as you can, finish screwing on the nut with the basin wrench by turning it a quarter turn. Do not overtighten, as this can damage the threads.
- Make sure you attach the right end, because the diameter of the hose is probably different where it connects to the faucet versus the water supply.
-
6Attach the hose to the water supply. Once the faucet end has been connected, you can attach the new hose to the water supply. Tighten the nut by hand (turn it to the right), and then finish tightening it with the adjustable wrench.
- Do not turn the nut more than a quarter turn with the wrench, as too much tightening can cause damage.
-
7Turn on the water and test the hose. Turn the water back on by turning the shutoff valves to the left (counterclockwise). When the water is back on, turn on the faucets to run the water. As the water runs, check for leaks or other problems.[9]
- After turning on the water, it may take a moment for the water to come out the taps, and it may sputter for a minute.


Replacing a Pull-Out Faucet Hose
-
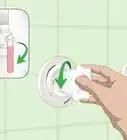
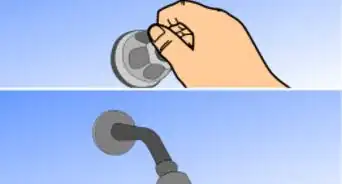
1Detach the hose from the water pipe. With the adjustable wrench, turn the nut attaching the hose to the water pipe. To loosen the nut, turn it to the left (counterclockwise). Once you’ve loosened the nut with the wrench, unscrew it by hand the rest of the way.
- If there is no nut to loosen, you may have a different type of connection. If there's a gray button where the hose and water supply connect, press the button to release the hose.[10]
- Otherwise, you may have a collet-style hose. In that case, hold the ring in place, gently push the hose deeper into the connection to release it, and then pull the hose out.
-
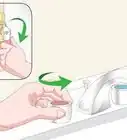
2Remove the weight from the hose. Every pull-out faucet has a weight attached to the hose that draws the hose back in when you replace the faucet into the holder. Make a mark on the hose where the weight is located so you can replace it later. Before you can remove the hose, you'll have to remove the weight.
- Some weights will slide off the end of the hose. Others will snap in and out of place. For the rest, unscrew the screws holding the two sides together and pull the sides apart to remove them from the hose.
-
3Pull out the hose and detach it from the pull-out faucet. Once the weight has been removed, you can pull the faucet and the hose out through the holder. Then, you can remove the hose from the faucet head to replace it.
- To remove the faucet from the hose, use a wrench to loosen the nut attaching them, and then hold the nut in place as you unscrew the faucet head.[11]
-
4Purchase a new hose. To make sure that you get the same style and size of hose, take the old hose with you to the home or hardware store. The three main styles of hose are threaded, which uses a nut to secure the attachment, quick disconnect, which will have a button that clicks to secure it, or collet, which won’t have a nut or a button.[12]
- If you want to buy the hose in advance but aren't sure what style you have, you can purchase a universal style that will come with multiple attachments and adaptors.
-
5Attach the new hose to the faucet. Use a clean towel or rag to clean and dry the threads and connections on the hose and faucet. Wrap the threads with plumbing tape to lubricate the connection and form a good seal. Insert the hose into the faucet head, hold the nut, and screw the faucet head on. Tighten the nut by turning it to the right (clockwise) by a quarter turn.[13]
- Take care not to kink the hose when you replace it.
- The threads will be located on the connection that gets inserted into the other end.
-
6Install the hose, faucet head, and weight. Thread the hose through the hole in the holder. When the hose has been pulled through the hole the entire way, set the faucet head in its position in the holder. Reattach the weight by sliding it onto the new hose.
- For weights that screw together, clamp the two sides together over the hose and screw them back together.
-
7Attach the hose to the water pipe. For threaded hoses, butt the connections together and tighten the nut by screwing it to the right (clockwise). Then use a wrench to tighten it a quarter turn.
- For quick disconnect hoses, simply insert the male end in until it clicks.
- For collet hoses, hold the ring in place and push the hose into the connection.[14]
-
8Turn on the water and test the hose. Once the water is on, turn on the faucet to run the water. Look for leaks, and make sure the water is running through the hose and faucet properly.[15]


Things You'll Need
- Adjustable wrench
- Basin wrench (for supply line hoses)
- Old towel
- Rag or cloth
- Plumbing tape


References
- ↑ https://www.youtube.com/watch?v=3SH1TYsASJg
- ↑ http://www.handymantips.org/kitchen-faucet-pull-out-hose/
- ↑ http://www.planitdiy.com/how-to/plumbing/how-to-replace-a-kitchen-faucet/
- ↑ http://www.homedepot.com/c/how_to_install_a_single_handle_kitchen_faucet_HT_PG_KI
- ↑ https://www.youtube.com/watch?v=0fwa3B6gV0M
- ↑ https://www.youtube.com/watch?v=0fwa3B6gV0M
- ↑ https://www.youtube.com/watch?v=6TDwJmWZXIw
- ↑ http://www.planitdiy.com/how-to/plumbing/how-to-replace-a-kitchen-faucet/
- ↑ http://www.familyhandyman.com/plumbing/faucet-repair/how-to-fix-a-leaking-sink-sprayer/view-all
- ↑ http://www.handymantips.org/kitchen-faucet-pull-out-hose/
- ↑ https://www.youtube.com/watch?v=2YZJZfUlnVc
- ↑ http://www.handymantips.org/kitchen-faucet-pull-out-hose/
- ↑ https://www.youtube.com/watch?v=2YZJZfUlnVc
- ↑ http://www.handymantips.org/kitchen-faucet-pull-out-hose/
- ↑ http://www.familyhandyman.com/plumbing/faucet-repair/how-to-fix-a-leaking-sink-sprayer/view-all
About This Article

If the faucet hose in your kitchen sink is worn out, you’ll need to change it. To replace a supply line hose, you’ll need an adjustable wrench, a basin wrench, a rag, and plumbing tape. First, you’ll need to shut off the valve where your pipes connect to the supply line and turn on the tap until it runs dry. Then, detach your old hose from the water supply and the faucet. Once you’ve removed the hose, you’ll need to dry the threaded pipe ends and wrap them with thread sealing tape. This will help lubricate the threads and form a stronger seal. After that, you’ll need to attach your new hose to the faucet and water supply. For more tips, including how to replace a pull-out faucet hose, read on!