This article was co-authored by wikiHow Staff. Our trained team of editors and researchers validate articles for accuracy and comprehensiveness. wikiHow's Content Management Team carefully monitors the work from our editorial staff to ensure that each article is backed by trusted research and meets our high quality standards.
This article has been viewed 123,109 times.
Learn more...
Whether you’re fixing a faulty drain or upgrading your hardware, installing a new drain is a fairly straightforward job. After removing the old stopper, take out the old drain flange, or the housing that connects the tub and drain to the pipe below. Cover the underside of the new flange with plumbers’ putty, then twist it into the drain opening. From start to finish, installing a new drain should only take some elbow grease and an hour of your time!
Steps
Removing the Old Stopper
-
1Turn a foot lock stopper counterclockwise to take it out of the drain. Foot lock stoppers are the simplest type of drain mechanism. All you need to do is rotate the stopper, or the part that moves up and down to open and close the drain. Pull up as you twist it counterclockwise until it lifts out of the drain flange.[1]
- Make sure the stopper is in the open position. You won’t be able to unscrew it if it’s closed.
- The drain flange, or drain basket, is the body that connects the tub and stopper to the waste pipe.
-
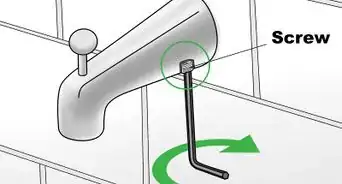
2Loosen the center screw if you have a lift-and-turn drain. Lift-and-turn drains and some foot lock drains may have a screw in the center of the stopper that holds it in place. If there’s no visible screw, see if you can pop or twist off a cap on the stopper’s top. Then, using a screwdriver, turn the screw counterclockwise and lift the stopper out of the drain flange.[2]
- Some lift-and-turn drains simply twist out, so see if you can remove your stopper by turning it clockwise if you can’t find any screws.
Advertisement -
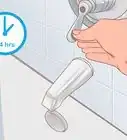
3Remove the overflow plate and linkage if you have a lever-style drain. Start by removing the screws that secure the overflow faceplate. Take off the overflow plate, and pull the linkage rod and plunger out of the overflow hole. Then remove any screws that secure the drain plate, and lift it out of the drain flange.[3]
- The overflow faceplate is the part with the lever on the tub wall beneath the faucet. The linkage connects the lever to a plunger, which drops down to stop the tub when the lever is down.
- You may also need to pull out lower linkage when you remove the drain plate.
Tip: If you plan on reinstalling the same hardware, put a towel over the drain when you remove the overflow plate so you don’t lose the screws. Keep them in a safe place until you reinstall the drain.[4]


Replacing the Drain Flange
-
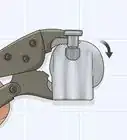
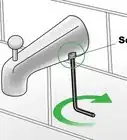
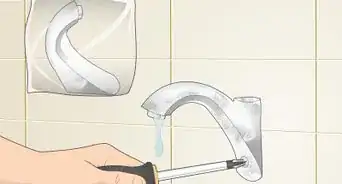
1Unscrew the exposed drain flange with a drain key or pliers. After removing the stopper, you’ll see the exposed drain flange. The easiest way to remove it is to insert the head of a drain key into the flange and twist counterclockwise. You can find drain keys online and at home improvement stores.[5]
- If you don’t have a drain key, try sliding the handles of a pair of pliers down the flange past the X-shaped metal arms. Slide a strong screwdriver between the handles, and use it like a lever to turn the flange counterclockwise.
Tip: If you have trouble turning the flange, try heating it for 1 or 2 minutes with a hair dryer set to high. The heat will loosen the plumber’s putty that’s preventing you from turning the flange.
-
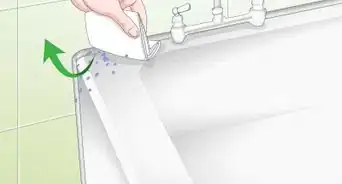
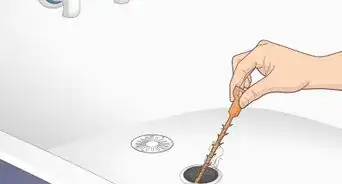
2Scrape off old plumber’s putty with a scrub pad or putty knife. Once you’ve lifted the flange out of the drain opening, scrape away any putty left behind. Take care not to damage the tub's enamel and avoid using harsh, abrasive cleaning products.[6]
- Remove and discard larger pieces of putty by hand, then rinse away smaller bits. If necessary, wipe away any stubborn residue with rubbing alcohol.
-
3Spread a pencil-sized bead of putty around the rim of the new flange. Roll out a long, thin strand of plumber's putty about the size and thickness of a pencil. Place it on the underside of the new flange’s rim, then press it to cover the rim in an even layer.[7]
- Purchase plumber’s putty online, at home improvement stores, and at plumbing supply stores. The putty will help create a watertight seal.
-
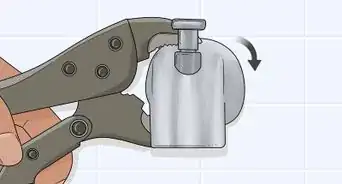
4Slide a new gasket into the opening, then screw in the new flange. If your new drain came with a rubber gasket, place it over the drain opening. Then fit the new flange into the opening and, using a drain key or pliers, rotate it clockwise until it’s tight. If necessary, scrape away excess plumber’s putty with a putty knife.[8]
- It shouldn’t be so tight that you can’t loosen it if it needs to be adjusted or replaced in the future.
- The gasket is a rubber ring that helps create a waterproof seal between the flange and waste pipe.


Installing the New Stopper
-
1Twist or screw on the new stopper, if necessary. If the stopper isn’t already connected to the flange, attach it according to your product’s instructions. If it's a foot lock or lift-and-turn design, either twist it clockwise by hand or secure it with a screw.[9]
- Specific installation steps vary, so be sure to follow the new drain’s manual.
-
2Thread the linkage through the overflow hole if you have a lever drain. If you’re installing a lever-style drain, insert the plunger and linkage into the hole in the tub wall beneath the faucet. Feed it into the overflow pipe, screw the overflow faceplate onto the opening, then screw the new drain plate onto the flange.[10]
Tip: Keep in mind the linkage rod catches hair and other debris, so it requires regular cleaning. Stick with a lever-style drain if you prefer that design and don't mind cleaning it. For a lower maintenance option, go with a lift-and-turn stopper.[11]
-
3Add some water to the tub to test the seal. After you’ve installed the new drain, close the stopper and fill about ¼ of the tub with water. Let it sit for an hour, then go back and see if any water drained. If it’s around the same level as an hour prior, congratulations! You’ve installed your drain successfully![12]
- If the seal isn’t watertight, inspect the drain flange. Make sure it’s sitting flush with the tub and, if necessary, remove and reinstall it.
- If you’ve installed a lever-style drain, remove the overflow plate and linkage, and twist the linkage rod’s adjuster counterclockwise to extend the plunger. Some designs aren't adjustable and include linkage rods of various lengths, so you may need to swap the rod for a longer one.
- If you can’t find the problem on your own, you might want to consult a professional plumber.
- There’s no need to wait to fill the tub with water after installing the drain. You can use a fixture immediately after applying plumber’s putty.


Community Q&A
-
QuestionWhere does the rubber gasket go -- on top of or under the tube?
 Community AnswerOn a tub drain, it usually goes on top, since a tub drain normally screws down and into a receiver. On most any sink drain, the gasket goes under the sink, since the sink's receiver is screwed against the drain.
Warnings
- If you notice rusting, mildew, or water pressure problems when you attempt to replace a drain, contact a plumber.⧼thumbs_response⧽
Things You'll Need
- Screwdriver
- Drain key
- Putty knife
- Plumber’s Putty
- New drain flange and stopper


References
- ↑ https://www.bobvila.com/articles/how-to-remove-a-tub-drain/#.WkuN54hOnIU
- ↑ https://www.bobvila.com/articles/how-to-remove-a-tub-drain/#.WkuN54hOnIU
- ↑ https://www.familyhandyman.com/bathroom/shower-installation/how-to-convert-bathtub-drain-lever-to-a-lift-and-turn-drain/view-all/
- ↑ https://www.thisoldhouse.com/how-to/tub-drain-fix
- ↑ https://www.thisoldhouse.com/ask-toh/removing-tub-drain
- ↑ https://www.bobvila.com/articles/how-to-remove-a-tub-drain/#.WkuN54hOnIU
- ↑ https://www.familyhandyman.com/bathroom/shower-installation/how-to-convert-bathtub-drain-lever-to-a-lift-and-turn-drain/view-all/
- ↑ https://www.familyhandyman.com/bathroom/shower-installation/how-to-convert-bathtub-drain-lever-to-a-lift-and-turn-drain/view-all/
- ↑ https://www.thisoldhouse.com/how-to/how-to-fix-bathtub-drain-stopper
About This Article

If you need to fix a faulty drain or want to upgrade your hardware, you can easily install a tub drain in about 1 hour. Foot lock stoppers are a simple type of drain mechanism that can be removed by turning them counterclockwise. For a lift-and-turn drain, loosen the center screw or turn it clockwise and twist the piece out. If you have a lever-style drain, you’ll need to remove the overflow plate and linkage by taking out the screws that secure it down. Now that the drain flange is exposed, you can unscrew it with a drain key or pliers. Scrape off any old plumber’s putty with a scrub pad or putty knife, then spread some new putty around the rim of the replacement flange. Slide a new gasket into the opening, and screw the new flange in place. To learn how to test the seal, keep reading!