This article was co-authored by American Automobile Association and by wikiHow staff writer, Janice Tieperman. The American Automobile Association (also known as "AAA" or "Triple A") is a federation of motor clubs throughout North America and a non-profit organization focused on the safety of the driving public and the future of mobility. Best known for providing its members with roadside assistance, AAA has also been providing auto repair services and insurance for auto, home, life, and business for over a century. Founded in 1902, AAA is headquartered in Heathrow, Florida.
There are 12 references cited in this article, which can be found at the bottom of the page.
This article has been viewed 24,579 times.
Although most car seats are sturdy and well-built, these items can’t keep your child safe and secure if they aren’t balanced and level within your vehicle. Though each seat is different, you can try using anchor clips, tether straps, and regular seatbelt buckles to keep your seat sturdy and level. While you should always consult the user manual or manufacturer with any major questions or concerns, you may be able to make your child’s car seat safer and more well-balanced with a few simple components.
Steps
Taking the Proper Precautions
-
1Park your car on a flat surface before installing the seat. If you have an inclined driveway or live on a sloped road, drive your vehicle to a flatter location. If your car is parked at an incline, your car seat will automatically be sloped and angled improperly, which could be dangerous for your infant or young child.[1]
- Babies lack the muscle strength to hold their heads up properly, so they need constant support and cushioning for their heads. If your car seat isn’t level, your baby could tip forward and have difficulty breathing.
- If your driveway or neighborhood isn’t flat, try visiting a nearby park, parking lot, or other area to level the base of your car seat.
-
2Arrange the seat base in the center of your car seat. Choose where you want your car seat to go, then place the base in the center of that seat. If you have a front-facing car seat, lean it against the vehicle’s backrest. If you have a rear-facing car seat, turn the item 180 degrees so it’s angled towards the back of the front passenger or driver’s seat.[2]
- Double-check your user manual for specific instructions on how to position your car seat model.
- If you have a front-facing car seat, consider placing it behind the driver’s seat.[3] If your seat is rear-facing, try putting it behind the front passenger seat.[4] Above all else, consult your user’s manual to see if there’s a recommended placement for your seat.
Did you know? Some front-facing car seats may come with a built-in base. In this case, you’ll be installing the seat and base instead of just the base.[5]
Advertisement -
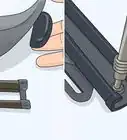
3Check your car seat base to see if it’s reclined at the right angle. Check the outer border of your seat base to find a thin, curved or rectangular leveling tool. This type of device is attached to all car seats, and lets you know if your seat is too inclined or reclined. If you can’t find this device on your own car seat base, consult your user manual for help.[6]
- Some seat have a red and green dial that indicates the proper angle of the base. Other products may have arrows pointing to the correct recline angle, or some other label that indicates the correct angle for your seat.[7]
- Don’t worry if your seat isn’t reclined correctly at first; once you level and position the seat, your seat should be in a more stable position.


Using a Front-Facing Seat
-
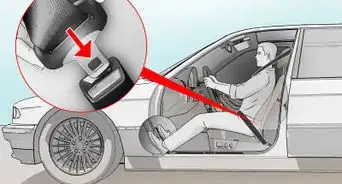
1Anchor the seat’s backing tether over the car’s neck rest. Find a thick strap with a hook or buckle that’s attached to the backrest of the car seat. If possible, thread this tether strap beneath your vehicle’s neck rest. If your car’s neck rests aren’t adjustable, strap the tether over the neck rest instead of under it. Behind this neck rest, look for a bracket or anchor point on the ledge behind the passenger seats. To secure the tether into place, attach the hook or buckle to this anchor point.[8]
- Seat tethers work best in sedans or other 5-seat vehicles.
-
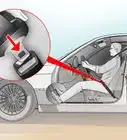
2Attach your seat’s anchor hooks to the anchor point of the car. Search along the back of your portable car seat to find 2 thick, hooked straps dangling from each side. While holding 1 of these hooks, use your hands to pry between the backrest and seat cushion of your vehicle’s seat. Feel around in this gap until you find a rectangular bracket, or lower anchor. Open the clip and loop it onto the lower anchor point of the larger seat. Once you’ve completed this step, attach the other anchor hook to the second anchor point beneath the seat in your vehicle.[9]
- Anchor hooks only support a certain amount of weight. Check your car seat’s user manual to see how much weight the individual seat can hold.
- If you’re transporting a larger, non-infantile child, you might be able to use the seat belt instead of the anchor hooks.
- Some manuals may recommend that you secure the anchor hooks before installing the seat itself. Be sure to double-check this before installing the actual seat.
-
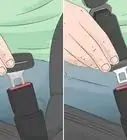
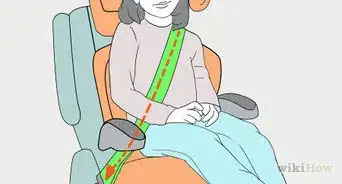
3Slide a seat belt through the back opening of the car seat if you have older children. Search along the sides of your car seat for 2 matching, circular or ovular openings. If you’re transporting a toddler or young child, string a seat belt through both of these openings and click it into the fastener. If your car seat doesn’t have these openings, consult your user manual for additional advice.[10]
Warning: Check your user manual to confirm how to install your car seat properly. Due to weight limits, many manuals may recommend that you only use anchor hooks or a seat buckle to secure your car seat into place.
-
4Pull on the tether and seat belt slack to ensure that they’re tight. Find the excess portion of the tether strap and tug on it slightly; however, don’t tighten it all the way. Next, grip the seat belt with 1 hand, then pull the belt forward to loosen it. After this, you can release the belt, letting it tighten completely against the vehicle’s car seat.[11]
- While you want the tether to be snug, you don’t want it to be too tight.


Balancing a Rear-Facing Seat
-
1Place a towel or pool noodle beneath the car seat if the user manual specifies. Check your car seat’s instruction guide to see if your seat needs additional support when placed in the actual vehicle. While some rear-facing seats accommodate for the gap between the car seat and the vehicle itself, your seat might need a little extra support. If the user manual calls for it, stack 1-3 pool noodles or a rolled-up towel along the seam of the passenger seat.[12]
- Some car seat brands like Chicco or Diono forbid the use of noodles or towels with their seats, while other brands like Clek allow towels only.
-
2Connect the seat’s anchor hooks to the lower anchor points of your car’s seat. Examine both sides of your vehicle’s car seat to find 2 thick straps dangling from either side. Next, hold 1 of these straps in your hand and pry between the seams of the passenger seat. Search for a rectangular bracket, or lower anchor point, within this gap, then attach the strap’s hook to it. Repeat this process on the opposite of the passenger seat, using your hand to feel around for a second anchor point.[13]
- There are 2 anchor points within each passenger seat. Attach the leftmost and rightmost straps to their corresponding brackets.
-
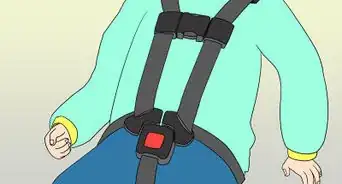
3Tighten the slack attached to the anchor hooks. Use both hands to pull on the secured straps, which helps to level and secure the car seat. Pull each strap as tightly as you can, or until the car seat feels rigidly attached.[14]
-
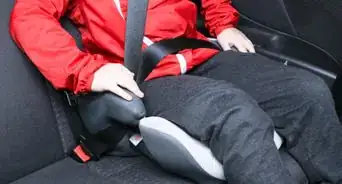
4Use a seatbelt to secure the base if the user manual recommends it. Check the car seat base for an opening along the central portion. Follow your manual’s instructions and thread the belt through the opening, feeding through the base to the seat buckle. Secure and buckle the belt into place to keep your car seat sturdy.[15]
- Some car seats may come with a belt buckle lock. Check your user manual for specific instructions on how to install it.
-
5Move the base around to ensure that it’s secure. Grip both sides of the car seat base and try to move it left and right, as well as up and down. Check to see if your seat moves more than 1 in (2.5 cm); if so, you may need to tighten the slack on your car seat straps. If the seat base doesn’t budge, then it’s level and ready to be used![16]
-
6Snap the car seat into the base to secure it into place. Center and arrange the car seat on top of the base, checking to make sure that both pieces are completely lined up. Next, press down on the car seat until you hear a clicking sound, which indicates that the seat is connected to the base. If you aren’t sure how to install your car seat properly, consult the user manual for extra assistance.[17]


Warnings
- Always consult your user manual if you’re uncertain about any part of the leveling process.[19]⧼thumbs_response⧽
Things You’ll Need
Balancing a Rear-Facing Seat
- Rolled-up towel (optional)
- Pool noodles (optional)


References
- ↑ https://www.youtube.com/watch?v=fcA-p88Mkng&t=1m10s
- ↑ https://www.nhtsa.gov/car-seats-and-booster-seats/how-install-rear-facing-only-infant-car-seat
- ↑ https://www.youtube.com/watch?v=8qEINkKaRbc&t=1m5s
- ↑ https://www.youtube.com/watch?v=8qEINkKaRbc&t=1m11s
- ↑ https://www.youtube.com/watch?v=ZnuaumJ1C2c&t=0m56s
- ↑ https://carseatsite.com/correctreclineangle/
- ↑ https://www.youtube.com/watch?v=fcA-p88Mkng&T=1m5s
- ↑ https://www.youtube.com/watch?v=8c09sht80k0&t=1m30s
- ↑ https://www.youtube.com/watch?v=ZnuaumJ1C2c&t=0m39s
- ↑ https://www.youtube.com/watch?v=8c09sht80k0&t=2m35s
- ↑ https://www.youtube.com/watch?v=8c09sht80k0&t=2m39s
- ↑ https://carseatsite.com/correctreclineangle/
- ↑ https://www.youtube.com/watch?v=8qEINkKaRbc&t=1m11s
- ↑ https://www.youtube.com/watch?v=8qEINkKaRbc&t=1m18s
- ↑ https://www.nhtsa.gov/car-seats-and-booster-seats/how-install-rear-facing-only-infant-car-seat
- ↑ https://www.nhtsa.gov/car-seats-and-booster-seats/how-install-rear-facing-only-infant-car-seat
- ↑ https://www.nhtsa.gov/car-seats-and-booster-seats/how-install-rear-facing-only-infant-car-seat
- ↑ https://carseatsite.com/correctreclineangle/
- ↑ https://carseatsite.com/correctreclineangle/
About This Article