This article was co-authored by wikiHow Staff. Our trained team of editors and researchers validate articles for accuracy and comprehensiveness. wikiHow's Content Management Team carefully monitors the work from our editorial staff to ensure that each article is backed by trusted research and meets our high quality standards.
This article has been viewed 176,104 times.
Learn more...
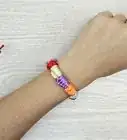
Making bracelets with thread can be a fun way to spend the day. There are a variety of different designs and knots you can use when making threaded bracelets. The process can be tricky at first, especially if you are a beginner. However, if read instructions carefully and move slowly through the process you'll be able to make a great bracelet.
Steps
Following a Basic Design
-
1Cut 3 equal sized strands of thread. If you want to make a very basic design, you can use three strands of thread. In this example, we're using violet, pink and blue. You may want to make a more elaborate design later on, but this pattern will teach some of the basics of knotting.
- Cut out the strands to the length you wish. Keep in mind, as you'll be knotting during the process, the original length of of your threads will be shorter than the final product.
- Lie your threads out side-by-side on a flat surface to start.
-
2Tie a knot near the end of the strands. To begin, you'll need to tie a knot near the end of your stands of thread. These will connect the strands together. Tie your knot roughly two centimeters away from the ends of the threads.
- As you move forward, you'll have to use specialized types of knots. However, at this point that is not necessary. Just use a basic knot, like a knot you'd use when tying your shoes. Just make sure your knot is tight enough. If it comes undone, your bracelet could unravel.
Advertisement -
3Make a forward knot with the outermost strand on the left. Take the outermost strand on the left. In our example, this is the violet thread. Use this thread to make what is known as a forward knot.
- To make a forward knot, take your violet thread and bend it at roughly a 90 degree angle, laying it over the pink thread. This should look something like the number four.[1]
- Then, loop the violet thread under the pink thread, moving upward towards the knot connecting all the threads together. Pull upwards. Then, repeat the process. It's very important you knot twice using forward knots. If you don't knot twice, your bracelet will have too much slack.[2]
-
4Make a forward knot around the next string. Continue working with the violet string. Use this string to make a forward knot around the last string in your row. In our example, this is the blue string. Follow the same process you did before, making sure to remember to double knot and tighten the string.
-
5Repeat the forward knotting process with the pink string. Once you've made a row with the violet string, repeat this process with the pink string. The pink string will now be the outermost layer of your bracelet, followed by the blue string. Make a forward knot, looping the pink string over the blue string. Then, make a forward knot by looping the pink string over the violet string.
-
6Repeat the forward knotting process with the blue string. The blue string will now have taken its place as the outermost string. Make a forward knot around the violet string. Then, make a forward knot around the pink string.
-
7Repeat. Now, the violet string will be the outermost string again. Repeat this process, making forward knots with the violet string, followed by the pink string, followed by the blue string.
- You can continue knotting until your bracelet is as long as you want. This depends on your needs, wrist size, and other factors.
- A bracelet that is too short may not fit. However, a bracelet that's too long may slip off. Pause on occasion while working to wrap what you have around your wrist. Stop when you reach a point where the bracelet can be slipped on and off easily, but remains in place.
-
8Tie the ends in place when you finish. When you reach your desired length, tie the remaining loose threads together in a knot. As with the knot you made at the beginning, just use a basic knot to do so. Then, pull the remaining strings through the loop on the other end of the bracelet. Tie the strings around the loop, forming a circular bracelet.


Using Six Different Colors
-
1Gather the necessary supplies. You can make a basic striped bracelet using 6 strands of embroidery thread. You will use some of the methods outlined in the basic thread bracelet above to make a more elaborate design. To begin, gather your supplies.
-
2Cut the embroidery thread. Once you have your supplies together, you'll be able to begin the process. First, you have to cut the embroidery thread.
- Cut 12 strands of thread in your different colors. Strands should be about 24 inches (61 cm) each. Make sure you have 2 sets of each of the six colors you chose.[6]
- Combine the thread by tying a knot towards the end of the strands, leaving at least 3 inches (7.6 cm) of slack. You'll need these 3 inches (7.6 cm) later when you're finishing up your bracelet.[7]
- In order to work with your thread, you'll need to secure it. There are two ways you can do this. You can tape the knot to a flat surface, like a table. You can also use a safety pin to pin the knot down on a pillow.[8]
-
3Arrange the strands in a mirror image pattern. Now you have to arrange your threads. You'll have to do so in a way that creates a mirror image. This helps create the stripe design.
- Separate your threads, placing six strands of the different colors on each side. Then, move them in such a way that the colors mirror each other.[9]
- If this is confusing, look at this example. On your left side, moving from the outermost thread to the innermost thread, you have red, then orange, then lavender, then green, then yellow, then blue. On your right side, the innermost thread would be blue. Blue would be followed by yellow, then green, then lavender, then orange, and ending on a red thread.[10]
-
4Start with a forward knot on your left side. To begin, you would start with the outermost thread on your left side. In the example above, that would be the red thread. You would take the red thread and make a forward knot over the second outermost color. In our example, the second outermost color is orange. If you do not remember how to make a forward knot, see Step 3 of Method 1.
-
5Continue knotting the outermost color towards the middle. Using your outermost thread, move inward. Continue to make forward knots over each color until you reach the thread in the middle. In our example, this would be the blue thread. Make sure to remember to knot twice when making forward knots.[11]
-
6Repeat on the right with backwards knots. Once you're finished with the left side, you can move to the outermost thread on the right. The process is mostly the same. You're moving the outermost color inwards towards the middle thread. However, you'll be using what are called backwards knots instead of forward knots.
- Once again, you'll lay the outermost thread on top of the thread next to it. In our example, this means placing the red thread on the right over the orange thread on the right.[12]
- Loop the red thread under the orange thread. This time, move downward when you loop the thread, moving away from the knot holding your strands of thread together. Pull tight into a knot. As with a forward knot, knot twice.[13]
- As you did on the left side, continue moving inward with your outermost thread. Make two backwards knots with each color on the right side until you reach the innermost thread. In our example, this would be the blue thread.
-
7Tie a backwards knot to connect the two middle strands. In the middle, you'll have two stands of the same color. In our example, there are two blue strands in the middle. Once you've finished knotting the left and right side, tie these middle strands together. Use a backwards knot, outlined above, to do so.[14]
-
8Repeat the process with the next outermost color. After you've knotted the first outermost color, a new thread should emerge as the outermost color on each side. In our example, orange would become the new outermost color. Repeat the above process with the orange thread.
- Start on the left side. Use forward knots, remembering to knot twice, to tie the orange thread with all the other colors.
- On the right side, use the orange thread to tie backwards knots with all the other colors. Remember to knot twice.
- When you reach the center, tie the two innermost strands of thread together using a backwards knot.
- Repeat this process until you've knotted all the strands of thread together. You should have a nice, simple striped pattern by the end of the process.[15]
-
9Braid the last bit of tread together. When you're done merging all the threads, tie a tight knot on the end of the bracelet. Braid the remaining strands together. Remove the tape or the pin from the other end. Braid these strands together as well. You've made a simple, striped pattern bracelet out of thread.[16]


Trying Knotted Bracelets
-
1Get the supplies together. A knotted bracelet can be a fun and simple design to try. To begin, you'll need some basic supplies. You'll need three different colors of embroidery thread, a safety pin, and a pair of scissors.[17]
-
2Cut your thread. Once you have you supplies together, you can cut your thread. Cut a strand of each color. Your strands should be fairly large. Each strand should be 2 to 3 arm lengths long.[18]
-
3Tie the threads together in a loop. Once your strings are cut, you'll need to gather your strings together and tie them into a loop. This process can be somewhat tricky so go slowly and follow instructions carefully.
- Gather all your strings together. You can lie them down side-by-side on a long table or on the floor. Find the midpoint of all three strings. Fold all the strings in half along the midpoint.[19]
- Towards the end of your folded strings, tie them together in a tight knot to secure. This will make a small loop on the end of your stands of strings. Use a basic knot here, like you'd use when tying your shoes.
- You'll use the loop you create when your finish your bracelet. You will end up slipping your strings through the loop and tying them together. Make sure the loop is big enough to fit three threads through.[20]
- Slip a safety pin through the loop. Fasten the loop on a pillow or other firm surface. This will keep the threads organized and secure while you work.[21]
-
4Tie your knots. Once all is set up, you can begin the knotting process. For this type of bracelet, you simply repeat the following process until the bracelet is as long as you want.
- Use one hand to gather two strings on the right.
- Use your other hand to create a loop with the string to the left. Lie the left thread over the two threads on the right, creating a circular loop with the slack from the left thread. It should look something like a backwards "P."
- Slip the left string under your two right strings. Move it through the loop you created, moving upward towards the knot on the top.[22]
- Pull the left string, holding the other two strings loosely. You should be able to pull upward until the knot you created reaches the knot connecting the threads.[23]
- Repeat this process until all your threads are knotted together.
-
5Change colors as you wish. The knots will take on the color of the string to the left. If you want to change colors, return the left string to other two strings. Then, pull a string of a different color out of the bunch, moving it to the left side. Repeat the knotting process with that string.
- How and when you change colors depends on your personal preferences. If you want a bracelet with a more random design, change colors whenever you feel like it. If you want a more uniform design, make a rule for yourself. For example, you'll change color every 5 knots.[24]
-
6Tie the final knot. When you reach the end of your bracelet, you'll need to tie an end knot. How long you make your bracelet is up to you. However, make sure you have at least a few inches of thread at the end. Simply tie a knot using all three strings, as you did when making the loop at the beginning.
- Remove the bracelet from the safety pin. Pull the excess strings through the loop at the top. Then, tie a knot with the excess strings to create a fully formed bracelet.[25]
- For this part of the process, you can simply use basic knots, like you would use to tie your shoes.


Community Q&A
-
QuestionWhat if I'm not very coordinated?
 Community AnswerPractice! You'll get better the more you work at it. In the meantime, you could have someone that is a little more coordinated than you help you with the hard parts.
-Step-12.webp)
References
- ↑ http://www.how-to-make-jewelry.com/forward-knot.html
- ↑ http://www.how-to-make-jewelry.com/forward-knot.html
- ↑ http://honestlywtf.com/diy/diy-friendship-bracelet/
- ↑ http://honestlywtf.com/diy/diy-friendship-bracelet/
- ↑ http://honestlywtf.com/diy/diy-friendship-bracelet/
- ↑ http://honestlywtf.com/diy/diy-friendship-bracelet/
- ↑ http://honestlywtf.com/diy/diy-friendship-bracelet/
- ↑ http://honestlywtf.com/diy/diy-friendship-bracelet/
- ↑ http://honestlywtf.com/diy/diy-friendship-bracelet/
- ↑ http://honestlywtf.com/diy/diy-friendship-bracelet/
- ↑ http://honestlywtf.com/diy/diy-friendship-bracelet/
- ↑ http://www.how-to-make-jewelry.com/backwards-knot.html
- ↑ http://www.how-to-make-jewelry.com/backwards-knot.html
- ↑ http://www.how-to-make-jewelry.com/backwards-knot.html
- ↑ http://honestlywtf.com/diy/diy-friendship-bracelet/
- ↑ http://honestlywtf.com/diy/diy-friendship-bracelet/
- ↑ http://www.the-red-kitchen.com/2012/01/lots-of-knots-friendship-bracelet.html
- ↑ http://www.the-red-kitchen.com/2012/01/lots-of-knots-friendship-bracelet.html
- ↑ http://www.the-red-kitchen.com/2012/01/lots-of-knots-friendship-bracelet.html
- ↑ http://www.the-red-kitchen.com/2012/01/lots-of-knots-friendship-bracelet.html
- ↑ http://www.the-red-kitchen.com/2012/01/lots-of-knots-friendship-bracelet.html
- ↑ http://www.the-red-kitchen.com/2012/01/lots-of-knots-friendship-bracelet.html
- ↑ http://www.the-red-kitchen.com/2012/01/lots-of-knots-friendship-bracelet.html
- ↑ http://www.the-red-kitchen.com/2012/01/lots-of-knots-friendship-bracelet.html
- ↑ http://www.the-red-kitchen.com/2012/01/lots-of-knots-friendship-bracelet.html
About This Article

To make bracelets out of thread, start by cutting 3 equal-sized strands of thread and tie a knot near the end of the strands to connect them. With the outermost strand on the left, make a forward knot by bending the thread to a 90-degree angle and laying it over the middle strand. Then, loop the original thread under the middle thread, moving upward toward the knot connecting all of the threads together. Repeat the process for a double knot before making a forward knot around the next string. Make these forward knots with each strand until your bracelet is the right length. Finally, tie the ends in place when you finish. To learn how to use 6 different colors in your bracelet, keep reading!