This article was co-authored by wikiHow staff writer, Jessica Gibson. Jessica Gibson is a Writer and Editor who's been with wikiHow since 2014. After completing a year of art studies at the Emily Carr University in Vancouver, she graduated from Columbia College with a BA in History. Jessica also completed an MA in History from The University of Oregon in 2013.
There are 11 references cited in this article, which can be found at the bottom of the page.
The wikiHow Video Team also followed the article's instructions and verified that they work.
This article has been viewed 659,513 times.
Learn more...
If you've mastered a basic 3-strand braid and want a bit of a challenge, add an extra strand! Once you get the hang of working with 4 strands of yarn, ribbon, or leather, you'll be surprised at how easy it is to create a complex-looking braid. Make a flat or round 4-strand braid in several colors and then wrap it around your wrist to make a completely unique bracelet.
Steps
Weaving a Flat 4-Strand Bracelet
-
1Cut 4 equal strands of cord or yarn. Wrap a fabric measuring tape around your wrist and make a note of the measurement. Then, cut 4 strands of cord or yarn that are about 2 inches (5.1 cm) longer than that distance. This will account for weaving and tying off the ends of the bracelet.If you're braiding thin thread, you may want to use 2 or 3 strands for each main strand of the braid.
It may be easier to learn to braid with at least 2 different colors. Once you become more familiar with making 4-strand braids, you could use just 1 color.
-
2Tie 1 end of the strands together and tape them to a flat work surface. Gather the 4 strands together into a knot about 1 inch (2.5 cm) from 1 end. Lay the strands flat on a table and put a piece of tape across the end to hold the yarn in place. Then, separate the strands so they fan away from each other.[1]
- If you don't want to tape the yarn, try pinning the strands of yarn in place. This would work best if you were working on a flat cork or bulletin board.
Advertisement -
3Braid the outer strands towards the center. Take the rightmost strand of yarn and bring it over the strand that's next to it. Pinch the 2 middle strands together and bring the leftmost strand of yarn over them.[2]
- Keep the tension tight as you braid so your bracelet doesn't unravel.
-
4Bring the right strand over 1 and lift the leftmost strand over 2 strands. Repeat what you just did while keeping the tension on the strands tight so the braids are visible. Move the rightmost strand over the strand that's next to it and then pinch the 2 middle strands together. Then, take the leftmost strand and bring it over them.[3]
- Try to remember that you're working over a single strand from the right and over a double strand when you braid from the left.
-
5Keep braiding the outermost strands until you reach the end of your yarn. You can stop braiding when you're about 1 inch (2.5 cm) from the bottom. Try to keep the tension the same as you work from the top of the yarn to the bottom. For example, don't start really tight and then become loose as you reach the end of the yarn or your bracelet will be uneven.[4]
-
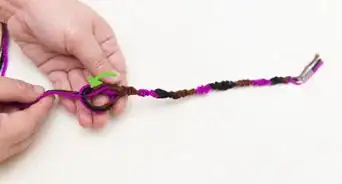
6Tie the bottom end of the braid. Once you're about 1 inch (2.5 cm) from the end of the yarn, stop braiding and pinch the strands of yarn together. Tie the yarn into a strong knot. Then, remove the tape from the top end of the braid.[5]
- Leave the excess yarn that's sticking out from the ends so you can tie the braid into a bracelet.
-
7Wrap the braid around your wrist and tie the ends together. Since it can be tricky to tie a knot using 1 hand, ask a friend to knot the ends together for you. If you have a long bracelet, you may be able to tie a knot at the ends before sliding it onto your wrist.[6]
- If you make an extra-large bracelet, you can wear it as an anklet.


Creating a Round 4-Strand Bracelet
-
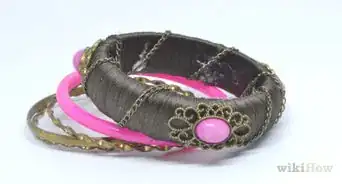
1Cut 4 strands of cord, leather, or thick yarn into equal lengths. Wrap a flexible measuring tape around your wrist and add at least 2 inches (5.1 cm) to the measurement. Then, cut your firm material, such as cord or leather, into 4 equal pieces according to the new measurement.[7]
- Although you can use a thick yarn, your round bracelet won't be as sturdy as a bracelet made with leather or cord.
Tip: Consider using at least 2 different colors when you're starting out. This will allow you to easily see which strands you're working with.
-
2Gather 1 end of the strands in a knot and tie it to your work surface. Hold the 4 pieces near 1 end and tie a knot about 1 inch (2.5 cm) from the end. Then, lay the knot on the table and place a piece of tape over it so the knot doesn't slide around. Separate the 4 strands so they fan out and away from each other.[8]
- If you're using 2 colors, alternate the colors when you arrange the strands.
-
3Wrap the left strand around and through the 2 middle strands. Take the leftmost strand and bring it underneath the 2 middle strands. Take it up and then down between the 2 strands.[9]
- Tug on the strands as you work so the tension shapes the round braid.
-
4Wrap the right strand around and between the 2 middle strands. At this point, you'll have 4 strands in front of you, but you'll see a slight twist near the top of the middle 2. Take the rightmost strand and wrap it underneath these 2 middle strands. Bring it around and then down between them.[10]
- You may want to hold the 2 middle strands in place with your non-dominant hand and use your dominant hand to hold the working strand.
-
5Continue to braid with the leftmost and rightmost strands. To form the round braid, keep bringing an outer strand under and around the middle strands and tug tightly once you've wrapped it. Braid until you're about 1 inch (2.5 cm) from the bottom of the strands.[11]
- Remember to alternate braiding the leftmost and rightmost strands so your braid doesn't become lopsided.
-
6Make a knot when you reach the end and tie the bracelet around your wrist. Make the knot at least 1 inch (2.5 cm) away from the bottom of the strands. Then, peel the braid off of the tape and wrap it around your wrist. Tie a knot using both ends of the braid so it doesn't slide off of your wrist.
- If you can't tie the bracelet yourself, ask a friend to help you or tie it before you slide it onto your wrist.


Community Q&A
Did you know you can get answers researched by wikiHow Staff?
Unlock staff-researched answers by supporting wikiHow
-
QuestionWhat is a 4-strand braid?
 wikiHow Staff EditorThis answer was written by one of our trained team of researchers who validated it for accuracy and comprehensiveness.
Staff AnswerwikiHow Staff EditorStaff AnswerAs the name suggests, 4-strand braid works similarly to a classic 3-strand braid, except that you are working with 4 strands. The outer right strands are woven over and under the strands next to them, going from right to left, and the outer left strands are woven under and then under the strands to the right of them. This pattern repeats until the braid is complete.
Support wikiHow by unlocking this staff-researched answer.
-
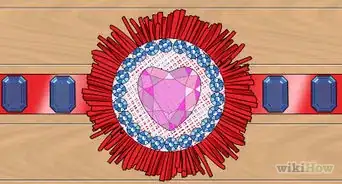
QuestionHow do you make a 4-strand chevron bracelet?wikiHow Staff EditorThis answer was written by one of our trained team of researchers who validated it for accuracy and comprehensiveness.
Staff AnswerwikiHow Staff EditorStaff AnswerChoose 4 separate colors of thread, then cut the threads to the desired length. Fold them over in the middle and knot the strings together at the top (where you made the fold). Spread the strands out so that the colors mirror each other in a 4 3 2 1 1 2 3 4 pattern. Make a series of knots, moving from the outer strand on one side to the middle, then repeating this process on the other side, and finally knotting the 2 middle strands together. Continue doing this down the length of the threads until your bracelet is as long as you like, then tie off the ends.Support wikiHow by unlocking this staff-researched answer.
-
QuestionHow do you make a 4-wire braid?wikiHow Staff EditorThis answer was written by one of our trained team of researchers who validated it for accuracy and comprehensiveness.
Staff AnswerwikiHow Staff EditorStaff AnswerYou can braid the wires the same way you would with strands of yarn, but you’ll need to use more force to bend them into the shape you want. Make sure you secure the strands together on one end (e.g., by twisting them together or clamping them in place) so that your wires stay lined up correctly.Support wikiHow by unlocking this staff-researched answer.
Things You'll Need
Weaving a Flat 4-Strand Bracelet
- Yarn in different colors
- Tape
- Scissors
- Measuring tape
Creating a Round 4-Strand Bracelet
- Cord, leather, or thick yarn in different colors
- Tape
- Scissors
- Measuring tape
-Step-12.webp)

References
- ↑ https://youtu.be/x9LxFmOZNls?t=11
- ↑ https://youtu.be/x9LxFmOZNls?t=30
- ↑ https://youtu.be/x9LxFmOZNls?t=38
- ↑ https://youtu.be/x9LxFmOZNls?t=66
- ↑ https://youtu.be/x9LxFmOZNls?t=99
- ↑ https://youtu.be/x9LxFmOZNls?t=86
- ↑ https://youtu.be/NLjs_MeGNpo?t=32
- ↑ https://youtu.be/NLjs_MeGNpo?t=94
- ↑ https://youtu.be/NLjs_MeGNpo?t=128
About This Article

To make a flat 4-strand braided bracelet, start by measuring your wrist and cutting 4 equal strands of yarn that are 2 inches longer than your wrist circumference. Next, gather the strands together about 1 inch from the end and tape them to a flat work surface. Then, take the rightmost strand of yarn and bring it over the strand that's next to it. Pinch the 2 middle strands together and bring the leftmost strand of yarn over them. Be sure to keep the tension tight as you braid! Keep braiding until you're about 1 inch from the end. Finally, pinch the strands of yarn together and tie them in knot to complete the bracelet. For tips on making a round 4-strand braided bracelet, read on!