This article was co-authored by Margo West. Margo West is a Professional Tailor and the Owner of Margo West Bridal Alterations in Dallas, Texas. She is renowned for her expertise in bridal alterations, custom wedding gowns, wedding-related design, and pattern making. Her 44 years of bridal experience has earned her the prestigious WeddingWire Brides Choice Award, Couples Choice Award 2013-2019, and The Knot Best of Weddings 2018-2020. Margo was also featured in House of Diffa 2018 Jacket Collection and Modern Luxury Brides Magazine 2020. She will launch her new bridal gown collection for fall 2021.
wikiHow marks an article as reader-approved once it receives enough positive feedback. This article received 16 testimonials and 80% of readers who voted found it helpful, earning it our reader-approved status.
This article has been viewed 393,555 times.
Have extra fabric, jewels, or beads lying around? Take those leftover scraps and turn them into something beautiful—like a brand new outfit for your favorite doll! You probably love to play with and display your doll, and by giving it an exciting, unique style, you can double the fun. Below, we'll teach you how to craft a special look for your favorite toy; read on for a complete guide covering how to make clothes for your doll.
Steps
Making a Top or Dress
-
1Cut out a piece of fabric. Choose a fabric that will not fray, such as felt. The fabric should be wide enough to fit around the doll and overlap by at least 1 inch (2.5 cm). The fabric piece can be as long as you want the top or dress to be. Measure the widest part of your doll to find the width. Then, use the doll to find the length.
- For a top, cut the fabric so that it will end about 1 inch (2.5 cm) below the doll's waist.
- For a short dress, cut the fabric so that it will come to the doll’s knees.
- For a long dress, cut the fabric so that it will come to the doll’s toes.
-
2Lay the doll on the fabric and mark the fabric next to the doll’s shoulders. Center the doll on the fabric from the right and left sides. The top of the doll’s shoulders should be about 0.5 inches (1.3 cm) to 1 inch (2.5 cm) below the top edge of the fabric. Use a pen or piece of fabric chalk to place a small mark on the fabric next to each of your doll’s shoulders. There should be 2 marks when you are done.[1]Advertisement
-
3Cut holes in the fabric where you marked it. Cut along each of the marks you made on the fabric to create armholes for the doll dress or shirt. Make sure that the holes are wide enough for the doll’s arms to fit through by inserting the doll’s arms through each one.[2]
-
4Slide your doll’s arms into the holes. Insert your doll’s hands through each of the holes and slide the holes up to your doll’s shoulders. If the holes are not wide enough to get them all the way to the doll’s shoulders, then snip a little more fabric to widen the holes.[3]
- Keep mind that it is better for the armholes to be a little too small than too big because you can always make them larger.
-
5Cross the fabric in front of the doll’s body. Next, wrap the fabric across the doll’s body, as if you were closing a robe. Wrap the fabric as tight or as loose as you want it to be. The fabric should be long enough to wrap all the way around to the back of the doll if you want it to.[4]
-
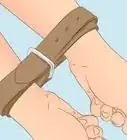
6Use a long strip of fabric to secure the shirt or dress at your doll’s waist. To secure the wrap dress you have created, cut out a strip of stretch fabric. Wrap it around the doll’s waist and tie a bow to secure it.[5]
- You can also use a piece of ribbon to secure the dress if you prefer.
-
7Fold back the collar if desired. You can leave the neckline area of the dress as is, or you can fold it back to create the look of a collar. It’s up to you![6]
-
8Decorate the dress with jewels, beads, and sequins. Use glue to attach jewels, beads, and/or sequins to the dress. You can add them anywhere you like. Just add a dab of fabric glue to the jewel, bead, or sequin and press it onto the dress where you want it to go. Let the glue dry overnight.
- Add a jewel to the center of the neckline.
- Apply some beads to the bottom of the skirt.
- Layer the skirt with sequins.


Making a Wrap Skirt
-
1Lay the doll on the fabric and mark the fabric. Choose a fabric that will not fray, such as felt. You can make a skirt for your doll using a method similar to making a dress for your doll. The fabric should be wide enough to fit around the doll and overlap by at least 1 inch (2.5 cm). Cut the fabric so that it is as long you would like the skirt to be. Mark the fabric to indicate this length and then turn the doll so that she is centered on the fabric between these marks. Mark the fabric where you want the skirt to begin and end on the doll.
- For example, if the doll is 18 inches (46 cm) and you want the skirt to extend 10 inches (25 cm) from its waist, then the rectangle should be 18 inches (46 cm) wide and 10 inches (25 cm) long.
- Use a fabric that is a little stiff.
- You can use a tape measure to measure the waist.
-
2Cut out a rectangle of fabric using the marks. Connect the marks in a rectangle with a pen or piece of chalk. Then, use a pair of sharp scissors to cut along these lines. This rectangular piece will be your fabric for the skirt.
-
3Cut a strip of fabric to secure the skirt. The strip of fabric should be about 1 inch (2.5 cm) wide and as long as the width of your rectangle. This is necessary so that you can wrap the strip around the doll’s waist multiple times to secure the skirt. You can also trim it down shorter after you have tied it around the skirt.
- For example, if the rectangle is 18 inches (46 cm) wide, then the strip should be 18 inches (46 cm) long.
-
4Wrap the rectangle around the doll’s waist. Lay your doll in the center of the rectangle with the top of the long edge about 0.5 inches (1.3 cm) above your doll's waistline. Then, wrap the rectangle around the doll’s waist and legs to create the skirt. You can wrap the fabric around the doll so that it is tight or somewhat loose. Just make sure that the ends overlap by at least 1 inch (2.5 cm).[7]
- Try wrapping the fabric around the doll tightly for a pencil skirt.
- Do a loose wrap for a full flowing skirt.
- Wrap the fabric so it is tighter at the top than at the bottom for an A line skirt.
-
5Secure the skirt with a strip of fabric. When you are happy with the fit of the doll skirt, take the strip of fabric and wrap it tightly around the doll’s waist a few times. Tie a knot or a bow to secure the skirt.[8]


Making Pants
-
1Lay your doll on a piece of folded fabric. You do not need a pattern to create doll pants. Get a piece of fabric that is long enough and wide enough to cover your doll’s legs when wrapped around them. Fold the fabric in half. Place your doll on top of the fabric so that her legs are centered over the fabric. Make sure that the print sides of the fabric are facing each other.
-
2Trace along the edges of your doll’s legs. Use a pen, pencil, or piece of chalk to trace around the edges of your doll’s legs. Trace closer or further from the edges of the doll's legs to determine the fit of the pants, and stop tracing at the point where you want the pant legs to end.[9]
- Try tracing 0.5 inches (1.3 cm) from the edges of the doll's legs for fitted pants.
- Trace 1 inch (2.5 cm) from the doll’s legs for loose fitting pants.
- Trace 2 inches (5.1 cm) from the doll's legs for baggy pants.
- Stop tracing at the ankles for full length pants, or stop tracing higher up, such as mid-calf for capris or mid-thigh for shorts.
-
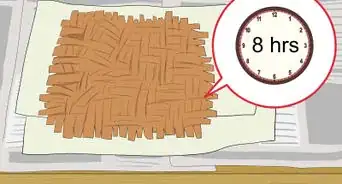
3Cut out the pieces. When you have finished tracing the pants, remove the doll from the fabric. Keep the fabric folded and cut along the lines using a sharp pair of scissors. Don't separate the 2 pieces you cut out. You will need to sew or glue them together just as they are.[10]
-
4Sew or glue the pieces together. Use a needle and thread or a sewing machine to sew a straight stitch about 0.25 inches (0.64 cm) from the edges of the inner and outer edges of the pantlegs. Or place several small dots of fabric glue between the 2 fabric layers along the edges of the pant legs.[11]
- Make sure the non-print sides of the fabric are still facing out.
- If you use glue, make sure to let it dry overnight.
- Ask an adult for help if you want to sew the seams on the pants.
-
5Turn the pants inside out. When you have finished sewing or gluing the pants, turn them inside out so that the seams will be hidden and the print will be visible. You can use a capped pen or marker to help you invert the pants if needed.[12]
- Once the pants are right side out, try them on your doll!
-
6Secure the pant waist with a strip of fabric, if desired. If the pants are a bit too loose around your doll’s waist, you can make a belt or sash with a piece of scrap fabric. Cut a strip of fabric that is about 0.5 inches (1.3 cm) to 1 inch (2.5 cm) wide and long enough to wrap around the doll's waist a few times.
- For example, if the doll's waist is 5 inches (13 cm), then the strip should be at least 15 inches (38 cm).
- Wrap the strip around the doll's waist over the pants and tie the strip in a knot or bow to secure it.


Making a Sock Dress or Skirt
-
1Cut the cuff section of a sock from the foot section. Find a spare sock with a long cuff that will fit around your doll’s torso, such as a baby sock for a Barbie doll or an adult size sock for a larger doll. You can use a solid color sock or a sock with designs printed on it. Then, cut the sock where the cuff meets the ankle of the sock.[13]
- If desired, you can trim the sock cuff down even more for a shorter skirt or dress.
-
2Cut out armholes for a dress. If you want to make a sock dress, then you will need to cut armholes in the sock. Cut a small hole out of each side of the sock about 0.5 inches (1.3 cm) to 1 inch (2.5 cm) from the top edge of the sock cuff. Make sure the holes are large enough for your doll’s arms to fit through.[14]
- Don't worry if you make the armholes too small. You can always make them wider later.
-
3Decorate the sock if desired. You don’t need to add any decorations to your sock dress or skirt, but you can if you want to. Add these decorations and let the glue dry before you put the sock dress or skirt on your doll.
- Use fabric paint on the sock to create polka dots, stripes, or another design.
- Glue on some beads, sequins, or jewels.
- Use a piece of ribbon or scrap fabric to make a belt or decorative sash for the dress or skirt.
-
4Put the sock dress or skirt on the doll. Slide the sock onto the doll by putting her legs through the sock dress or skirt first. Insert her arms through the armholes if you made a sock dress.[15]


Community Q&A
-
QuestionWhat sized doll is this dress supposed to be for?
 Community AnswerReally, you could make it any size, depending on the doll. If you're using stretchy fabric, you don't need to worry too much about the size. You can always measure the doll's height, waist, and arms (if its full-sleeved) to make sure it will fit.
 -
QuestionHow can I repair the paper clothes if they become ripped?
 Community AnswerTry to stick the ripped part with clear or magic tape. You can always make it again if you don't like the one you ripped; just print a copy (scan if needed first) and start afresh.
 -
QuestionI have a Monster High doll that needs clothes. Can I use soft cloth for her?Community AnswerOf course. Another thing that works great is to make a T-shirt -- take a sock and put a hole for the doll's head and two holes on the sides of the sock for the doll's arms.
Things You’ll Need
- A doll
- Fabric
- Sock
- Scissors
- Fabric glue
- Needle and thread (optional)
- Jewels, bead, and sequins(optional)


References
About This Article

To make a dress for your doll, all you need is some colourful fabric, a pen, and scissors. Start by cutting a strip of fabric that’s wide enough to wrap around your doll and long enough to cover its whole body. Place your doll on the the fabric and draw a dot where each of its arms are with a pen. Then, cut out the holes and slide the fabric onto its arms. Cut a thin strip of fabric out of the same material for a belt and tie it around your doll’s waist to hold its dress in place. You can use the same method to make a top for your doll. Just cut the fabric below your doll’s waist. For more tips, including how to make pants for your doll, read on!