This article was co-authored by wikiHow staff writer, Aly Rusciano. Aly Rusciano is a Creative Writer based outside of Nashville, Tennessee. She has over ten years of experience in creative, academic, and professional writing. Aly’s writing has been nationally recognized in the Sigma Tau Delta Rectangle and featured in Blue Marble Review, The Sunshine Review, PopMatters, and Cathartic Literary Magazine. She graduated from The University of Tennessee at Martin with a BA in English, focusing in Creative Writing and minoring in Theatre.
There are 23 references cited in this article, which can be found at the bottom of the page.
The wikiHow Video Team also followed the article's instructions and verified that they work.
This article has been viewed 23,889 times.
Learn more...
Wanting to do a fun craft with the kiddos? Tin or aluminum foil hats are super easy to make and a whole lot of fun! This quick craft has endless possibilities, and gives you and the kids something new to play with. We've got three of the best ways you can make a tin foil hat, so grab your tin foil and get ready to let your imagination run wild.
Things You Should Know
- Make a classic tin foil hat by folding a piece of tin foil in half lengthwise and wrapping it around your head.
- Make a tinfoil cowboy hat by placing a piece of tin foil directly over your head and molding the center to your crown. Then, shape the brim with scissors.
- Make a tinfoil boat hat by folding and tucking a piece of tin foil into a diamond shape. Then, fold the bottom flaps of the diamond up and shape the hat to your head.
Steps
Classic Tin Foil Hat
-
1
-
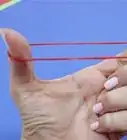
2Fold the piece of tin foil in half lengthwise. Take the top edge and bring it down towards the bottom until the edges match up. Press along the crease to hold the fold in place.[2]Advertisement
-
3Wrap the folded tin foil around your head. Hold the tin foil to your head just above your brows with the folded crease facing down—this will act as the rim of your hat.[3]
-
4Mold the tin foil around your head.[4] Use your hands to bend and shape the tin foil to the size of your head. Press the foil above your head down for a flat cap, or scrunch and squeeze it together to make a cone-like funnel shape.
- If you don’t have enough tin foil to work with, add another piece of foil to your hat as you shape it.[5]


Tin Foil Cowboy Hat
-
1
-
2Fold the piece of tin foil in half. Bring the left side of the tin foil over to the right side. Line up the edges, and run a finger or hand along the crease.[7]
-
3Put the foil over your head and press down. Use your hands to mold the foil around your head. Curl up the edges around your face to resemble a large brimmed hat.[8]
- The edges and shape won’t be perfect, and that’s okay. This gives you a rough outline of what your cowboy hat will look like.
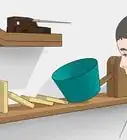
- If you don’t want to press the foil while it’s on your head, drape the foil over a large bowl.[9]
-
4Flatten out the edges of the hat. Take the tin foil hat off your head and place it on a flat surface. Use your hands to press the wrinkles out of the foil that’s not domed.[10]
-
5Trim the foil edges to match the style of cowboy hat you want. Use scissors to carefully cut an oval around the dome to create the brim of your hat. Bend and shape the foil while you cut, curving the edge of the foil upwards for that classic cowboy look.[11]
- The closer to the dome you cut, the smaller your hat’s rim will be.
- Some cowboy hats are flatter, while others are more curled, so pick what you like and roll with it!
-
6Put on the hat and make any final adjustments. Squeeze the dome of the hat together if the hat’s too big, or bend in the sides of the hat for a curvier brim. Use these last adjustments to make your tin foil cowboy hat worthy for the ranch.[12]


Tin Foil Boat Hat
-
1Rip a 36 to 40 in (91 to 102 cm) piece of tin foil from the roll. Use the sharp edge of the tin foil box to tear the tin foil away from the roll.
- Play around with how much tin foil you use. If your piece of foil is smaller, you’ll have a smaller hat. If your piece is bigger, you’ll have a bigger hat.
-
2Fold the piece of foil in half widthwise. Bring the left end of the foil over to the right, matching up the edges to make a smaller rectangle. Use your hands to flatten out the foil and secure the crease.[13]
-
3Fold the foil widthwise again. Take the left edge and bring it to the right edge as you did before, creating an even smaller rectangle. Press your hand or fingers along the crease to indent the foil.[14]
-
4Open the foil and bring the corners into the center crease. Peel back your previous fold so that the foil’s only folded in half once—a middle crease will be left behind. Take the upper right-hand corner of the foil and fold it ¾ of the way down towards the center along the crease. This will create a triangle. Do the same with the left corner, bringing the edge to meet the other triangle’s edge.[15]
- Think of it like making a paper boat, except with tin or aluminum foil.
-
5Bring the top flap over the triangle. Separate the bottom two ¼ pieces of tin foil. Fold the front flap up and over the triangle’s bottom edge. Press your fingers along the crease to keep the fold in place.[16]
-
6Flip the foil over and fold in the other flap. Take the remaining ¼ flap of foil and bring it up and over the triangle’s edge like you did before.[17]
-
7Tuck the edges of the foil into each other. Bring a corner piece of the right back side’s flap up and over the triangle’s edge, then under the front-facing flap. Take the right top flap and fold it up and over the folded flap. Repeat on the left side.[18]
-
8Open the foil and fold it in half to create a diamond. Turn the foil so the top point of the triangle is down. Pull the edges of the foil apart to form a small pouch. Fold the top point of the pouch to the bottom point in the opposite direction you opened the pouch.[19]
- If you open the pouch widthwise, fold inwards lengthwise.
- If the point of the triangle goes in while you fold, push it back out by sliding a finger inside the pouch.[20]
-
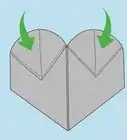
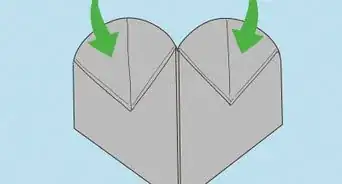
9Fold the bottom flaps of the diamond up. Lift the top flap up and over to meet the points. Flip the foil over and repeat on the other side to form one thick triangle.[21]
-
10Reopen the pouch and pull out the outer flaps. Turn the foil around so the triangle’s top point faces down. Carefully pull the folds apart to create a pouch. Flatten the pouch to form a diamond. Then, gently pull the outer flaps or pockets out and down.[22]
-
11Shape the boat onto your head. Place your boat on your head, and use your hands to shape it into the best shape and fit.[23]


Things You’ll Need

References
- ↑ https://youtu.be/VnvrW8Yb9cs?t=171
- ↑ https://youtu.be/q9sndq4gEbc?t=27
- ↑ https://youtu.be/q9sndq4gEbc?t=35
- ↑ https://youtu.be/VnvrW8Yb9cs?t=256
- ↑ https://youtu.be/q9sndq4gEbc?t=108
- ↑ https://youtu.be/RDuTPEeLQ9c?t=111
- ↑ https://youtu.be/RDuTPEeLQ9c?t=146
- ↑ https://youtu.be/RDuTPEeLQ9c?t=164
- ↑ https://youtu.be/RDuTPEeLQ9c?t=199
- ↑ https://youtu.be/RDuTPEeLQ9c?t=206
- ↑ https://youtu.be/RDuTPEeLQ9c?t=239
- ↑ https://youtu.be/RDuTPEeLQ9c?t=278
- ↑ https://youtu.be/NWNTEt71KX8?t=4
- ↑ https://youtu.be/NWNTEt71KX8?t=12
- ↑ https://youtu.be/NWNTEt71KX8?t=16
- ↑ https://youtu.be/NWNTEt71KX8?t=27
- ↑ https://youtu.be/NWNTEt71KX8?t=32
- ↑ https://youtu.be/NWNTEt71KX8?t=37
- ↑ https://youtu.be/NWNTEt71KX8?t=56
- ↑ https://youtu.be/b3QZpBL8-Tg?t=113
- ↑ https://youtu.be/b3QZpBL8-Tg?t=122
- ↑ https://youtu.be/b3QZpBL8-Tg?t=173
- ↑ https://youtu.be/NWNTEt71KX8?t=108
About This Article