This article was co-authored by wikiHow Staff. Our trained team of editors and researchers validate articles for accuracy and comprehensiveness. wikiHow's Content Management Team carefully monitors the work from our editorial staff to ensure that each article is backed by trusted research and meets our high quality standards.
The wikiHow Video Team also followed the article's instructions and verified that they work.
This article has been viewed 3,922,631 times.
Learn more...
Making an origami paper boat is a great activity that’s easy to finish and doesn’t require a lot of materials. The beauty of making a paper boat is that you only need one piece of printer paper to complete the task! By folding the paper with sharp creases and shaping it carefully, you can make a great-looking origami boat in minutes. We'll walk you through folding your own paper boat with our complete step-by-step instructions.
Steps
Creating the Initial Folds
-
1Fold an 8 ½ in x 11 in (21.5 cm x 28 cm) sheet of paper in half. Lay the paper down vertically and fold it from left to right so that its corners meet up. You can use ordinary white printer paper, construction paper, or origami paper. This is called folding the paper "hot dog style." Make a neat crease along the paper.[1]
- To strengthen the crease, run your finger down the fold 3-4 more times.
-
2Unfold the paper, rotate it 90 degrees, and fold it in half again. At this point, the paper should be lying down horizontally. Once you’ve adjusted the paper, fold from left to right. This "hamburger style" fold will create a new crease in the center of the page.[2]
- You should now have 2 creases along both centers (x-axis and y-axis) of the page.
Advertisement -
3Flip the paper so that the fold opens toward you. Then, fold down the top corners towards the middle of the paper while leaving 1-2 in (2.5-5 cm) of space at the bottom. Make sure the folds line up with the center crease. Crease along the edges to secure the folds.[3]
- Use the crease you made before to help line up the folds coming in from the corners.
-
4Bring the bottom of the paper up to fold it against both sides. Grab the flap at the bottom of the paper and fold it up against the bottom of the 2 folded triangles. Turn the paper over and do the same thing to the flap on that side. This will make a paper hat.[4]
- The 2 folds should line up with each other.
Tip: When you go to fold the second side, use the first fold as a reference point.
-
5Take the bottom corners and fold them in. On 1 side of the paper, grab the corners of the rectangle that are sticking out over the triangle. Wrap these parts of the paper around the edges of the triangle and crease them so that they stay wrapped around the edge of the triangle. Then, fold the bottom flaps around the edges of the triangle and back towards you.[5]
- The flaps closest to you should be folded in front of the back flaps, not over them. If you fold over the back flaps, you won’t be able to fold the back flaps themselves.

Making the Final Folds
-
1Make the triangle into a square. Pick up the triangle, rotate it 45 degrees, then use your fingers to open up the bottom of the triangle. Pull the paper apart gently until it pops into a square shape. Make sure the bottom corners of the triangle fold over each other and become the bottom corner of a diamond.[6]
- Crease the paper along its edges so that it stays in the square shape.
-
2Fold up the bottom flaps. Arrange your paper so that the bottom points of the diamond can fold upward. Fold up 1 corner, aligning it with the top corner. Then, flip the paper over and do the same thing to the other side.[7]
- The bottom of the diamond should be the part of the paper with extra folds.
-
3Construct the triangle into a square again. Just like last time, pick up the triangle, rotate it 45 degrees, then open up the bottom of your new triangle with your fingers. Crease the paper along its edges so that it stays in the square shape.[8]
- The bottom corners will line up to become the bottom point of a square diamond.
-
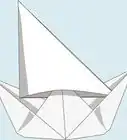
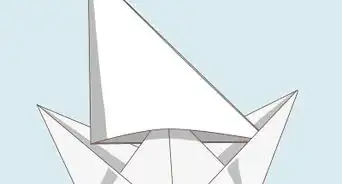
4Pull out the triangles on the side of the square. Start at the top of the diamond, and gently pull the two sides apart so that the seam running down the middle of the diamond blooms. Crease the bottom of the folded out sides to make the boat a bit stronger.[9]
- You may need to pull up the triangle inside the diamond while pulling apart the two sides. Try to keep the triangle inside the diamond sticking straight up as this will be your boat's "mast."
-
5Float your origami boat. Fill a small tub with water and place the boat on the water. If it starts to droop a little, keep making small adjustments to keep the sides up and prevent the boat from sinking.[10]
- You can reinforce the corners with clear tape and tape around the bottom to keep your boat dry.
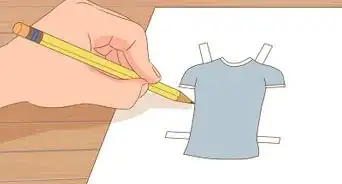
Tip: Waterproof your boat! Use a waxed paper from an art store to make your boat last longer, or color one side of the paper completely with a crayon. You can also try to make your boat out of aluminum foil.
Community Q&A
-
QuestionCan I use a sheet of aluminum foil?
 Community AnswerYes, and it won't sink as quickly, since it'll be waterproofed.
 -
QuestionCan you put things in your boat?
 Community AnswerYes, but not too many things, and not things that are too heavy or too big.
 -
QuestionWhat happens if you use normal paper? What sort of difference will it make instead of using origami paper?
 Community AnswerIt may be slightly harder to fold, since normal paper is thicker than origami paper.
Warnings
- Make sure you don't have any holes, as one little hole can turn into a huge rip. This could be good in a procedural text.⧼thumbs_response⧽
References
- ↑ https://www.lonelyplanet.com/kids/lp-kids-activity-venice-regatta-origami-paper-boat/
- ↑ https://www.easypeasyandfun.com/how-to-make-a-paper-boat/
- ↑ https://www.lonelyplanet.com/kids/lp-kids-activity-venice-regatta-origami-paper-boat/
- ↑ https://www.youtube.com/watch?v=b3QZpBL8-Tg#t=1m20s
- ↑ https://kids.nationalgeographic.com/explore/nature/make-a-paper-boat/
- ↑ https://www.lonelyplanet.com/kids/lp-kids-activity-venice-regatta-origami-paper-boat/
- ↑ https://www.easypeasyandfun.com/how-to-make-a-paper-boat/
- ↑ https://www.youtube.com/watch?v=b3QZpBL8-Tg#t=2m54s
- ↑ https://www.lonelyplanet.com/kids/lp-kids-activity-venice-regatta-origami-paper-boat/
About This Article

If you want to make a paper boat, fold a piece of paper in half from top to bottom. Then, fold it again from side to side and unfold so you have a crease in the center. Fold the top right corner down towards the center. Next, flip the paper over and fold the other corner down on the other side. Fold each of the bottom edges of the paper up and outwards to make a paper hat shape. Then, open the hat and flatten it horizontally to create a diamond. Fold the bottom edge of the diamond upwards towards the top. Then, turn the paper over and repeat on the other side. Pull the paper apart again and smooth it out to create a boat shape.