X
wikiHow is a “wiki,” similar to Wikipedia, which means that many of our articles are co-written by multiple authors. To create this article, volunteer authors worked to edit and improve it over time.
This article has been viewed 32,019 times.
Learn more...
Do-it-yourself cufflinks can make great gifts for Father's Day, Valentine's Day, and plenty of other special occasions, or you can simply opt to make a pair for yourself. There are multiple methods you can use, but each one is straightforward and easy to personalize.
Steps
Method 1
Method 1 of 4:
Method One: Button Cufflinks
-
1Cut the wire. Use wire cutters to snip off two 4-inch (10-cm) lengths of 20-gauge craft wire.
- You can use a different wire gauge, if desired, but it must be thin enough to bend without pliers.
- If you don't have any craft wire available, try unfolding two small, uncoated paperclips and using them, instead.
-
2Thread one button with wire. Insert one of your wire pieces through the hole on the back of a small shank button.
- You'll need to use two shank buttons for this project. Ideally, the two buttons should match. Choose buttons with a design you like since the decorative face of the button will show.
- Check the size of the buttons, too. The buttons themselves must be able to slide in and out of standard sleeve buttonholes. The holes on the back of each button must be wide enough for the craft wire to fit through.
Advertisement -
3Twist the wire ends. Once the wire is halfway through the hold on the back of the button, fold it in half and twist the ends together once or twice.
- This secures the button in place at the center of your wire.
- Note that the two wire ends should still be separate and distinct beneath the twist.
-
4Glue the fabric over each wire end. Place one scrap of fabric, wrong-side up, beneath one wire end. Lay a thin line of glue over the fabric and alongside the wire, then fold the fabric over to cover the wire.
- Fray-resistant fabric works best, but most medium to heavy weight materials can be used.
- Repeat with the other wire end. Note that you should use matching or coordinating fabric scraps.
- Let the glue dry before continuing.
-
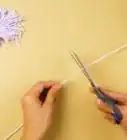
5Trim the ends. After the glue dries, trim away any excess wire and fabric.
- Use wire cutters to trim the length of each wire end to approximately 1 inch (2.5 cm).
- Use scissors to trim down the width of the fabric. Cut away all fabric that lies to the outside of the glue seal.
-
6Repeat with the other button. Create a matching cufflink with your second button and second length of wire. Follow the same steps used to complete the first cufflink.
- Check the fabric after you complete both cufflinks. If the material starts fraying, you can apply a little seam sealant to the raw edges.
-
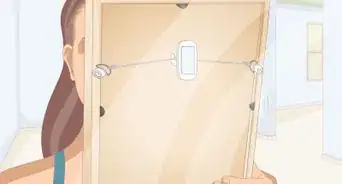
7Wear the cufflinks. Insert the wire ends of one cufflink through the buttonhole of one sleeve. Bend the covered wire ends back in opposite directions to hold the cufflink in place.
- Repeat with the second cufflink and the second sleeve.


Advertisement
Method 2
Method 2 of 4:
Method Two: Double Button Cufflinks
-
1Choose two sets of buttons. You will need two large shank buttons and two small shank buttons. Both large buttons should match each other. Likewise, both small buttons should match each other, too.
- The small buttons should be small enough to fit snugly through standard sleeve buttonholes.
- On the other hand, the large buttons will work better if they are too large to fit through average buttonholes.
-
2Separate a few chain links. Use a pair of needle-nose pliers to separate one to three links from a standard metal chain.
- The right number of chain links will depend upon the thickness of the chain. You need to separate a section that is just long enough to fit through the thickness created by a folded shirt cuff.
- If you don't have excess chain to work with, you can use a small jump ring or piece of elastic hair tie, instead.
-
3Attach a large and small button to the chain. Open one link of the detached chain and slip it into the hole on the back of one large button. Open the link on the opposite end of the chain and slip it into the hold on the back of one small button.
- Close both chain links to complete your first cufflink.
- If using a single link of chain or jump ring, you'll need to open the ring and insert it through the holes on both the small and large button.
- If using elastic hair ties, cut the hair tie and insert it through the holes of both the small and large button. Knot the hair tie so that it is roughly 1/4 to 1/2 inch (0.6 to 1.25 cm) away from both buttons, then trim away the excess elastic.[1]
-
4Repeat for the other cufflink. Follow the same steps to create a second cufflink from the remaining small and large button.
- Use the same number of chain links for both cufflinks.
- The two cufflinks should be identical when finished.
-
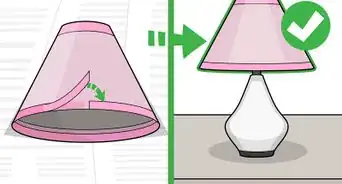
5Wear the cufflinks. To put one cufflink on, slide the smaller button through the buttonhole of one sleeve. The decorative faces of both buttons should be visible from either side of the buttonhole.
- Put the second cufflink on your other sleeve in the same manner.


Advertisement
Method 3
Method 3 of 4:
Method Three: Cufflink Backs[2]
-
1Choose your embellishments. You'll need two matching embellishments, both with flat backs that are roughly the same shape and size as the flat surface of your cufflink backs.
- Most cufflink findings have square or circular flat backs measuring approximately 0.4 inch (10 mm). For cufflink backs of this size, the flat back of your embellishment should be between 0.4 and 0.8 inch (10 to 20 mm).
- Popular options worth considering include small Lego bricks, flat-back metal charms, coins, non-shank buttons, and polymer clay charms.
- If you're feeling especially crafty, you can even layer together thin flat embellishments, like watch cog.
-
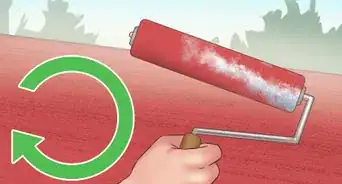
2Paint the embellishments, if desired. If you want the embellishments to match the cufflink backs, spray paint them an appropriate metallic color. Let the paint dry before continuing.
- This is only optional, of course. It isn't necessary if the embellishments already match the cufflinks. Even if they don't match, you can still leave the original color to create cufflinks with a more informal appearance.
-
3Glue one embellishment to one cufflink back. Apply a dot of hot glue to the flat surface of the cufflink back. Quickly center the flat back of the embellishment over the cufflink and press it into the glue.
- Allow the glue to cool and dry completely before handling the cufflink.
- Note that superglue could be used instead of hot glue, if desired.
- If layering cogs or other thin, flat objects, apply a dot of glue to the cufflink back and press the largest piece on top. Give it a few seconds to dry, then apply another layer of glue on top before pressing the next piece into that. Repeat as needed to create the desired effect.[3]
-
4Repeat. Glue the second embellishment onto the second cufflink in the same manner.
- When finished, you should have two nearly identical cufflinks.
-
5Wear the cufflinks. To put the cufflinks on, simply insert the stem of each cufflink into the buttonholes of each sleeve.


Advertisement
Method 4
Method 4 of 4:
Method Four: Cufflink Blanks[4]
-
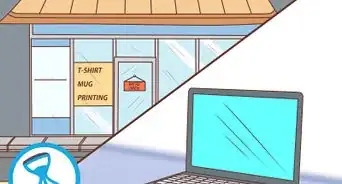
1Choose a paper design. You'll need to use cardstock weight paper for this project. Choose a ready-made design or print one from the computer.
- Grab some scrapbook paper with an appealing design for a simple option.
- Alternatively, you can print a special design, set of text, or photograph to use for your cufflinks. Make sure that the part of the design you want to use has been resized to match the dimensions of your cufflink blanks and glass tiles.
- If you print a design from an inkjet printer, allow the ink to dry for at least an hour before continuing.
-
2Glue both glass tiles onto the paper. Apply a dab of clear-drying craft glue onto the center of your chosen design, then firmly press the back of the glass tile into the glue.
- To ensure even adhesion, use a paintbrush to spread the glue over the entire surface of the design before pressing the glass tile on top.
- Continue pressing down on the glass tile until you can see the full design through it.
- Readjust the placement as needed to center the tile over the design, and carefully shift the tile around to pop any air bubbles that appear in between the glass and the paper.
-
3Allow the glue to dry. Let the glue dry completely before attempting to handle the glass tile further.
- If the moisture of the glue causes the paper to start bubbling up during the first few minutes, firmly press down on the tile for one to two minutes to smooth it out.
- You will need to wait at least four hours for the glue to dry, but waiting overnight would be an even safer option. The glue should be completely dry when ready.
-
4Trim away the excess paper. Use scissors to cut the excess paper from around the glass tiles, trimming it as close to the edges as possible.
- If you have trouble getting close to the tile using scissors, consider using a craft blade.
- After you think you've cut away enough paper, try placing the tile paper-side down into the indentation of the cufflink blank. If it doesn't fit, trim away more paper and try again.
-
5Glue one tile onto each cufflink blank. Spread a small dot of craft glue into the inside indentation of the cufflink blank, then firmly press the paper-side of the tile on top of it. Repeat with the second cufflink.
- As before, place a dab of glue into the center of the cufflink blank and spread it around with a paintbrush.
- If some of the glue squeezes out over the sides of the tile when you press the pieces together, simply wipe the glue away with your fingers or a damp paper towel.
-
6Let the glue dry completely. Allow the glue to dry for at least four hours before handling the cufflinks.
- To exercise even more caution, wait overnight before using the cufflinks.
-
7Wear the cufflinks. Simply insert the foot of each cufflink through the buttonholes of each sleeve to put them both on.


Advertisement
Things You'll Need
Button Cufflinks
- Craft wire, 20 gauge or thinner
- Fabric scraps
- 2 small shank buttons
- Wire cutters
- Scissors
- Fabric glue
- Seam sealant
Double Button Cufflinks
- 2 large shank buttons
- 2 small shank buttons
- Chains, jump rings, or elastic bands
- Needle-nose pliers
- Scissors (optional)
Cufflink Backs
- 2 flat cufflink backs
- 2 flat-back embellishments
- Spray paint (optional)
- Hot glue gun
- Hot glue sticks
Cufflink Blanks
- 2 cufflink blanks
- 2 matching glass tile inserts
- Craft glue
- Scissors
- Decorative paper (scrapbook paper, photographs, etc.)
- Paint brush

References
- ↑ http://www.cremedelacraft.com/2012/05/diy-cufflinks-from-buttons.html
- ↑ http://www.dreamalittlebigger.com/post/delight-dorky-dads-this-fathers-day.html
- ↑ http://www.polkadotbride.com/2013/04/diy-steampunk-grooms-accessories/
- ↑ http://somethingturquoise.com/2013/11/22/how-to-make-wedding-cufflinks/
About This Article
Advertisement