This article was co-authored by Claire Donovan-Blackwood. Claire Donovan-Blackwood is an Arts & Crafts Specialist and CEO of Heart Handmade UK, a site dedicated to helping people live a happy, creative life. With over 13 years of experience, Claire uses art as a form of therapy and focuses on mindfulness in the making of art. She makes crafting easy and accessible for those she works with. Claire received her B.A. in Photography & Visual Imagery from The University of Huddersfield.
There are 8 references cited in this article, which can be found at the bottom of the page.
This article has been viewed 197,588 times.
Painted mugs are an awesome way to spice up anyone’s cabinet or coffee table! They make the perfect DIY project or gift. Just get a mug, wash it, dab rubbing alcohol where you intend to put paint, and you’re almost ready to start painting!
Steps
Painting with Acrylic Paint
-
1Lay down newspapers on your workspace. Make sure that the newspaper covers your entire workspace. If you are worried about the newspaper sliding out of place, tape it down. Use 2 or more layers of newspaper if you are messy.
-
2Pour the acrylic paint(s) of your choice onto a paint palette. Squirt a grape-sized dollop of each color around the edges of the palette. Keep the colors separate, with about 1 inch (2.5 cm) in between each one. If you want to mix colors, pour a little of each color into one divot and mix with a separate brush.[1]
- Use a paper plate if you don’t have a paint palette.
- Don’t pour out too much paint!
Advertisement -
3
-
4Brush the first layer of paint on the mug and let it dry. Dip your brush in water and dry it on a paper towel. Then, dip it in the acrylic paint color of your choice. Take the paintbrush and paint whatever you want! Just make sure not to paint on the mug’s lip.[4]
- To paint larger areas, like background color, use a thick foam brush. When painting details and smaller designs, use a thin, pointed brush.[5]
-
5Paint more layers until your design is complete. Wait until the first layer is relatively dry before adding more. For a glossy finished look, add a top coat of clear acrylic paint. Just take a separate foam brush and lightly glide the clear acrylic over the design.[6]
-
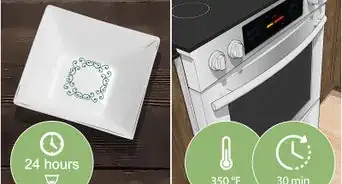
6Air-dry the mug for 24 hours. Place your mug on a piece of newspaper and store it in a safe place. Try not to touch the mug when it’s drying! Doing so can lengthen the drying time and mess up the paint.[7]
-
7Clean-up your design with an eraser and or rubbing alcohol. For paint smudges, use a Q-Tip soaked in rubbing alcohol to dab at the paint until it’s gone. Move slowly when dabbing so you don’t accidentally remove part of the design you like.[8]
-
8Bake your mug at 350 °F (177 °C) for 35 minutes. Place the mug upright on a baking sheet. Once the oven is at 350 °F (177 °C), put the sheet in the oven. After 35 minutes, remove the mug and set it to cool completely.[9]
- Read your paint labels. If the label provides specific baking instructions, follow them.[10]
- Don’t burn yourself!
-
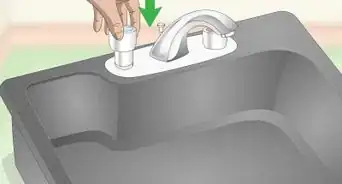
9Hand wash your mug. Don’t use the dishwasher because it can mess up the paint design. Just use dish soap and warm water to rinse your mug. Once you’ve cleaned your mug, it’s ready to be put to use![11]

Painting with Paint Pens
-
1
-
2Paint pen the first layer on the mug. Use an oil-based paint marker to decorate the mug. You can follow the design you made with pencil or change it up! Just don’t use a sharpie as a replacement paint pen because it will wear off quickly.[14]
-
3Add more layers of paint. Wait a few minutes to let the first layer of paint dry before adding. Continue adding more layers until you reach the color, thickness, and texture levels that you want. Just be careful not to mix the colors![15]
-
4Erase and or rub mistakes with a rubbing alcohol soaked Q-Tip. Use an eraser on leftover pencil markings. If there are stray paint marks, wait until they are dry to remove them. Then, use the rubbing alcohol soaked Q-Tip to dab at the paint until it’s gone. Dry off the Q-Tip before using so it isn’t dripping![16]
- Work slowly and dab gently. You don’t want to accidentally erase or remove a part of the design that you like.
-
5Air-dry the mug for at least 24 hours. Put the mug on a newspaper to dry. Don’t touch the mug while it’s drying. Doing so can elongate the drying process and mess up the design.[17]
-
6Bake the mug at 375 °F (191 °C) for 25 minutes. Put the mug right-side up on a baking sheet. Place the sheet and mug in the oven at 375 °F (191 °C). After 25 minutes, turn the oven off, but keep the mug in the oven for up to 2 hours. After 2 hours, remove the mug and set it to cool.[18]
- Use heat protection when removing the mug from the oven.
-
7Hand wash the mug with dish soap. Your mug is safe to wash now. However, while the dishwasher may be tempting, don’t use it. It will be too harsh on the mug and can wreck your new design! Once you clean the mug, put it to use! [19]
Painting Watercolor Designs with Nail Polish
-
1Fill a Tupperware container with warm water. Leave around 3 inches (7.6 cm) to the top of the container. The Tupperware should be deep enough to submerge your mug. If you don’t have a Tupperware, use any plastic container, big bowl, or sink.[20]
- The nail polish can leave a residue, so use a container you don’t care about.[21]
-
2Pour a few drops of nail polish in the water. Use as many colors as you want. Add more paint drops if the colors don’t disperse across the water.[22] Move quickly to prevent the paint from drying on the water’s surface.[23]
- Look at a color wheel if you are having trouble picking paint colors. It’ll show you which colors work well together.
-
3Swirl the paint slowly with a toothpick. Hold the toothpick and swirl it in a snake, zigzag, or random pattern. Go slowly to prevent the paint from clumping. Whilst this step isn’t necessary, it helps create an effortless look.[24]
-
4Dip your mug in the paint design for 3 to 4 seconds. Hold the mug straight and lower its bottom in the water. After 3 to 4 seconds, pull it out. Keep the mug straight when removing it to protect the paint design.[25]
-
5Air-dry the mug for 1 hour. Place the mug on a piece of newspaper or outside to dry. To protect the design, put the mug face down. And remember not to touch it while it’s drying![26]
-
6Hand wash the mug. Rinse the mug using cold or hot water and dish soap. Don’t use a dishwasher because it can ruin your design. Once you’ve washed the mug, gift it, use it, or place it around your home![27]
Community Q&A
-
QuestionInstead of rubbing alcohol, can I use nail polish remover?
 Community AnswerProbably, but rubbing alcohol is a lot safer than a solvent like nail polish remover.
 -
QuestionWon't the nail polish smell on the mug be strong?Community AnswerIf you seal the mug properly and wash it several times, the smell should fade.
-
QuestionCan I ever use a dishwasher? Is there a way to make it so that I can?
 Community AnswerYes, you can, if you use oil based paint. Sharpie Oil Based Paint Pens work great and your mug can withstand the dishwasher.
Warnings
- Keep the paint away from the mug’s lip.⧼thumbs_response⧽
- Baking can be dangerous! Wear oven mitts when handling the oven.⧼thumbs_response⧽
Things You’ll Need
Using Acrylic Paint
- Acrylic paint of your choice
- Newspaper and paper towels
- Paint brushes
- Paint palette or paper plate
- Pencil and eraser
- Painter’s tape
- Rubbing alcohol
- Water
- Oven
Using Oil-Based Paint Pens
- Oil-based paint pens of your choice
- Newspaper and paper towels
- Pencil and eraser
- Painter’s tape
- Rubbing alcohol
- Oven
Using Nail Polish
- Nail polish of your choice
- Newspaper and paper towels
- Tupperware
- Toothpicks

References
- ↑ https://www.youtube.com/watch?v=2oNsMva04MM
- ↑ https://www.youtube.com/watch?v=W4CU_uofy58
- ↑ https://www.youtube.com/watch?v=W4CU_uofy58
- ↑ https://www.youtube.com/watch?v=W4CU_uofy58
- ↑ https://www.youtube.com/watch?v=2oNsMva04MM
- ↑ http://lifeasmama.com/diy-handprint-mug/
- ↑ https://www.youtube.com/watch?v=W4CU_uofy58
- ↑ https://www.blessthismessplease.com/painted-sharpie-mugs-that-wont-wash-off/
- ↑ https://www.youtube.com/watch?v=W4CU_uofy58
- ↑ https://www.youtube.com/watch?v=W4CU_uofy58
- ↑ https://www.youtube.com/watch?v=dCWkh-CmsIU
- ↑ https://www.youtube.com/watch?v=W4CU_uofy58
- ↑ https://www.blessthismessplease.com/painted-sharpie-mugs-that-wont-wash-off/
- ↑ https://www.blessthismessplease.com/painted-sharpie-mugs-that-wont-wash-off/
- ↑ https://www.blessthismessplease.com/painted-sharpie-mugs-that-wont-wash-off/
- ↑ https://www.blessthismessplease.com/painted-sharpie-mugs-that-wont-wash-off/
- ↑ https://www.blessthismessplease.com/painted-sharpie-mugs-that-wont-wash-off/
- ↑ https://www.blessthismessplease.com/painted-sharpie-mugs-that-wont-wash-off/
- ↑ https://www.youtube.com/watch?v=dCWkh-CmsIU
- ↑ https://www.youtube.com/watch?v=uL5oBMF7zNQ
- ↑ https://www.youtube.com/watch?v=dCWkh-CmsIU
- ↑ https://www.youtube.com/watch?v=uL5oBMF7zNQ
- ↑ https://www.youtube.com/watch?v=QSQsWGPwQQQ
- ↑ https://www.youtube.com/watch?v=uL5oBMF7zNQ
- ↑ https://www.youtube.com/watch?v=dCWkh-CmsIU
- ↑ https://www.youtube.com/watch?v=dCWkh-CmsIU
- ↑ https://www.youtube.com/watch?v=dCWkh-CmsIU
- ↑ https://www.strathmoreartist.com/blog-reader/acrylic-paint-storage-tip.html
About This Article

To paint a mug, start by using a pencil to outline your design if you have one in mind. Once you’ve finished your outline, brush your first layer of acrylic paint on the mug and let it dry. Then, paint on any addition layers, letting your mug dry in between coats. If you want to paint background colors, use a thick, foam brush to make the process quicker. When you’ve finished painting your mug, leave it for 24 hours to air-dry. Finish by baking your mug for 35 minutes at 350 degrees Fahrenheit. Afterwards, make sure to always wash your mug by hand to avoid damaging the paint. For more tips, including how to paint your mug with watercolors and paint pens, read on!