This article was co-authored by Jordan Stolch. Jordan Stolch is an Image Strategist, Style Advisor, and the Founder of MiKADO - a concierge personal styling firm. With over a decade of experience, Jordan specializes in helping people eliminate the confusion and insecurities associated with how to dress in order to build a powerful image and use clothing to their strategic advantage. Jordan trains entrepreneurs, business leaders, and corporate executives in the foundations of "power dressing", from some of the country's preeminent companies such as Morgan Stanley, Deloitte, Berkshire Hathaway, Universal Music Group, Starbucks, and Disney. She works with clients both in-person and virtually, teaching them how to take the confusion out of style so they can operate at a higher level. Jordan earned her BA in Psychology from the University of Waterloo and studied Merchandise Marketing at the Fashion Institute of Technology (FIDM).
wikiHow marks an article as reader-approved once it receives enough positive feedback. In this case, 91% of readers who voted found the article helpful, earning it our reader-approved status.
This article has been viewed 391,270 times.
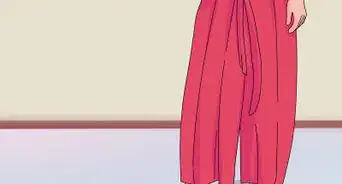
Palazzo pants are long, loose, wide leg trousers that seem to come in and out of fashion regularly. They are usually made from light, breathable fabrics, like crepe and jersey for the hot summer months. Even if you are a sewing novice, you can create your own custom pair of palazzo pants in under 30 minutes.
Steps
Fabric Prep
-
1Gather your materials. Creating palazzo pants is easier than you might think, but you will need some special materials and tools to create them. Before you begin, you will need:[1]
- a pair of loose fitting sweatpants
- some stretchy jersey fabric in the print or color of your choice.
- a pair of sharp scissors
- pins
- a sewing machine
- elastic material for the waistband
- Keep in mind that a lot of palazzo pants are made with printed, Indian- or bohemian-inspired fabric.
-
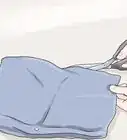
2Lay out your fabric. Fold your jersey fabric in half so that the edges line up and the print is on the inside. Then, lay your fabric out on a hard, clean surface, such as a hardwood floor or a large table. Make sure that the fabric is laying flat and that there are no bumps or ripples in the fabric.[2]Advertisement
-
3Place your pants on the fabric. Your sweatpants will serve as the pattern for the palazzo pants. Fold your sweatpants in half lengthwise and then lay them on top of your fabric. The inseam should be facing out towards the edge of the jersey fabric a few inches away from the edge of the material.[3]
-
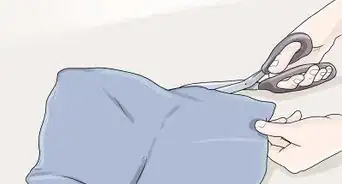
4Cut the fabric. Use your scissors to cut along the outer edge of your sweatpants. You should cut the fabric a few inches away from the sweatpants to ensure that they will be large enough. Follow the curve of the waist towards the crotch of the sweatpants. Then, cut downwards along the outer edge of the sweatpants leg.[4]
-
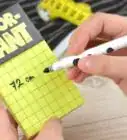
5Trim a few inches off of the top and bottom. Next, trim a long even strip off of the top and bottom of your fabric. This will allow you to customize the length of your pants and the height of the waist. Use your sweatpants as your guide. Trim the fabric so that it is a few inches away from the bottom hem of your pants and a few inches away from the waistband.[5]
- Don’t worry if there is a lot of excess fabric at the top of your pants. Later on, you will trim this excess fabric and customize your waistband for the fit you want.
-
6Turn the pants over. After you have cut one side, flip your sweatpants over lengthwise so that they inseam is a few inches away from the other edge of your fabric. Then, cut along the waist, crotch, and leg of the sweatpants as you did with the other side.[6]
- After you have finished cutting the basic pattern, pick up your sweatpants and set them aside.
-
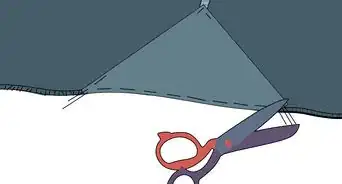
7Trim along the curve. The curve that you created in the fabric will be the waist and hips of your pants. This area should be snug, so you will need to trim it. Trim about an inch off of this area on both sides to bring the waist in.[7]

Waist and Inseam
-
1Pin along the edges. Leave your fabric as it is and begin pinning along the curved edges (the waist area). Do not pin along the legs yet, just along the outer edge of the curved area. Place the pins about one inch away from the edge of the fabric and space them out about three inches apart.[8]
- When pinning fabric, place ball-head pins so that the points are facing in towards the fabric and the balls are on the outside of the fabric.[9]
-
2Sew the curved edges. Begin sewing along the curved edges that you just pinned.[10] Remove the pins right before you sew over them.[11] You can use a regular straight stitch, or use a baste stitch first to secure the edges and then go along the baste stitch with a regular stitch. A baste stitch is a temporary stitch that is easy to remove if you do not like the results.
- Make sure that your stitch is about one to two inches from the edge of the fabric to ensure a strong seam.
- After you have finished sewing, trim off any excess thread from the areas you just sewed.
-
3Readjust and lay out your fabric. After you have sewed both sides of the pants, pick up your fabric and adjust it so that the two seams that you created are facing each other. Then, lay the fabric out on a flat surface.[12]
- The leg fabric should now look more like pant legs with a space between them. This space will be the inseam of your pants.
- Keep the fabric’s print facing inwards. Do not turn it inside out.
-
4Pin the crotch and the inseam of the pant legs. Place one pin at the crotch and then go down the inside of one of the pant legs and place pins about three inches apart. Make sure that the pins are about an inch from the edge of the fabric. Pin the other pant leg as well.[13]
-
5Sew along the inseam. After your pants are pinned, being sewing along the inseam.[14] Take out the pins as you go, right before you sew over them.[15] Remember to sew about an inch or two away from the edge of the fabric. You may want to begin with a baste stitch and then follow it up with a regular stitch, or you can just start with a regular stitch.
- After you have finished sewing the inseam, go along the sewn edges and trim off any excess thread.
Waistband
-
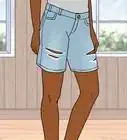
1Try on your pants. To determine where to cut your waistband, turn the pants inside out and try them on. Pull the waistband fabric up and then fold it over. Adjust the fabric to where it feels comfortable. The top of the folded fabric should be close to your belly button.[16]
- After you have found a comfortable height for your waistband, remove the pants. Try to keep the waistband folded at the level that you like it. You may even want to place a couple of pins to keep it in place.
-
2Trim along the bottom edge of the folded waistband. Use your scissors to trim along the bottom edge of the folded material. Do not worry if this is a little lower than you want your palazzo pants to be. You will reattach the fabric that you trimmed off.[17]
- If you want your waist to be a little lower than you measured, you can always cut a bit of fabric off of the folded waistband material that you just trimmed off. However, keep in mind that this is optional.
-
3Cut and sew your elastic band. You will need to trim the elastic band so that it is slightly smaller than the waistband fabric. Fold the elastic band in half and hold it next to your fabric waistband material. Then, trim along the open edge of the elastic band so that it is a couple of inches smaller than your fabric waistband.[18]
- After you have cut your elastic band, sew the edge that you cut to secure the band in a circle. Just sew across the elastic band near the edge of the side you cut.
-
4Prepare your waistband fabric. Take the waistband fabric and turn it so that the print is facing outwards. Make sure that the waistband is doubled. If it is not, then fold it in half all the way around to double the material.[19]
- Check the edges to ensure that they are all even. The edges will need to be lined up in order to sew the waistband onto the pants.
-
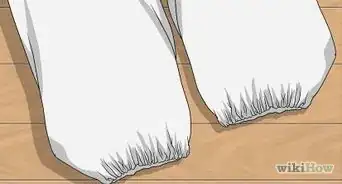
5Tuck the elastic into the waistband. Take your elastic waistband and begin tucking it in between the waistband fabric. Push the elastic band up towards the fold, which will be the top of the waistband of your palazzo pants. When you are finished, the elastic band should not be visible.[20]
-
6Pin the waistband to the pants. Hold the waistband so that the top fold is facing down towards your pant legs. Then, pull the waist of your palazzo pants through the waistband and line up the edges. The open edges of the waistband should be even with the edges of the waist. Pin these edges together to secure them.[21]
- Make sure that the pins go all the way through the waistband material and the waist. Space them about three inches apart all along the edge of the waist.
-
7Sew along the pinned area. After you have pinned the waistband to the waist, sew along this area.[22] Stretch the fabric as you sew to ensure an even stitch with no bumps or ripples. Make your stitch about an inch away from the edge.
- You can remove the pins as you go or take them out after you have finished sewing the edge.
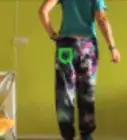
- After you have taken out the pins, flip up your waistband and try on your new palazzo pants!
Community Q&A
-
QuestionWhat if I'm not skinny?The same directions hold true whether you are skinny or plus-sized.
-
QuestionHow can I find out how many meters of fabric I will need?
 Community AnswerAfter you make stencils, you can lay them on the fabric with an inch seam allowance in the most space-efficient way possible. If you are unable to do this, you could produce a scale diagram on paper, using the same rules in regards to space efficiency and seam allowance.
 -
QuestionWhat fabric should I use to make palazzo pants?
 Community AnswerCotton is the best in my opinion - it is comfy and has cool designs.


References
- ↑ https://www.youtube.com/watch?v=CvLUC4_lTBY
- ↑ https://www.youtube.com/watch?v=CvLUC4_lTBY
- ↑ https://www.youtube.com/watch?v=CvLUC4_lTBY
- ↑ https://www.youtube.com/watch?v=CvLUC4_lTBY
- ↑ https://www.youtube.com/watch?v=CvLUC4_lTBY
- ↑ https://www.youtube.com/watch?v=CvLUC4_lTBY
- ↑ https://www.youtube.com/watch?v=CvLUC4_lTBY
- ↑ https://www.youtube.com/watch?v=CvLUC4_lTBY
- ↑ http://howtosew.com/blog/sewing-basics/how-pin-fabric
- ↑ https://www.youtube.com/watch?v=CvLUC4_lTBY
- ↑ http://howtosew.com/blog/sewing-basics/how-pin-fabric
- ↑ https://www.youtube.com/watch?v=CvLUC4_lTBY
- ↑ https://www.youtube.com/watch?v=CvLUC4_lTBY
- ↑ https://www.youtube.com/watch?v=CvLUC4_lTBY
- ↑ http://howtosew.com/blog/sewing-basics/how-pin-fabric
- ↑ https://www.youtube.com/watch?v=CvLUC4_lTBY
- ↑ https://www.youtube.com/watch?v=CvLUC4_lTBY
- ↑ https://www.youtube.com/watch?v=CvLUC4_lTBY
- ↑ https://www.youtube.com/watch?v=CvLUC4_lTBY
- ↑ https://www.youtube.com/watch?v=CvLUC4_lTBY
- ↑ https://www.youtube.com/watch?v=CvLUC4_lTBY
- ↑ https://www.youtube.com/watch?v=CvLUC4_lTBY
About This Article

If you want to make your own palazzo pants, fold a large piece of jersey in half so the edges line up and the print is on the inside, then lay the fabric on a hard, clean surface. Fold a pair of sweatpants in half lengthwise and lay them on top of the jersey so the inseam is facing the fold in the jersey. Cut the jersey on the folded side a few inches away from the crotch and legs of the pants, then flip the pants over and cut the jersey again. Sew the curved edges of the pants, then lay the pants out and sew the legs. Finish by adding an elastic waistband. To learn how to sew the waistband, keep reading!