This article was co-authored by wikiHow Staff. Our trained team of editors and researchers validate articles for accuracy and comprehensiveness. wikiHow's Content Management Team carefully monitors the work from our editorial staff to ensure that each article is backed by trusted research and meets our high quality standards.
There are 17 references cited in this article, which can be found at the bottom of the page.
This article has been viewed 81,474 times.
Learn more...
Sweatpants are comfortable to wear. They are perfect for working out, relaxing at home, and running errands in the middle of the night. If it is too warm to wear sweatpants where you live, however, consider giving sweatshirts a try. You can make them from an old pair of sweatpants, or you can make them from scratch.
Steps
Turning Sweatpants into Sweatshorts
-
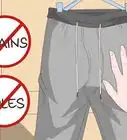
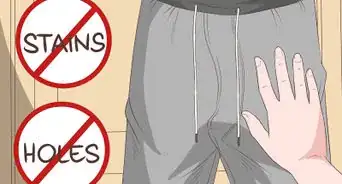
1Spread out a pair of sweatpants on a flat surface. You will be cutting these sweatpants up, so make sure that they are a pair you don't mind permanently altering. Make sure that the front of the pants is facing you.[1]
-
2Lay a pair of shorts on top, matching up the waistbands. Find a pair of shorts that are the length you want the sweatshirts to be. Place them on top of the sweatpants so that the waistbands are aligned. Make sure that the front of the shorts is facing you too.[2]
- If you don't own a pair of shorts, put the sweatpants on, make a mark with a chalk or pen where you want them to end, then take them off.
Advertisement -
3Trace the bottom edge of the shorts with a chalk or pen. Use chalk for dark fabrics, and a pen for light fabrics. If you need to, use a ruler to make the line nice and straight.[3]
- If you want to hem the cuffs later for a finished look, add 1⁄2 inch (1.3 cm) to the cuffs.
- If you don't have a pair of shorts, use a ruler to draw a straight line across 1 of the legs. Angle the line up towards the inseam slightly.[4]
-
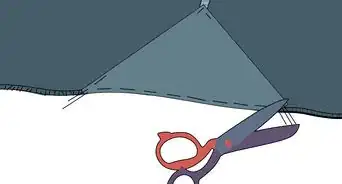
4Set the shorts aside and cut along the lines that you drew. Use a sharp pair of scissors for this, and make sure that you cut through both layers of fabric. If you plan on leaving the edges raw, cut just above the line that you drew so that it doesn't show on the finished product.[5]
- If you don't have a pair of shorts, cut off the leg that you marked. Fold the pants in half, then use the cut edge as guide for cutting the second leg off.
-
5Leave the cut edges raw if you prefer a rugged look. Just like T-shirt material, sweatpants material does not fray. You can leave the cut edges of your sweatshorts raw, and never have to worry about the fabric unraveling.
- It might be a good idea to place a drop of super glue or fabric glue on the cut edges of the seams. This will prevent the seams from splitting.
-
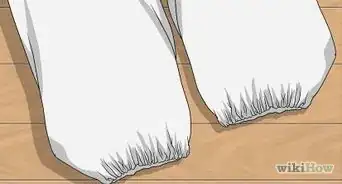
6Fold the cut edges inward and sew them, if you want a finished cuff. Fold the cut edges into the legs by 1⁄2 inch (1.3 cm). Sew the hem down as close as possible to the cut edge. Use a thread color that matches your fabric and a straight stitch.[6]
- Be sure to backstitch when you start and finish sewing, and to snip the excess thread off.
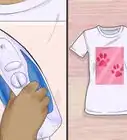
- If you don't know how to sew, you can use fabric glue or iron-on hem tape instead. Follow the instructions on the label or packaging of your chosen product.
Sewing Sweatshorts from Scratch
-
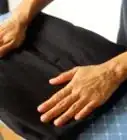
1Fold sweatpants fabric in half, with the wrong sides facing out. Sweatpant fabric looks similar to T-shirt fabric on the right side, and fuzzy on the wrong side. You can find it in most fabric shops. Make sure that you are folding along the grain. The thin stripes that make up the knitting should run parallel to the fold.[7]
- If you can't find sweatpant fabric, use T-shirt or jersey fabric instead.
-
2Fold pair of shorts in half and them place on top of fabric. Find a pair of loose-fitting shorts and fold them in half lengthwise. Place them on top of the folded fabric. Leave enough space at the top of the shorts for the elastic.[8]
- Double the width of the elastic that you'll be using for your waistband. This is how far the shorts should be from the top edge of the fabric.
- Place the shorts in such a way so that you have enough room to cut a second pair.
-
3Cut around the shorts, leaving a 1⁄2 in (1.3 cm) border. Make sure that you cut around the side and bottom edges of the shorts. Don't cut along the top edge. Instead, extend the side edges up to the top edge of the fabric.[9]
- You are adding extra length to the top edge for the waistband.
- You can trace the shorts first. Use a tailor's chalk for dark fabrics, and a tailor's pen for light fabrics.
- If you don't want to hem the cuffs, do not add a 1⁄2 in (1.3 cm) seam allowance to the bottom of the shorts.
-
4Sew up both of the straight edges along the sides. Use a straight stitch, a matching thread color, and a 1⁄2 in (1.3 cm) seam allowance. Backstitch when you start and finish sewing. Do not sew the curved part that was the crotch/sew of your shorts. You are just doing the inseam and the outside seam for now.[10]
- Use sewing pins to hold the fabric together as you sew, if needed. Remember to take them out when you are done sewing.
-
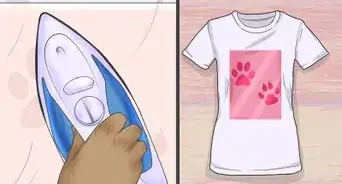
5Fold the cuff up by 1⁄2 inch (1.3 cm) and sew it down, if desired. Roll the bottom edge of pan leg up by 1⁄2 inch (1.3 cm). Sew as close as possible to the raw edge. Use a straight stitch and a matching thread color, just like before. Backstitch when you begin and finish sewing, and snip the excess thread off.
- Make sure that you are folding the cuff on the outside of the pant leg. The raw edge will eventually be on the inside.
-
6Repeat the process to make a second pant leg. Use the shape you just finished sewing to trace an identical shape on your folded fabric. Cut the second shape out and sew up the straight side edges. Sew the cuff, if desired.[11]
- At this point, you can trim the side seams down to 1⁄4 inch (0.64 cm), or you can leave them as they are.
-
7Turn 1 leg right-side-out and tuck it inside the other leg. You will have a tube that has the fuzzy side of the fabric on the outside and inside. The smooth sides of the fabric will be sandwiched inside the layers.[12]
-
8Sew the curved seat and crotch. Start sewing at the waistband. Work your way along the curve, and up towards the other end at the waistband. Use a straight stitch, 1⁄2 in (1.3 cm) seam allowance, and a matching thread color, just like before. Remember to backstitch when you start and finish sewing.[13]
- Secure the curved part of the crotch and seat with sewing pins, if you have to, but remember to remove them later.
-
9Un-tuck the legs and turn the shorts inside-out. Reach into the tube and grab the inside leg at the cuff. Pull the leg out so that you have a completed set of shorts. The wrong side of the fabric should be facing you. If it isn't, turn the sorts inside-out.[14]
-
10Cut a piece of wide elastic according to your waist measurement. Wrap a piece of wide elastic around your waist, then cut it where it overlaps. The color of the elastic does not matter because it will be inside the waistband.[15]
-
11Sew the ends of the elastic together using a zigzag stitch. Overlap the ends of the elastic by about 1⁄4 inch (0.64 cm). Sew across the overlapped ends 3 to 4 times using a zigzag stitch. The thread color does not matter because it will be on the inside.[16]
-
12Sew the elastic to the top edge of the waistband using a zigzag stitch. Slip the elastic over the waistband of your shorts. Secure it to each of the front, back, and side seams with sewing pins. Make sure that the top edges are aligned, then sew the elastic to the shorts using a zigzag stitch and a matching thread color.[17]
- You will need to pull on the elastic as you sew so that it stretches to fit the waistband.
- Remember to take the pins out when you are done!
-
13Fold the waistband down and sew along the bottom edge. Fold the waistband down so that the elastic is hidden. Sew along the bottom edge of this folded waistband using another zigzag stitch. Match the color to your fabric, and backstitch when you start and finish sewing. Snip the excess thread off when you are done.[18]
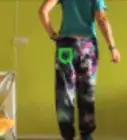
- Turn the shorts right-side-out when you are done. They are now ready to wear! It would be a good idea to quickly go over them, and trim off any loose or hanging threads, however.

Things You'll Need
Turning Sweatpants into Sweatshorts
- Sweatpants that fit you
- Shorts that fit you (optional, but recommended)
- Tailor's chalk or pen
- Fabric scissors
- Thread and sewing machine (optional)
- Iron-on hem tape (optional)
Sewing Sweatshorts from Scratch
- Tailor's chalk or pen
- Fabric scissors
- Sewing pins
- 1 in (2.5 cm) wide elastic
- Shorts that fit you
- Sweatpant fabric
- Thread
- Sewing machine

References
- ↑ https://www.youtube.com/watch?v=n51UYDXr4uQ&feature=youtu.be&t=1m59s
- ↑ https://www.youtube.com/watch?v=n51UYDXr4uQ&feature=youtu.be&t=2m11s
- ↑ https://www.youtube.com/watch?v=n51UYDXr4uQ&feature=youtu.be&t=2m26s
- ↑ https://www.manmadediy.com/users/gabriel/posts/2626-how-to-make-your-own-shorts-from-a-pair-of-pants-no-sewing-required
- ↑ https://www.youtube.com/watch?v=n51UYDXr4uQ&feature=youtu.be&t=3m1s
- ↑ https://www.manmadediy.com/users/gabriel/posts/2626-how-to-make-your-own-shorts-from-a-pair-of-pants-no-sewing-required
- ↑ https://www.youtube.com/watch?v=zvNyjkQ4peE&feature=youtu.be&t=27s
- ↑ https://www.youtube.com/watch?v=zvNyjkQ4peE&feature=youtu.be&t=43s
- ↑ https://www.youtube.com/watch?v=zvNyjkQ4peE&feature=youtu.be&t=48s
- ↑ https://www.youtube.com/watch?v=zvNyjkQ4peE&feature=youtu.be&t=56s
- ↑ https://www.youtube.com/watch?v=zvNyjkQ4peE&feature=youtu.be&t=1m2s
- ↑ https://www.youtube.com/watch?v=zvNyjkQ4peE&feature=youtu.be&t=1m16s
- ↑ https://www.youtube.com/watch?v=zvNyjkQ4peE&feature=youtu.be&t=1m23s
- ↑ https://www.youtube.com/watch?v=zvNyjkQ4peE&feature=youtu.be&t=1m35s
- ↑ https://www.youtube.com/watch?v=zvNyjkQ4peE&feature=youtu.be&t=1m40s
- ↑ https://www.youtube.com/watch?v=zvNyjkQ4peE&feature=youtu.be&t=2m
- ↑ https://www.youtube.com/watch?v=zvNyjkQ4peE&feature=youtu.be&t=2m15s
- ↑ https://www.youtube.com/watch?v=zvNyjkQ4peE&feature=youtu.be&t=2m35s
About This Article