This article was co-authored by wikiHow Staff. Our trained team of editors and researchers validate articles for accuracy and comprehensiveness. wikiHow's Content Management Team carefully monitors the work from our editorial staff to ensure that each article is backed by trusted research and meets our high quality standards.
The wikiHow Video Team also followed the article's instructions and verified that they work.
This article has been viewed 472,793 times.
Learn more...
Wind chimes are a pretty way to decorate your porch. When the wind blows, they will make a gentle tinkling noise. While you can always buy one from the store, making your own wind chime is easy. All you need is a glass bottle, some ornaments and key rings, and a bit of chain or cording.
Steps
Cutting the Bottle
-
1Find an empty wine bottle. You can use one from the recycling bin or you can buy a brand new bottle from the craft store. Be sure to wash the bottle with soap and water and remove any labels.
- Remove the cork and set it aside for a different project.
- If you are buying a tinted bottle from the craft store, be aware that color usually does not go through the bottle and may chip off.
-
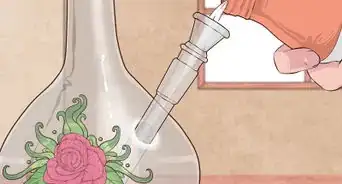
2Prepare a pot of boiling water and a pot of iced water. The key to cutting a bottle in half is to dip it between hot and cold water until it comes apart. Fill a large pot with water and bring it to a boil. Have another pot or bowl filled with iced water close by.[1]
- Keep the water at a steady boil on the stove.
- The iced water needs enough ice in it to make it very cold, but not so much ice that you can't stick anything inside it.
Advertisement -
3Score a line around the bottle with a glass saw. Put on a pair of leather work gloves first. Next, place the bottle on a stable surface, then set the saw down next to it. Rotate the bottle as you apply constant, even pressure with the saw, scoring a thin line. Don't worry about cutting the bottle completely in half.[2]
- You can use a tile saw with a glass blade instead.
- How far down you make this line is up to you. About 3/4 of the way down from the top would be ideal, however.[3]
- If you want to, you can use a metal clamp or string as a cutting guide.
-
4Dip the bottle in boiling and iced water until the bottom comes off. You only need to dip the bottle deep enough so that the scored line is submerged. Rotate the bottle while it is under the water, sort of like stirring soup with a spoon. Keep doing this until the bottom half of the bottle breaks off.[4]
- Start with the boiling water, then do the cold. Keep alternating between the 2 pots until the bottom half of the bottle breaks off.
- How many alternations you do will vary each time. It will depend on various factors, such as the depth of the scored line, the thickness and quality of the glass, etc.
-
5Discard the bottom half of the bottle and keep the top. What you do with the bottom half is up to you. You can toss it into the recycling bin, or you can set it aside for another project. For example, you can turn it into a glass jar or cup.
- If you wish to keep the bottom half, be sure to sand and polish the cut edge.
-
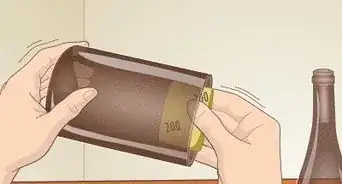
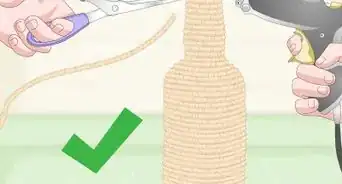
6Polish the cut edge with various grits of sandpaper. Hold the sandpaper against a flat surface, like a plate, then rub the cut edge of the bottle against the sandpaper. Start with a coarse grit first, then work your way up to a medium grit, and finally to a fine grit.[5]
- Keep the bottle wet as you sand it to prevent dust and chipping.[6]
- The exact grit number does not matter, as long as the packaging says: coarse, medium, and fine. It would be good to finish with a high number, like 400-grit, however.
- Keep your work gloves on during this step. Don't take them off until after you have finished smoothing the glass.


Adding the Hanging Chain
-
1Decide how long you want the hanging chain to be. Starting at the base of the bottle's neck, measure towards the top of the bottle. Add this measurement to however long you want your hanging chain to be.[7]
- For example, if your bottle's neck measures 3 inches (7.6 cm) and you want your hanging chain to be 14 inches (36 cm) long, you should cut the chain down to 17 inches (43 cm).
-
2Cut a piece of chain with wire cutters according to this length. The chain should be thin enough so that you can slide it down the neck of the bottle, and delicate enough so that you can cut it with wire cutters. A jewelry chain could work, but the loops need to be big enough so that you can thread a split key ring through them.
- It is better to cut the chain too long than too short. You can always trim it shorter.
- Alternatively, you can a length of nylon cording instead. Cut it a little longer than you need it so that you can tie knots into it.[8]
-
3Secure a split key ring to the bottom of the chain. Find a split key ring that is wider than the neck of your bottle--about 1 inch (2.5 cm) wide should be fine. Separate the key ring, and feed it onto the end of your chain. The key ring will act as a stopper inside the bottle.[9]
- The key ring must be bigger than the neck of the bottle. If it is too small, it won't hold the bottle up.
- If you are using a cord, tie the bottom end to a large key ring using a secure double-knot. If you can't find a key ring, you could use plain, metal ring.
-
4Feed the other end of the chain through the neck of the bottle. Turn the bottle upside down, and place the chain inside. Let the chain fall through the neck of the bottle and out the top. The key ring will sit right inside the neck.
- Follow this same process if you are using a nylon cord.
-
5Thread another split key ring onto the top of the chain. This will allow you to actually hang the finished wind chime from a hook. Hold the wind chime up by the second key ring; the bottle will slide down the chain and stop at the first key ring.
- The first key ring will be either somewhere inside the neck or just below it.
- If you are using a nylon cord, simply tie the other end to another key ring or metal ring.

Adding the Wind Catch
-
1Cut a second chain for the wind catch to dangle from. Hold the bottle up by the chain and note where the key ring sits inside. Measure from this point down to about 1 inch (2.5 cm) from the bottom edge of the bottle. Cut a second piece of chain according to that length.[10]
- The wind catch is the little ornament that dangles from the bottom of the wind chime.
- If you used a nylon cord previously, you should use a second piece here. Extend the cord below the bottom edge of the bottle.
-
2Add the second chain to the key ring inside the bottle. Reach into the bottle and pull out the key ring. Thread the end of your second chain onto this key ring, then hold your wind chime up again.
- You will have 2 chains in your bottle. The first chain should be sticking out of the top of the bottle. The second chain will be dangling inside the bottle.
- If you used a nylon cord, tie it to the ring. For extra noise, thread a large, wooden bead onto the cord, then tie a knot below it so that it sits inside the bottle.[11]
-
3Thread a third split key ring to the bottom of the dangling chain. This will allow you to secure your desired ornament.[12] Alternatively, you can skip this step and rely on a small hook attached to the top of the wind catch.
- Keep in mind that if you choose the hook, you'll need to screw it onto your dangle first. It must also be small enough to fit through the bottom loop on the chain.
- If you used a nylon cord, then tie a metal ring to the bottom. Don't use a hook.
-
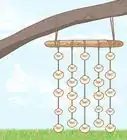
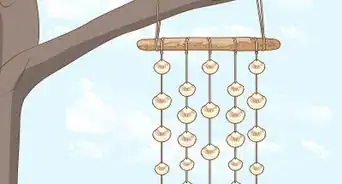
4Choose an ornament to use as the wind catch. A chunky necklace pendant will work just fine, but you can also use a wooden ornament instead. If you choose a wooden ornament, drill a hole into the top, then add a hook or eye screw.[13]
- Alternatively, you can repeat the process to add a smaller bottle to the bottom of the first one. This will give you a stacked wind chime.
-
5Secure the ornament onto the key ring. Split open the key ring, and thread it onto the loop that's on top of your pendant. If you used a hook, simply slide it onto the bottom ring of the chain.[14]
-
6Hang the wind chime using the key ring at the top of the chain. You can hang it outside where the wind will catch it, but if you want to use it for purely decorative purposes, hang it indoors instead.


Community Q&A
-
QuestionDo I have to worry about the bottle sliding off the cork?
 Community AnswerYou shouldn't have to. The cork should be tight enough to keep the bottle from slipping.
 -
QuestionWhat do I do with the other half of the wine bottles?
 Community AnswerSand the edges of the remaining bottles with 200 grit sand paper and use them as retro/modern cups or showpieces.
 -
QuestionWhen you cut the bottle, do you press hard or light with the glass cutter?
 Community AnswerDo not press too hard as the glass might splinter. You just want to break the surface tension on the glass by making a faint gray line, along which the glass cracks when put alternately in hot (near boiling point) and ice cold water.
Warnings
- Be careful when cutting the glass bottle. If you are concerned about chips and dust, put on a pair of safety goggles and a dust mask.⧼thumbs_response⧽
Things You'll Need
- Empty glass wine bottle
- Glass saw or a tile saw with a glass blade
- Leather work gloves
- 2 pots
- Boiling water
- Iced water
- Coarse, medium, and fine-grit sandpaper
- Thin chain
- 3 split key rings
- Wire cutters
- Medallion or ornament

References
- ↑ http://www.homegrown.org/forum/topics/wine-bottle-wind-chimes-101
- ↑ https://www.hometalk.com/23926111/how-to-make-a-wine-bottle-wind-chime
- ↑ http://www.homegrown.org/forum/topics/wine-bottle-wind-chimes-101
- ↑ http://www.homegrown.org/forum/topics/wine-bottle-wind-chimes-101
- ↑ https://www.hometalk.com/23926111/how-to-make-a-wine-bottle-wind-chime
- ↑ http://www.homegrown.org/forum/topics/wine-bottle-wind-chimes-101
- ↑ http://www.homegrown.org/forum/topics/wine-bottle-wind-chimes-101
- ↑ https://www.youtube.com/watch?v=S__C4GPMIsg&feature=youtu.be&t=12m35s
- ↑ http://www.homegrown.org/forum/topics/wine-bottle-wind-chimes-101
- ↑ http://www.homegrown.org/forum/topics/wine-bottle-wind-chimes-101
- ↑ https://www.youtube.com/watch?v=S__C4GPMIsg&feature=youtu.be&t=12m45s
- ↑ http://www.homegrown.org/forum/topics/wine-bottle-wind-chimes-101
- ↑ https://www.hometalk.com/23926111/how-to-make-a-wine-bottle-wind-chime
- ↑ https://www.hometalk.com/23926111/how-to-make-a-wine-bottle-wind-chime
About This Article

To make a wine bottle wind chime, start by gathering the supplies you’ll need, including a wine bottle, glass saw, sandpaper, chain, and wire cutters. Then, score a line with the saw around the bottle about 3/4 of the way down from the top. Once you’ve completed the line, alternate between dipping the bottle in a pot of boiling water and a bowl of ice cold water until the bottom falls off. Sand the sharp edges down with sandpaper, then cut off a piece of chain with your wire cutters. Attach a keyring to the end of the chain that’s wider than the neck of the bottle so it can hold the bottle up. Next, thread the chain through the bottleneck so the keyring comes to rest at the bottom of the neck. Finally, attach a second keyring to the other end of the chain so you can hang up your chime. For tips on how to add the wind catcher, keep reading!