This article was co-authored by wikiHow Staff. Our trained team of editors and researchers validate articles for accuracy and comprehensiveness. wikiHow's Content Management Team carefully monitors the work from our editorial staff to ensure that each article is backed by trusted research and meets our high quality standards.
There are 12 references cited in this article, which can be found at the bottom of the page.
This article has been viewed 26,723 times.
Learn more...
Wooden beads are a great way to add a rustic touch to any beaded necklace, bracelet, or garland. They can be expensive to buy, but luckily they are fairly cheap to make. Best of all, they are easy to produce at home with basic supplies, like saws, dremels, and drill bits. Once you get the hang of making basic beads, you can move onto more intricate designs!
Steps
Cutting the Beads
-
1Find a twig that's no thicker than your finger. Anything that's less than 1⁄2 inch (1.3 cm) would be ideal.[1] The length and type of wood don’t matter, but the longer the twig is, the more beads you'll be able to make!
- You don't have to use the entire twig to make your bead(s). Focus on the thickness rather than the length.
-
2Remove the bark from the twig. Try to peel the bark off with your fingers first. If that doesn't work, scrape the bark off with a pen knife. If the bark just won't come off, boil the twigs in water for a few minutes, then try again.[2]
- Some types of wood will be a lot easier to peel than others. Don’t worry if there’s some bark left, however; you can always sand it off later.
Advertisement -
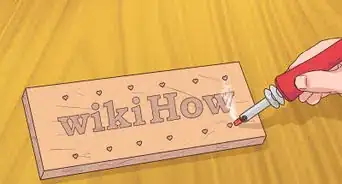
3Draw marks on the twig based on your desired bead size. Decide how wide you want your final beads to be. Next, use a pen or pencil to draw lines on the twig. How many lines you make is up to you. The space between each set of lines will create 1 bead.[3]
- Make the spaces between these lines a little bit bigger than you want your beads to be. This will allow room for shrinkage and error.[4]
- The beads don't have to be the same size. If you want them to be all the same size, however, use a ruler to make the marks.
-
4Place the twig on a split bench hook and align the first line with the slit. Set a split bench hook on your workbench. Make sure that the bottom stopper is secure against the edge of the table, then place your twig on top. Align the first mark on the twig with the slit on the bench hook.[5]
- A split bench hook looks like a regular bench hook, except that it has a slit in it for a saw to fit into.
- A bench hook is a wooden board with wooden stoppers at each end, 1 on the top and 1 on the bottom.
-
5Use a saw to cut the twig along the lines you drew. Once you finish the first line, take the piece you just sawed off and set it aside. Move the twig so that the next line is aligned with the slit and cut off another piece. Repeat the process until you have sawed off as many pieces as you want.[6]
- Hold the twig against the hook, but keep your fingers away from the slit so that you don't accidentally nick them.
- A basic hand saw will do the job just fine here. If you don't have access to a saw, try using a pair of heavy-duty gardening shears instead.
-
6Allow the beads to dry in a well-ventilated place for 1 week, if needed. Spread the beads out on a baking sheet, making sure that they don’t touch. Place the sheet in a dry, well-ventilated area that receives lots of sunlight, and leave it there for 1 week. About halfway through the week, flip the beads over so that the other side can dry too.[7]
- Outdoors would be the best, but if it’s rainy or humid where you live, leave the baking sheet indoors.
- The beads are shaped like cylinders at this point. Set them down on 1 of the flat sides so that they don’t roll around.
- This is only necessary for fresh twigs that are still wet or green on the inside. If you work with wet twigs, they could rot or mold.


Drilling the Holes
-
1Place a bead on a flat work surface. Take a bead and hold it between your thumb and index finger. Set it down on a flat work surface so that 1 of the flat sides is facing down and the other flat side is facing up.[8]
- Consider working on top of a scrap piece of wood. This way, you won't accidentally mar your work surface.
-
2Drill through the center of the bead using a 3-mm drill bit. Fit a dremel with a 3-mm drill bit. Place the drill bit against the top, flat part of the bead so that it's pointing straight down. Turn the dremel on and apply a light, downward pressure. Continue drilling until the bit comes out of the other side of the bead, making a complete hole.[9]
- You can use a larger or smaller drill bit, but you'll have to get an Allen key in the exact same size.
- If you are making more beads, drill holes through the rest of the beads.
- If you're worried about injuring yourself, pull on a pair of work gloves or hold the bead between a pair of pliers.
-
3Fit a dremel with a 3-mm sawed-off Allen key. Use a metal file or saw to cut the short arm off of an Allen key. You can also use a dremel with a metal cutting disk to cut the Allen key. Remove the drill bit and replace it with the longer part of the Allen key. It doesn't matter which side is sticking out: the cut side or the uncut side.[10]
- An Allen key is shaped like the letter "L." It has a long arm and a short arm. Saw the short arm off and keep the long arm.
- The Allen key must be the same size as your drill bit, or it won't fit into the bead. If it's even slightly smaller, it can result in the bead flying off!
-
4Slide the bead onto the Allen key. The fit will be very snug, which is a good thing. If you're having trouble getting the bead on, tap the flat side of the bead against your work surface. This will help push it further onto the Allen key.[11]
- Don't slide the bead past the tip of the Allen key. If the Allen key starts to stick out of the other end of the bead, you've gone too far!


Shaping and Finishing the Beads
-
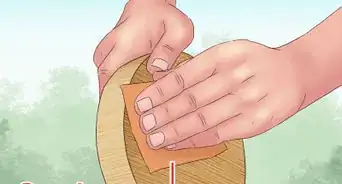
1Turn the dremel on and run the bead across 120-grit sandpaper. Wrap a piece of 120-grit sandpaper around a wooden board. Turn the dremel on and hold the side of the bead against the sandpaper. Gently move the dremel side-to-side.[12]
- Make sure that you're placing the curved part of the bead against the sandpaper, not the flat part.
-
2Continue to sand the bead until you get the diameter you want. Your bead should already be close to the correct height because of the way you cut it in the beginning. If you're making more beads, take the finished bead off of the Allen key and sand the rest.
- It’s best to sand multiple beads in a single batch. This way, you can ensure that they're all the same size.
-
3Adjust the angle of the sandpaper to shape the edges of the bead. Take the sandpaper off the board and fold it in half. Hold it at an angle against the bead and turn the dremel back on. Slowly move the dremel side-to-side until you get the shape you want for the bead.[13]
- You can hold the sandpaper at any angle you want. Sand the top part of the bead first, then the bottom.
-
4Smooth the bead with 320-grit sandpaper. Fold a sheet of 320-grit sandpaper in half. Turn the dremel on, then move the bead back and forth across the sandpaper. Do the sides of the bead first, then the top and bottom edges.[14]
- Follow the exact same process and angles as you did when shaping the bead. This way, you won't accidentally change the shape of the bead.
-
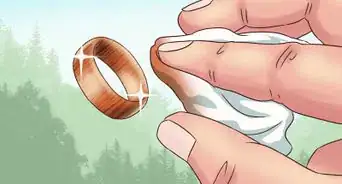
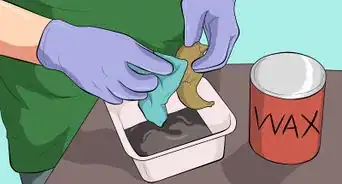
5Finish the bead with a rubbing or buffing pad, if desired. Hold the pad against the bead as you turn the dremel on. Move the pad across the entire surface of the bead until you get the level of shine you want.[15]
- This is just like how you smoothed the bead with 320-grit sandpaper, except that you're using a rubbing or buffing pad instead.
- You don't have to do this step if you want the beads to have a rougher texture.
- If you have other beads to shape and finish, now is the time to do so.
-
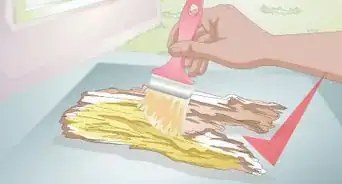
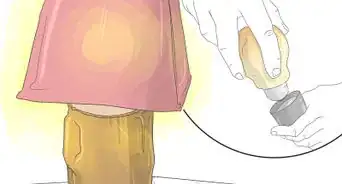
6Paint or varnish the bead while it’s still on the dremel, if desired. Hold the dremel in 1 hand, but don’t turn it on. Use your other hand to apply your desired paint or varnish to the bead. If you’d like to change the color of the bead while preserving the wood grain, use a wood stain instead. Once you’re done coating the bead, stand the dremel up on its end.[16]
- If the dremel can’t stand up on its own, lay it down on its side. If the bead is very large, move the dremel so that the bead is hanging off the edge of the table.
- If you don't want to use wood stain, you can dye the beads or paint them with watercolors.
-
7Let the paint or varnish dry, then remove the bead. How long it takes for the finish to dry depends on what sort of product you are using. Most paints dry within 30 minutes, but varnishes may require 1 or 2 hours. Wood stains will typically need much longer to dry.
- Read the label on the product that you are using to find out how long you should wait. Some finishes require a curing time as well.
- Once the first bead dries, you can move onto the rest.


Things You'll Need
- Twig, finger-thick or thinner
- Pen or pencil
- Split bench hook
- Hand saw
- Metal saw
- Dremel
- 3-mm drill bit
- 3-mm Allen key
- Baking sheet
- 120-grit sandpaper
- 320-grit sandpaper
- Rubbing or buffing pad
- Paint or varnish (optional)
- Dust mask (optional)
- Ruler (optional)


References
- ↑ https://pioneerthinking.com/tips-for-making-wood-beads-from-twigs
- ↑ https://pioneerthinking.com/tips-for-making-wood-beads-from-twigs
- ↑ https://www.youtube.com/watch?v=7yfwU8SXU18&t=20s
- ↑ https://pioneerthinking.com/tips-for-making-wood-beads-from-twigs
- ↑ https://www.youtube.com/watch?v=7yfwU8SXU18&t=40s
- ↑ https://www.youtube.com/watch?v=7yfwU8SXU18&t=45s
- ↑ https://pioneerthinking.com/tips-for-making-wood-beads-from-twigs
- ↑ https://www.youtube.com/watch?v=7yfwU8SXU18&t=3m20s
- ↑ https://www.youtube.com/watch?v=7yfwU8SXU18&t=3m40s
- ↑ https://www.youtube.com/watch?v=7yfwU8SXU18&t=4m30s
- ↑ https://www.youtube.com/watch?v=7yfwU8SXU18&t=5m20s
- ↑ https://www.youtube.com/watch?v=7yfwU8SXU18&t=6m30s
- ↑ https://www.youtube.com/watch?v=7yfwU8SXU18&t=8m15s
- ↑ https://www.youtube.com/watch?v=7yfwU8SXU18&t=9m20s
- ↑ https://www.youtube.com/watch?v=7yfwU8SXU18&t=10m
- ↑ https://pioneerthinking.com/tips-for-making-wood-beads-from-twigs
About This Article