wikiHow is a “wiki,” similar to Wikipedia, which means that many of our articles are co-written by multiple authors. To create this article, 46 people, some anonymous, worked to edit and improve it over time.
This article has been viewed 839,879 times.
Learn more...
Store-bought lamps are a quick, easy way to add light to a room, but they can also be a bit boring because they’re made to appeal to lots of different people. Instead, try building your own one-of-a-kind lamp using a meaningful object as the base.
Steps
Preparation
-
1Find a base. The base for your lamp should be sturdy enough to stand on its own, even after you add lamp apparatus and a shade on top. If you have a hollow base that you need to stabilize, consider partially filling it with something like marbles or sand. Some ideas for lamp bases that you could use:
- Wine bottles
- Log or timber
- Wooden pails or buckets
- Toys or figurines
- Hollowed-out books
-
2Buy a lamp kit. These can be found at most hardware stores. Note that it's possible to purchase the pieces separately, but buying them together will ensure a better fit. If you do buy the cord separately, choose a #18 size cord.[1]
- If you don't want to buy a lamp kit, and instead want to purchase the items separately, you'll need:
- Detachable harp
- Cord set
- Push-through socket and socket shell
- Finial
- Assorted hardware, like nuts, bolts and washers
Advertisement -
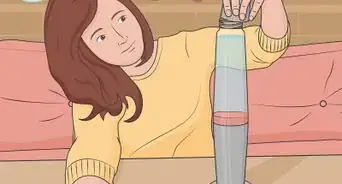
3Prepare the base for the rod. The rod is a hollow tube that will run the cord up through the bottom of your base to the lightbulb at the top. Depending on your base, you may have to drill or cut holes wide enough for the rod at the top and bottom of the lamp.[2]
- If necessary, you can trim the rod with a hacksaw or pipe cutters, but it's best (and easier) to choose a base that's fitted to your rod. Sawing your rod down to size is not ideal.
-
4Stabilize the bottom of the base. Your lamp kit might come with a piece meant to stabilize the bottom of your base. If it doesn't, simply purchase rubber stoppers. Affix these at intervals around the base to prevent sliding and lift the base slightly off the table, allowing room for the cord.


Setup
-
1Thread the cord through the rod. The cord should consist of two covered wires stuck together. Thread it through the rod from bottom to top, leaving 3 or 4 inches (7 to 10 cm) of cord about the base.
- Before threading, tape the wire ends together so that they fit smoothly inside the rod.
- When doing this, make sure that the bottom of the plug doesn't rub against the rod's sharp edge.
-
2Screw the lock nut onto the end of the lamp rod. Make sure your cords are threaded to where you want them first.
-
3Screw the neck onto the lamp rod (optional). Your lamp kit may or may not come with a flat, broad "neck" piece or a rubber stopper to add to the lamp rod.
-
4Add the harp bottom. Screw the harp bottom onto the lamp rod, arms facing upward. This will be the base for the rest of the harp.
-
5Screw on the socket cap. Put the bowl-shaped socket cap on top of the harp bottom, open end up. Secure tightly.
-
6Strip the wires. Pull the two covered wires at the top of the cord apart, separating about 4 inches (10 cm) down the cord. Using wire strippers or a knife, remove the insulation from the top 1 inch (2.5 cm) of the cords.
-
7Tie the wires. Tie the wires into an underwriter's knot, which looks like a pretzel. Doing this will prevent the wires from falling through the rod to the base. To tie an underwriter's knot:
- Bring the left wire down so that it's facing to the right, in front of the doubled wiring.
- Bring the right wire down so that it's facing to the left, in back of the doubled wiring.
- Put the right wire into the loop on the left side.
- Pull the ends of both wires tight, fastening the knot.


Finalization
-
1Find the hot wire and the neutral wire. Usually, the neutral wire will be surrounded by ribbed insulation. If you're unsure, refer to the instructions that came with your lamp kit.[3]
- If the wires have two colors at all, the white is the neutral wire and the black is the hot wire.
-
2Wrap the wires around the screws on the bulb socket. The bulb socket in the lamp kit should have two screws of different colors positioned at the base. Wrap the neutral wire clockwise around the silver (or white) screw, and the hot wire clockwise around the gold (or dark) screw. If you're unsure, check the manual that came with your lamp kit. Using a screwdriver, tighten the screws down over the wires.[4]
-
3Put the socket shell over the bulb socket. Line it up so that the slot coming up from the bottom of the socket shell aligns with the switch on the bulb socket. Tuck the cords inside so that they won't be visible, and push down the socket shell until it locks into place.
-
4Attach the top of the harp. Squeeze the sides of the harp as you slide them into the slots on the harp bottom.
-
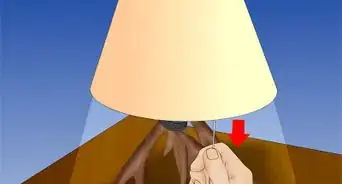
5Place your lampshade on top of the harp. Once it's secure, twist down the locknut to secure it.
-
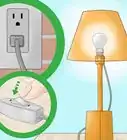
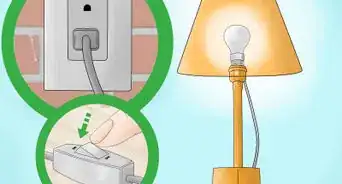
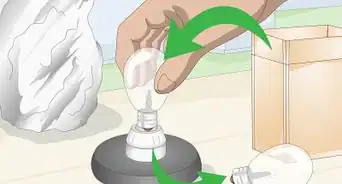
6Screw a lightbulb into the socket, and plug in your lamp.


Community Q&A
-
QuestionHow many sockets can I have on my lamp?
 Community AnswerYou can run as many sockets for the lights as you would like, as long as your power supply can power each light. This depends on the voltage of each light bulb and also how the circuit is run (i.e. if the lights are in a parallel circuit or not).
 -
QuestionHow much does a mediocre lamp kit cost on average?
 Community AnswerAnywhere from $5-$25, depending on the brand and parts that come with the kit.
 -
QuestionIs metal rod a must?
 AdrianTop AnswererNo, but most lamp kits include one. Sometimes the wires are already in the lamp rod making the metal rod a requirement.
Warnings
- Ensure that decorative items or wires are not too close to the lightbulb. Always leave spacing from the light bulb and other materials which can cause burning and damaging.⧼thumbs_response⧽
- Keep in mind that wiring electrical circuits carries some risk. If the wiring is not correct, you can be shocked or electrocuted or the device can cause a fire. If you are unsure of what you are doing, you may want to prepare the object you want to make a lamp out of for wiring (the mount, the passageways for the wire, the lamp socket and shade mounting) and let someone more skilled in electrical wiring actually wire up the lamp.⧼thumbs_response⧽
- Always unplug the lamp before working with the wires. Do not plug in the lamp until you're finished building it.⧼thumbs_response⧽
Things You'll Need
- Lamp making kit
- Base
- Shade
- Screwdriver
- Wire strippers (or knife)
- Drill (optional)


References
- ↑ https://www.apartmenttherapy.com/diy-project-idea-how-to-make-a-lamp-out-of-anything-apartment-therapy-tutorials-189083
- ↑ https://www.rachaelrayshow.com/articles/this-is-how-to-diy-a-lamp-out-of-a-vase
- ↑ http://hyperphysics.phy-astr.gsu.edu/hbase/electric/hsehld.html
- ↑ https://designsbystudioc.com/how-to-make-a-lamp-with-a-liquor-bottle-for-the-man-cave/
About This Article
To build a lamp, start by getting a lamp kit at your local hardware store, which will come with a detachable harp, a cord set, a socket and shell, a finial, and some basic hardware. You'll also need a base for your lamp, like a book or a wine bottle, since you won't get one in a lamp kit. Next, cut or drill a hole through the base and use rubber stoppers to make sure it’s stable. Then, thread the lamp cord through the rod and put it into the hole. Check that the cords are fully threaded, screw the lock nut onto the rod, and attach the harp bottom and socket cap. To learn how to strip your wires and attach them to the bulb socket, scroll down!