This article was co-authored by wikiHow Staff. Our trained team of editors and researchers validate articles for accuracy and comprehensiveness. wikiHow's Content Management Team carefully monitors the work from our editorial staff to ensure that each article is backed by trusted research and meets our high quality standards.
There are 7 references cited in this article, which can be found at the bottom of the page.
This article has been viewed 151,957 times.
Learn more...
For many people, one of the roughest aspects of camping is going without the comfort and familiarity of a modern toilet. However, if you’re out in the boonies without a toilet in sight, don’t fret; you can easily make your own! All you need to make a portable camping toilet is a large bucket, a garbage bag, and either a pool noodle or some plywood and a toilet seat.
Steps
Using a Pool Noodle
-
1Cut your pool noodle to be just shorter than the bucket’s circumference. Use measuring tape to measure the circumference of the rim of the bucket. Then, use a utility knife to cut your noodle to be about 1 to 2 inches (2.5 to 5.1 cm) shorter than this measurement.[1]
- The noodle needs to be slightly shorter than the bucket’s circumference so that you’re able to fit it entirely around the rim of the bucket without the edges of the noodle’s ends bumping up against each other.
-
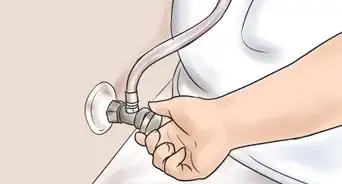
2Use a utility knife to slice open 1 side of the pool noodle. Draw a line down the length of the noodle from top to bottom to guide your knife when you go to slice it. Opening the noodle this way will allow you to set it snugly along the rim of the bucket.[2]
- After you cut open the side of the noodle, use your hands to gently pull the 2 sides of the cut you just made apart. Make sure the noodle has been completely cut open before you move on to the next step.
Advertisement -
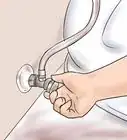
3Secure the noodle to the rim of the bucket with epoxy adhesive. Place epoxy adhesive along the inside of the pool noodle, making sure to closely follow the manufacturer’s instructions for usage. Then, place the noodle onto the rim of the bucket and push it downward so that it “snaps” into place.[3]
- You can also opt to skip the epoxy adhesive entirely and just make your toilet out of a bucket and pool noodle. However, without the epoxy, the noodle seat will be less secure when you go to sit on it.
- You can buy epoxy adhesive at any home improvement store.
- For best results, allow your epoxy to cure for at least 24 hours before using your camping toilet.


Attaching a Toilet Seat to a Bucket or Chair
-
1Trace the outer and inner circumferences of the toilet seat on plywood. Lay the toilet seat on top of a piece of 1⁄2 inch (1.3 cm) plywood and use a pencil or marker to trace around the interior hole and the outside of the seat. Be sure to mark the holes in the back where the seat will be screwed into the plywood, as well.[4]
- If possible, add a second, slightly larger circle around the tracing of the interior hole and plan to cut along this second line so that your piece of plywood is smaller than the actual toilet seat. This will make it less likely for waste to accidentally get onto the plywood.
-
2Cut out the tracing with a jigsaw and drill out the attachment holes. Cut along the exterior tracing first, then cut out the tracing of the interior hole. Use a drill bit that is equal in size to the bolts you’re using to attach the seat to the plywood.[5]
- Your toilet seat most likely came with bolts and nuts that you’re meant to use to install it. If for some reason you’re missing these materials, bolts that are 5⁄8 inch (1.6 cm) in diameter will probably work for your toilet.
- If you plan on using a chair for your camping toilet, be sure to drill a hole in the chair that is the same size as the interior hole of your plywood piece.
-
3Attach 4 small blocks of wood to the bottom of the plywood piece. These will act as stoppers to prevent the toilet seat from sliding off of the bucket or out of the chair when you go to use it. Use nails or screws to attach the wood pieces to the bottom of the plywood on all 4 sides.[6]
- Drive a nail or a screw down through the plywood piece and into each piece of wood in order to attach them.
- These wood pieces can be any size or shape, as long as they fit inside of the bucket. For best results, use pieces that are at least 2 inches (5.1 cm) long and that aren’t wider than the toilet seat itself.
-
4Secure the toilet seat to the plywood with bolts and nuts. Screw the bolts through the hinge on the back of the toilet seat and through the drill holes on the back of the plywood piece. Attach the nuts to the ends of the bolts on the underside of the plywood to secure the plywood to the toilet seat.[7]
- The hinge is the plastic piece on the back of the toilet seat that connects it to the lid.
-
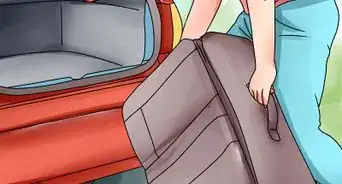
5Place the toilet seat over your bucket or chair to finish your toilet. Push the seat through the hole in the chair if you’re using one, or simply place it over the top of your bucket. Make sure all 4 bottom pieces of wood fit snugly and securely in the bucket or in the hole in the chair.[8]
- Be sure to place a bucket underneath your chair before you use your new camping toilet.


Using Your Camping Toilet
-
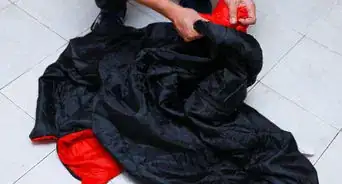
1Place a 10 US gal (38 L) bag inside the bucket. Make sure the bag goes all the way down to the bottom of the bucket and that the top of the bag completely covers your noodle seat. For best results, use a heavy-duty garbage bag that doesn’t easily rip.[9]
- If you’re worried about odor, you can also use special odor-blocking garbage bags instead of ordinary bags. You can buy these at any grocery store.
-
2Pour 1⁄2 inch (1.3 cm) of absorption medium in the bottom of the bag. Use sawdust, cat litter, dirt, or some other absorption medium to soak up any liquids in the bag and suppress the odor. You’ll also use this medium to cover your waste every time you finish using the toilet.[10]
- After you use the toilet, pour enough sawdust or cat litter into the bag so that your waste is completely covered.
- For convenience, keep your absorption medium in a separate garbage bag and use a plastic cup to scoop the medium into your toilet.
- You can get sawdust from a sawmill or lumberyard or buy sawdust at a feed store.
-
3Take the bag out of the toilet and tie it closed once you’re done with it. Again, make sure you’ve covered your waste before you take out the bag. Use a double knot when tying the bag to make sure it’s securely closed and that none of the contents will fall out.[11]
-
4Dispose of the bag and sanitize the inside of the bucket after every use. Tie the bag containing the waste closed, then place it inside another bag and tie this second bag closed as well. Take the bags to a drop-off facility for hazardous waste in order to dispose of them properly.[12]
- You can sanitize the inside of the bucket by washing it with dish soap and warm water.
- Do not simply leave your bag at the campsite when you head home; this is considered littering.


Community Q&A
-
QuestionWhat can I use instead of sawdust?
 Community AnswerBaking soda, cat litter, newspaper, or sand would work. You could just use a shovelful of dirt if you don't have anything else.
 -
QuestionHow would I "go" in this privately?
 Community AnswerYou put it in the center of a bunch of bushes, or you bring another tent and essentially you've created an outhouse.
 -
QuestionWhat if someone sees me?
 Tom De BackerTop AnswererRemember that no one is particularly interested in seeing urine or feces, let alone seeing these exit someone's body, so everyone will quickly turn away if they do see you. Avoid doing this in the open, and only do it if the need is high and there's no other way. The higher the need, the less you will care about anyone seeing you. But if they do, you'll be embarrassed, but it will pass.
Things You'll Need
- Pool noodle
- 1⁄2 inch (1.3 cm) plywood
- 4 small pieces of wood
- Jigsaw
- Utility knife
- 5 US gal (19 L) bucket
- 10 US gal (38 L) trash bags
- Epoxy adhesive


References
- ↑ https://www.youtube.com/watch?v=hNj5tKkFXOQ#t=01m29s
- ↑ https://www.youtube.com/watch?v=VNBTI8xcUXM#t=30s
- ↑ https://athriftymom.com/diy-portable-camping-toilet-made-with-a-5-gallon-bucket-and-pool-noodle-hacks/
- ↑ https://www.sunnysports.com/blog/diy-camping-toilet/
- ↑ https://www.sunnysports.com/blog/diy-camping-toilet/
- ↑ https://www.sunnysports.com/blog/diy-camping-toilet/
- ↑ https://www.sunnysports.com/blog/diy-camping-toilet/
- ↑ https://www.sunnysports.com/blog/diy-camping-toilet/
- ↑ https://athriftymom.com/diy-portable-camping-toilet-made-with-a-5-gallon-bucket-and-pool-noodle-hacks/
About This Article

Making your own camping toilet will make doing your business more comfortable and clean, and you only need a pool noodle and a bucket. First, cut the pool noodle 1 inch shorter than your bucket’s circumference. Then, cut a line down the noodle’s length to open it up, and press it onto the bucket’s rim. To avoid the noodle coming off, spread some epoxy adhesive inside it before you attach it to the bucket. To use your toilet, just place a heavy duty garbage bag inside the bucket and over the noodle and scoop ½-inch of sawdust, cat litter, or dirt into the bucket to suppress the odor and soak up any fluid. Dispose of the bag after each use. For more tips, including how to make a camping toilet with a real toilet seat, read on!