wikiHow is a “wiki,” similar to Wikipedia, which means that many of our articles are co-written by multiple authors. To create this article, 25 people, some anonymous, worked to edit and improve it over time.
This article has been viewed 215,036 times.
Learn more...
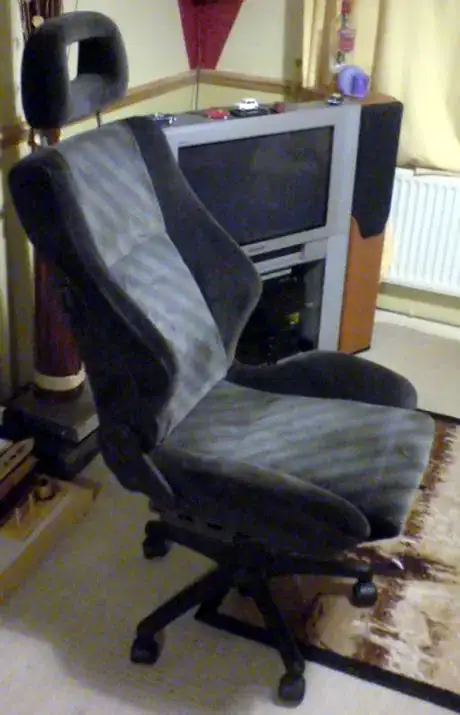
Good, comfortable desk chairs can sometimes be absurdly expensive, and even many of the most expensive ones concern themselves more with aesthetics rather than hour-on-hour comfort. If you're on a budget, making a desk chair from a car seat and a surplus swiveling desk chair is straightforward, fun, and results in something extraordinarily comfortable. Since the strength and accuracy requirements are not all that great, it also makes an excellent first welding project for metalworking beginners. (Or, build up the car-seat to swivel-base coupling from sturdy plywood, glue, and bolts with metal washers or scabs to reinforce attachment points for a bulkier but easier and potentially safer to build alternative. It can be painted to match the other parts.)
Steps
Making A Subframe
-
1Gather your supplies, tools, and materials, listed in the "Things You'll Need" section below.
-
2See how the desk chair's seat is attached to its mount. In particular, measure how far forward the center of the base is from the inside surface of the chair back (i.e., where the tailbone area would rest when one is sitting in the chair). Because the seat back, torso, and buttocks are heavier than the seat front and legs, the mount is probably attached close to the back of the seat for balance. Arrange the new subframe you will make and the car seat's mounting on it to approximately preserve this distance, reducing the chance that the chair will tip backwards.Advertisement
-
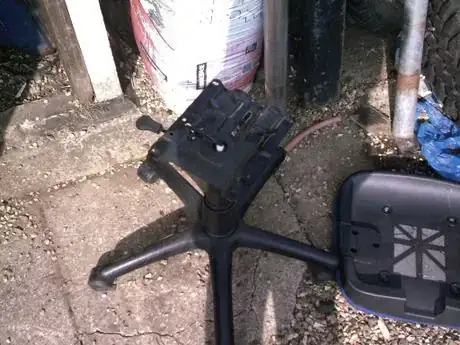
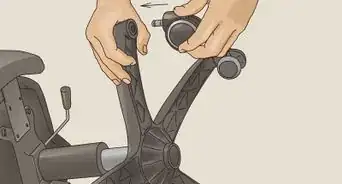
3Remove the padding (seat and back) from the desk chair. This usually unbolts or unscrews. Sometimes the back support will be held on by a separate piece of steel; save yourself some time and cut this off, rather than fiddling around to remove it. Dispose of the old padding in an ecologically sound manner.
-
4Unbolt the seat rails from your car seat. This is usually four, slightly fiddly, bolts. Keep the bolts, as you'll need them later.
-
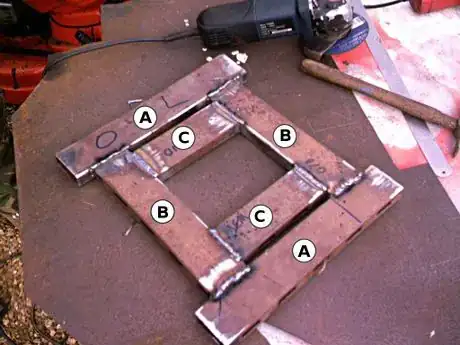
5Measure the distance between the bolt holes for the seat rail, from front to rear. Add about 20mm (just under an inch) to this number, then mark two of these lengths on your steel box-section. Write on the box-section what this length is for. We'll call these lengths "Lengths A".
-
6Measure the distance between the bolt holes from side to side. Subtract from this two times the width of the widest side of your steel box-section. For example, if your box section is 62mm, and the distance is 355mm, then you want 355 - 62 - 62 = 231 mm. Mark two of these lengths on your steel box-section. These will be "Lengths B".
-
7Go back to your stripped-down desk chair. Measure the distance, front to back, of the steel plate that your padding used to be sitting on. Write down this distance on a piece of paper (you'll need it later). Then, subtract one widest-side dimension of your box section from this. For example, if it's 195mm, and your widest side of your box section is 62mm, then it's 133mm. Mark out two of these lengths on your box section. These will be "Lengths C".
-
8Cut out the lengths you have marked on your box section. The easiest and quickest way is to use a band saw. Failing that, use an angle grinder; use the cutting discs to cut the sections out, then a grinding disc to clean up afterwards. Failing that, use a hacksaw. You will now have six small lengths of steel box section.
-
9Lay these sections down on a flat surface, widest length down, and position them. Lengths A should be on the sides, pointing away from you. Lengths B should be between them, at right angles, with their centers as far apart as the measurement you wrote down in step 5 of this section. If there is significant rust or paint on your box section, note where sections A and B meet and clean them to bare metal with a wire brush (or with your angle grinder, delicately).
-
10Make sure the sections are positioned accurately then weld them together. It might be a good idea to spot-weld them first then "dry run" them on your desk chair base to make sure everything's in order; it's easier to grind away and break a spot weld if you notice it's wrong.
-
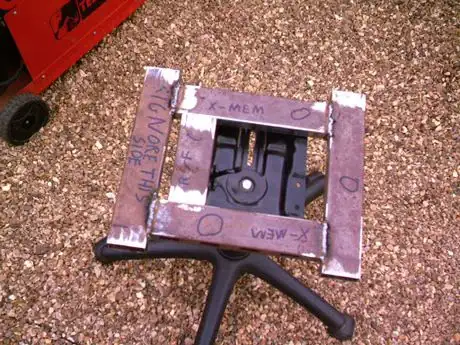
11Measure the width of the base plate of your desk chair (the opposite measurement to the one you took in step 5) and write it down. Go back to your subframe and position lengths C between lengths B, at right angles to it. You'll likely find that one or more will be slightly too long and won't fit; if this is the case, grind or cut them back. The centers of these sections should be as far apart as the distance you just measured. As above, clean up the mating surfaces then weld them in place. Your subframe is now finished.
-
12Take your old desk chair base. Turn it upside down and lay it on top of your subframe. Clean off any paint from the base where the two meet. Put on your safety gear, because it's not uncommon for the paint at the base to catch fire. Have a fire extinguisher ready. Weld the base onto your subframe.
-
13Finally, and optionally, use your angle grinder to clean up any messy welds. Be gentle!
Making the Mounts
We're going to need something to hold the chair in place to our new subframe. For this, we'll make some mounts out of some steel plate.
-
1Mark out three rectangles on your steel plate. These should be roughly an inch and a half wide by two or three inches down.
-
2Mark a bolt hole near the top of each of these. To do this, measure the thickness of the bolts that used to hold the seat rails in place (you did save them, right?). As a rough guide, the centers of the holes should be about one and a half bolt-widths away from the top of the rectangle. They should be slightly off-centre; again, about one and a half bolt-widths from the edge.
-
3Drill these holes out. Use a slightly larger (by 2mm or so) drill bit than your bolts; this gives us a margin of error in case we position them slightly wrong later on. This will take rather a long time.
-
4Cut out your rectangles. By far, the easiest, quickest, and most accurate way of doing this is to use an angle grinder with a cutting disc fitted. After cutting them out, wait for them to cool (cutting them can get them surprisingly hot), use a bolt to align the bolt holes on all four and then clamp them together in a vice or a pair of mole grips ("locking pliers"). Use a grinding disc to make them all the same size. You will want to make the top corners as rounded as possible to give you the maximum clearance. Again, wait for them to cool before releasing them and handling them.
-
5Position your mounts on the subframe. They will be sitting on the corners of lengths A, with the bolt holes facing outwards, the off-centred side closest to the bolt holes facing towards the ends. Measure the distance between the bolt holes, front to rear, of your car seat and make sure that the bolt holes on the rectangular mounts are the same distance apart. The mounts should be sitting a couple of millimetres from the edge in the other direction.
-
6Weld the mounts into place. Wait for them to cool.
-
7Optionally, paint your subframe and your mounts in black paint.
Finishing Up
-
1Bolt your subframe to your car seat. Usually, it's best to bolt on the front first, then the rear, since the front ones are often harder to access than the rear ones. Unless your measurements and positioning were perfect (they never are), you'll likely find that the bolt holes on your mounts don't line up perfectly with the bolt holes on the car seat; if this is the case, drill the holes out a little larger. Alternatively, you can force the bolt in at an angle ("cross-threading", though this might make it difficult to re-use the same chair on another base later on), or use a smaller bolt with a nut and washer on the other side (if you can access it).
-
2Clean up the car seat. You're finished!
Things You'll Need
- A salvage tilting, swiveling desk chair. The condition of the seat itself does not matter, since you'll be getting rid of it: what you want is the mechanical base. You can probably acquire one of these for free, since these are discarded thoughtlessly all over the place. The important thing is that the part where the seat bolts on is made of steel. Because a car seat is fairly large and heavy, and likely to be reclined shifting your weight distribution on it, a wide, sturdy base typical of a large, reclinable chair (known as an "manager" or "executive" chair in the US) is best. A five-footed one is preferable, but not essential.
-
A car front seat. Head to your local junkyard and find something comfortable and not too worn out. Ideally, you want something from a sporty-ish car, as these tend to be much more supportive and adjustable; try before you buy to find one right for you. Our example used a seat from a Vauxhall Astra GTE; early Toyota Supra seats are also excellent. The most important thing is that the seat is entirely manual in operation; any electrical components will, of course, be useless, and may complicate dismantling the seat.
- Look for a seat with adjustable armrests attached to the sides of the seat itself.
- A leather-covered seat is more likely to be and easier to keep clean, but a cloth-covered one may be more comfortable because it grips you somewhat rather than just sliding you toward its lowest point.
- A welder, or a friend who can weld for you.
-
Either:
- A bandsaw. If you don't have one of these, the angle grinder fitted with cutting discs is fine (if less accurate).
- An angle grinder; a small 115mm (6") one is fine. You'll want both cutting and grinding discs for it.
-
Or:
- A hacksaw, a file, and a lot of patience.
- A drill, with a selection of bits suitable for cutting metal. A variable-speed drill is preferable.
- Some steel box-section. You'll need roughly 5 feet (1.5 m) of this. Our example used 2.5" x 1" section from some old commercial shelving.
- A small sheet of steel, about 4mm thick. Since you only need a few inches of it, chances are good that you'll be able to scavenge this from somewhere (or something) rather than buying some.
- A steel rule or tape measure, plus a marker pen.
- Optionally, black paint suitable for metal; smooth Hammerite is a good bet.
- Some other basic tools like spanners (ratchet spanners are best, or a socket set), screwdrivers, hammers and so on.
Warnings
- Use caution with newer car seats. Some may contain side air-bags containing explosive charges. Do not use those seats.⧼thumbs_response⧽
- The usual frightening and overblown warnings about using power tools apply here. Especially when grinding and cutting, make sure your eyes (at least) are protected. Wear steel-capped boots if you have them.⧼thumbs_response⧽
- After welding or cutting, always wait for your metal to cool before handling it. Don't use water to cool it down; this can cause steel to go brittle.⧼thumbs_response⧽
- Always use a welding hood when welding or when watching someone weld; looking directly at the light can result in a very painful ailment called "arc eye." Also known as "flash burn," or "arc burn," this is the equivalent of a sunburn on your eye. It feels as though your eyes are full of sand or if really severe, broken glass and can do permanent damage. Any area of exposed skin is also subject to this effect, so cover up (arms, hands, neck, etc).⧼thumbs_response⧽
- Count the casters on the old office chair you want to use. Have you ever noticed that really old chairs have four casters and newer ones have five or six? That's because it's easier to lean over, over-balance, and fall on only four casters. If you use a four-caster chair as your base, do so at your own risk.⧼thumbs_response⧽
- Take care not to fall over backwards. Your center of gravity shifts backwards when you recline on a chair, due to more leverage from your further-back head and torso. Few if any office chairs have automatically sliding mounts to compensate. Most car seats recline much more than most office chairs, so an office chair's support may not extend far enough back to keep you from tipping over and potentially injuring your head or neck by fully reclining a car seat.⧼thumbs_response⧽
