X
wikiHow is a “wiki,” similar to Wikipedia, which means that many of our articles are co-written by multiple authors. To create this article, volunteer authors worked to edit and improve it over time.
This article has been viewed 29,874 times.
Learn more...
Sure, you need a file cabinet to hold your paperwork, but that doesn't mean it has to be boring, basic, and ugly. We'll show you how some budget-friendly DIYs that you can use to revamp your file cabinet and make it a real showpiece!
Steps
Method 1
Method 1 of 4:
Using Spray Paint
-
1
-
2Remove any stickers or labels. WD-40 and a razor blade work very well for this.
- Spray some WD-40 directly onto the sticker and let it stand for a few minutes.
- Then, carefully use a razor blade or something else that will scrape the sticker away.
- Wipe away the excess WD-40 with an old cloth or paper towel.
Advertisement -
3Sand chipped paint to smooth the surface. If there is chipped paint, sand the chipped area with 220 grit sandpaper until it feathers into the remaining paint.
- There is no need to strip the cabinet of all paint.
- Once you have sanded the chipped areas, use fine or very fine steel wool to rub down all exterior surfaces of the cabinet and drawers.
- This will flatten the glossy surface and make the paint adhere better.
-
4Wipe the entire cabinet down to prepare for priming. Wipe the surfaces of your cabinet clean with household window cleaner.
- This will remove any oily surface residue.
- Do it twice, then wipe it dry with a clean paper towel.
-
5Apply your primer coat to create a surface for painting. Make sure you are painting in a very well-ventilated area, and start by painting the drawers.
- Set the drawers face up on a garage floor, patio, etc.
- Be sure the surface is protected with newspaper, cardboard or other cover.
- Note: Use ONLY spray enamel. Do not use a lacquer! Lacquer will eat up anything in its path, except other lacquer. Enamel is a safe bet over nearly any paint.
- To be sure, spray a test area that will not be exposed when finished.
-
6Spray a light coat of primer to start. Mask any hardware that hasn't been removed.
- Use white or gray as this will make the final color more vivid.
- Recoat with primer within the time indicated on the can.
- Most enamels must be recoated within an hour.
- Otherwise, you will have to wait until the following day.
- Do not try to lay down one thick coat, because the primer will run and take a long time to dry.
- Spray all drawers then set them aside to make room for the cabinet.
-
7Spray the cabinet with a very light coat of primer. Spray the sides of the cabinet lightly because you will be painting vertical surfaces and the paint is more likely to run.
- Very light coats dry fast and can be recoated within a few minutes.
- Allow about five minutes between very light coats so the paint has a chance to set.
- This may require about four or five very light coats. Be patient!
- You may apply a slightly heavier coat to the top of the cabinet, as you will be painting a flat, horizontal surface. This is similar to painting the drawer faces.
-
8Let the cabinet dry before painting a color top coat. Allow the cabinet and drawers to dry the amount of time recommended on the spray can before applying your color top coat.
- If you create a design using masking tape, let the primer dry for at least 24 hrs. before taping, or the paint will peel when you remove the tape.
-
9Apply your top coat in several light coats, as with the primer. Don’t worry about the primer coat showing through after the first couple of coats.
- You may be tempted to go back and “fill in the blanks” with a heavier coat, but do not do that. It will ruin everything you have done up to this point.
- Too heavy of a coat may cause the paint to “crinkle” and create a big mess, so be patient.
- Be sure to hold the spray can about 10 inches (25.4 cm) from the surface as you spray, and make smooth passes from end to end.
- Do not paint in a random zig-zag pattern or it will be difficult to get an even finish.
- Several coats will be required, so be sure to have plenty of paint.
-
10Replace the hardware. When the paint has dried, usually after 24 hours, carefully replace the hardware.
- You now have a freshly made-over cabinet!
- You can replace the “U” shaped handle on the drawer with two decorative knobs, if you like.
- Be creative! Paint additional designs on your cabinet either by hand or by using your favorite stencils.
- You may choose to paint each drawer a different color. You can even personalize each drawer!


Advertisement
Method 2
Method 2 of 4:
Using Brush or Roller Paint
-
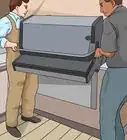
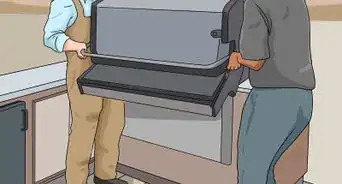
1Remove the drawers from the cabinet. Then, remove the exterior hardware (handles, lock cylinders, etc.).
- If you have difficulty removing the hardware, you may simply mask the hardware prior to painting.
- The cabinet and drawers will have to be hand-sanded around any hardware that is left in place.
-
2Remove any stickers or labels. WD-40 and a razor blade work very well for this.
- Spray some WD-40 directly onto the sticker and let it stand for a few minutes.
- Then, carefully use a razor blade or something else that will scrape the sticker away.
- Wipe away the excess WD-40 with an old cloth or paper towel.
-
3Sand chipped paint to smooth the surface. If there is chipped paint, sand the chipped area with 220 grit sandpaper until it feathers into the remaining paint.
- There is no need to strip the cabinet of all paint.
- Once you have sanded the chipped areas, use fine or very fine steel wool to rub down all exterior surfaces of the cabinet and drawers.
- This will flatten the glossy surface and make the paint adhere better.
-
4Wipe the entire cabinet down to prepare for priming. Wipe the surfaces of your cabinet clean with household window cleaner.
- This will remove any oily surface residue.
- Do it twice, then wipe it dry with a clean paper towel.
-
5Apply your primer coat to create a surface for painting. Make sure you are painting in a very well-ventilated area, and start by painting the drawers.
- Set the drawers face up on a garage floor, patio, etc.
- Be sure the surface is protected with newspaper, cardboard or other cover.
- Note: Use ONLY spray enamel. Do not use a lacquer! Lacquer will eat up anything in its path, except other lacquer. Enamel is a safe bet over nearly any paint.
- To be sure, spray a test area that will not be exposed when finished.
-
6Spray a light coat of primer to start. Mask any hardware that hasn't been removed.
- Use white or gray as this will make the final color more vivid.
- Recoat with primer within the time indicated on the can.
- Most enamels must be recoated within an hour.
- Otherwise, you will have to wait until the following day.
- Do not try to lay down one thick coat, because the primer will run and take a long time to dry.
- Spray all drawers then set them aside to make room for the cabinet.
-
7Spray the cabinet with a very light coat of primer. Spray the sides of the cabinet lightly because you will be painting vertical surfaces and the paint is more likely to run.
- Very light coats dry fast and can be recoated within a few minutes.
- Allow about five minutes between very light coats so the paint has a chance to set.
- This may require about four or five very light coats. Be patient!
- You may apply a slightly heavier coat to the top of the cabinet, as you will be painting a flat, horizontal surface. This is similar to painting the drawer faces.
-
8Let the cabinet dry before painting a color top coat. Allow the cabinet and drawers to dry the amount of time recommended on the spray can before applying your color top coat.
- If you create a design using masking tape, let the primer dry for at least 24 hrs. before taping, or the paint will peel when you remove the tape.
-
9Use a gloss or semi-gloss latex or acrylic based paint. Flat paints have a “dusty” finish and do not clean as well if the surface gets dirty in the future.
- For a high-use item like a file cabinet, it is best to use a paint that can be easily cleaned in the future.
-
10Brush or roll on your paint. Apply two light-to-medium coats of paint rather than one heavy coat.
- Runs or drips can easily be brushed out while paint is still wet.
- This type of paint usually cleans well with soap and water.
-
11Wait for the paint to dry. Wait until paint is dry to add different colors or to paint designs over the final coat.
- Using a roller adds an interesting texture to the paint.
- Replace the hardware or change it to something completely different depending on the look you are trying to achieve.


Advertisement
Method 3
Method 3 of 4:
Using Self-Adhesive Contact/Shelf Paper
-
1Choose your paper. Using paper is a simple, but fun way to makeover your file cabinets.
- Shelf paper or contact paper is usually made of vinyl and not paper.
- Be sure to choose vinyl if you come across both types as it is more durable and is easier to clean.
- The surfaces to which you will apply the contact paper should be dent-free, or the finished project will not look good. The exterior hardware MUST be removed in order for the paper to apply smoothly.
-
2Measure the width and height of the drawer face. With the drawer sitting face up, measure the width and height of the drawer face.
- Most contact paper has a “criss-cross” grid on the back side.
- This helps you cut straight lines. They are usually ½” or 1” squares.
-
3Cut the contact paper to size. Cut a piece of contact paper about one inch larger than each measurement.
- Peel back about one inch of the backing paper to expose the adhesive on the paper.
- Do this along the “long” edge of the paper.
-
4Align and place the paper on the drawer. Carefully align the exposed edge along the corresponding edge of the drawer face with about a half-inch overhang.
- Carefully run your finger over the paper to stick it down to the drawer. Make sure the paper does not wrinkle while you do this.
- Slowly peel back about ½” of backing paper at a time as you carefully stick the paper to the drawer surface.
- Do this in very small segments to reduce the risk of bubbles and wrinkles.
- Continue this process until the entire surface is covered.
- It is recommended that you “prime” a vinyl surface with a solid white contact paper. Otherwise, the wood-grain pattern will show through if you are using a light-colored pattern.
-
5Trim off the excess and correct any misapplications. Use a razor blade or sharp utility knife to trim off the excess. You can use the outer edges of the drawer as a natural straight-edge to get a clean, straight cut.
- If you get a wrinkle, be very careful if you peel the paper off the drawer. Vinyl stretches and it may not re-apply correctly.
- If this happens, you can cut away the bad piece and replace it with a new one. Use a straight-edge to make your cut so it will be straight.
- If you get air bubbles or pockets under the paper, use the sharp corner of a razor blade or the sharp tip of a utility knife to pierce the bubble and release the air. It should then flatten out nicely.
- Repeat this method for all surfaces. Do one surface at a time on the cabinet and do not try to completely wrap the cabinet with one piece.
-
6Add some extra decoration for a personal touch. Cut out decorative shapes with a contrasting color of contact paper and apply it to the newly covered surfaces.
- You may also get pre-cut letters and shapes to personalize your cabinet.


Advertisement
Method 4
Method 4 of 4:
Using The Real Wood
-
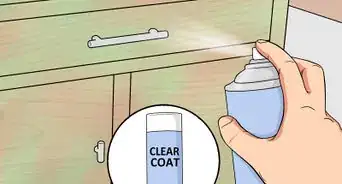
1Do not sand and re-stain wood cabinets. If you are giving a wood cabinet a makeover, it is not recommended to sand and re-stain wood cabinets.
- This is because if the wood is thoroughly sealed, it will not absorb new stain very well. This will result in a blotchy finish.
- If you are simply applying a new clear coat, remove all exterior hardware and clean the cabinet and drawers by buffing with very fine steel wool.
- Wipe away all the dust and follow the same procedure as painting metal cabinets.
-
2
-
3Choose a base color to contrast with the top coat. White, black or gray are common choices.
- Paint one thin coat of the base color that just covers the surface and let it dry until tacky to the touch.
- This requires two contrasting paint colors and must be brushed. Acrylic paint works best.
-
4Apply a thin coat of the top coat color over the tacky base coat. Let the base coat show through in streaks by completely brushing out the top coat of paint.
- Use your own judgment on how much base you want to show through.
- Sometimes, since the base coat is tacky when applying the top coat, the different phases of drying will create a wrinkled or distressed appearance of an antique piece of furniture.
- Allow the paint to dry thoroughly before replacing the hardware and using the cabinet.


Advertisement
Warnings
- Be sure the surface of a wood cabinet is actually real wood and not a wood-grain vinyl laminate. You cannot sand this type of surface and paint peels very easily, so painting is not recommended. If you have a vinyl laminate, only the contact paper method is feasible.⧼thumbs_response⧽
Advertisement
Things You May Need
- Phillips and flat head screwdrivers (to remove cabinet hardware)
- Painter’s tape
- Paper towels or old cloth
- Spray enamel (If repainting) in your choice of color(s) and primer (white or gray)
- #0000 (very fine) steel wool
- 220 grit sandpaper
- Mineral spirits
- Vinyl peel-and-stick shelf paper (if covering cabinet) in choice of pattern/color
- Power sander (optional)
- Miscellaneous items to be addressed throughout tutorial

About This Article
Advertisement