X
wikiHow is a “wiki,” similar to Wikipedia, which means that many of our articles are co-written by multiple authors. To create this article, volunteer authors worked to edit and improve it over time.
This article has been viewed 29,089 times.
Learn more...
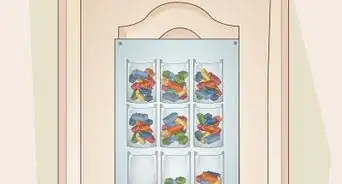
Legos aren't just the building blocks for imaginary adventures or model building. With the right ingenuity and creativity, Legos can be used for practical purposes as well. If you have some spare Legos lying around, or if you have a sweet tooth and want to represent your Lego-pride, a Lego candy machine might be the perfect thing for you.
Steps
Part 1
Part 1 of 3:
Constructing the Body
-
1Gather your building supplies. Before you get started, you need to make sure you have all the necessary parts to make your machine. If not, you might need to go out and buy some more! For this machine, you'll need:
- 2x1 connector piece (with holes, x2)
- 4x1 connector piece (with holes, x2)
- Assorted Legos (preferably single or double wide, including flat pieces)
- Connector pins (x2)
- Long connector pin (x1)
- Medium rubber band[1]
-
2Construct your reservoir. This is the part of your machine that will hold your candy. Your reservoir should be rectangular in shape. The size of this part depends on how many Legos you have at your disposal, but it's recommended that you build at least four layers for each side.[2]
- If you have a limited amount of Legos, you can leave some spaces in the walls of your reservoir as long as these spaces are not bigger than the candy you intend on putting in your machine. Gaps that are too large will allow candy to escape!
Advertisement -
3Fashion your floor. Assemble a platform that is roughly ½ to ¾ the length of your candy reservoir. You will need to leave a free space in your floor to allow your candy to drop down.
- The gap of in your floor should be towards the front of your machine.
-
4Give gravity a helping hand. To improve the flow of candy through your machine, top your floor with wedge shaped Legos. Now gravity can more easily pull your candy down toward the gap in your floor.
- The angled pieces should be oriented to slope downwards toward the gap.


Advertisement
Part 2
Part 2 of 3:
Creating a Slide Release and Return
-
1Make a slide to release your candy. This part will keep your candy in your reservoir until you are ready to set your candy free. Use long, narrow pieces to construct the handle of your slide, which will be a 1x1 block smaller than your reservoir so that your slide can fit inside your machine.
- Cover the top of your slide with smooth, flat Lego pieces so that it will move easily when the handle is pulled.
-
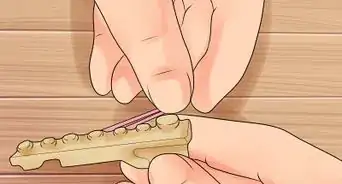
2Build your rubber band mount. Your rubber band will provide the force to return your release to its original position. To build the mount, attach two 1x2 pieces to the underside of both ends of your flat 2x6 piece. Put the connector pins in your 1x2 connector pieces if these aren't in already, place your rubber band so the connectors are encircled by it, and attach the connector pieces to the inside of each of your normal 1x2 pieces under your 2x6 piece.[3]
- The smaller 1x2 pieces will serve as supports for connector pieces that will hold the tension of your rubber band.
- If your rubber band is too small, you may need to loop it once or twice so that it has the appropriate length and tension to return your slide.
-
3Reinforce your rubber band mount. For better stability and thickness, you should use assorted flat pieces on the bottom of your 1x2 pieces and then reinforce these with another 2x6 piece.
-
4Complete your automatic return. You will need to use your 4x1 connector pieces to attach the rubber band to your release so that it can apply return force to the release. Insert the pin (if necessary) in your 4x1 connectors, with the rubber band around the pin, then reinforce your 4x1 connectors with a 3x2 flat piece to give stability.[4]
-
5Test your return. The mount for your return will need to be structurally sound, otherwise when you pull your handle the rubber band might come free and your machine break. Pull on your rubber band with moderate force and make sure that the pins hold it securely.
- Be sure the tension of the rubber band is not too great, or it might break the mount.
- If you feel that your automatic return isn't stable, use flat pieces at the boundary points of other Legos to reinforce the mount.


Advertisement
Part 3
Part 3 of 3:
Putting it All Together
-
1Attach your handle and return to your reservoir. Turn your reservoir upside down and put your release inside so that the flat surface of its top is also upside down. The thick part of your release opposite the handle shaped part should match up with the gap in your floor, with the 4x1 connector attaching to your floor to provide return tension to your release.
- The handle part of your release should remain partially outside of your machine.
-
2Retest your mechanism. Attaching your handle and automatic return may have revealed to you some parts of your machine that need to be braced or supported with additional Legos. Add Legos where necessary, and then retest the handle and return.
- If you notice your rubber band is too loose when testing your release and return, you may need to take a pin out of your connector and loop the band an addition time to provide tension.
- If you notice the rubber band applies to much force to your handle and return, you may want to swap in a thinner rubber band.
-
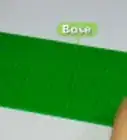
3Add a base to your machine. Add three or more layers of Legos that are the same dimensions as your reservoir to your machine to create a base. You can add a flat piece to the bottom to give it a finished look and add stability.[5]
- You may have to add an additional layer to your machine to keep the handle, return, and floor evenly aligned so that they pull smoothly and release your candy without a hitch.[6]
-
4Complete finishing touches. You may want to add pieces for stability, add parts to give your machine more character, or even add a roof. If you want to include a roof for your machine, you should attach a simple flat piece to the top of your machine.
- If you add a roof, you will need to remove this to add candy to your reservoir.


Advertisement


References
- ↑ http://www.instructables.com/id/How-to-make-a-Lego-Candy-Machine/
- ↑ http://www.instructables.com/id/How-to-make-a-Lego-Candy-Machine/step2/The-Floor-of-the-Candy-Holder/
- ↑ http://www.instructables.com/id/How-to-make-a-Lego-Candy-Machine/step3/The-Door-and-Thingy/
- ↑ http://www.instructables.com/id/How-to-make-a-Lego-Candy-Machine/step3/The-Door-and-Thingy/
- ↑ http://www.instructables.com/id/How-to-make-a-Lego-Candy-Machine/step5/The-Base/
- ↑ http://www.instructables.com/id/How-to-make-a-Lego-Candy-Machine/step4/Equalizing-the-Height-of-the-Sides-and-of-the-Thin/
About This Article
Advertisement