This article was co-authored by wikiHow Staff. Our trained team of editors and researchers validate articles for accuracy and comprehensiveness. wikiHow's Content Management Team carefully monitors the work from our editorial staff to ensure that each article is backed by trusted research and meets our high quality standards.
This article has been viewed 43,534 times.
Learn more...
With enough LEGOs and the right pieces, if you can imagine a design, you can usually build it! But getting from a bunch of loose LEGOs to a cool finished model can be difficult without some guidance. If your goal is to build a truck with your LEGOs, all you need is the right parts and attention to detail. Before long, you'll have a cool LEGO truck of your own.
Steps
Building the Frame
-
1Create the frame of your truck. Take your small car base piece and attach a 4 x 12 long piece to the back four raised studs of your base.[1] This will form the bed and front cabin of your truck.
-
2Add cabin features to the lowered section of your base. The recessed area of your small car base is where the cabin of your vehicle will be and where you LEGO driver will sit. Put the steering wheel and the seat in the dropped-down area.[2]Advertisement
-
3Create the windshield of your LEGO vehicle. Start by taking both your square windows and stacking them, one on top of the other. Then attach these in front of the steering wheel to complete your windshield.
-
4Fasten fenders to the front of your car.[3] Your fenders, sometimes called a rounded mudguard, should be half circles attached to a flat piece or brick. Connect your fenders in front of the windshield, so the half circles point downward on either sides of the front of your truck.


Assembling the Front End
-
1Add clear orange pieces to your front end piece. Your front end piece, also called the license plate holder, should have two studs on top and a contoured front stretching four studs wide and two studs tall. On the recessed studs on the rightmost and leftmost side of your front end add your 1 x 1 clear orange pieces.
-
2Sandwich your clear orange pieces with a 2 x 4 plate. Your clear orange pieces should have mad the contoured front of your front end even, which will allow you to put on a flat 2 x 4 piece on top of it.
- Now the orange pieces should be sandwiched between the 2x 4 plate the the front end piece.
-
3Include lights on the front of your truck.[4] The clear, sloped, red 1 x 1 piece will be attached to the top left and right sides of your front end, in line with the orange transparent pieces you installed earlier. Place the sloped sides of these pieces to face off to each side of the truck.
-
4Plate the very front of your front end. You should add the flat, smooth 1 x 2 piece between the sloped clear pieces. Then, below this, put the 1 x 2 flat piece with a middle circular stud directly below.
-
5Attach your front end to the front of your truck. The front-most part of your base that you have already attached fenders to will be the landing zone for your front end. Attach your front end to the free two studs at the very front of your base.
-
6Connect your hood and air intake to your front end. The hood piece should fit evenly, covering all free studs on the top of your front end. On top of the hood should be two free studs. On these, you should attach the 1 x 2 air intake piece.


Adding Features to the Cabin and Bed
-
1Install doors and walls of the bed of your truck.[5] The 1 x 1 circular attachment piece of your doors will have to go on the free stud closest to the front of your car to either side of the truck cabin. Then:
- Use 1 x 8 and 1 x 4 pieces evenly to the outside of your 4 x 12 truck bed piece to make you truck bed walls.
- Leave one row of studs at the very back of your 4 x 12 truck bed piece for the hitch and license plate.
-
2Create your rear end. Much like you did with the front end, you will use your license plate holder piece to create the back of your truck. On the left and right recessed studs on the top four-across row of your rear end, add red sloped pieces, slopes facing outward. Between these, attach your license plate.
-
3Add rear accents to your rear end. This includes a flat, yellow 1 x 4 piece with black diagonal slashes on it. This will be your read bumper. Attach it so that it stretches across the bottom of your license plate holder piece.
-
4Attach your rear end to your truck. On the free four studs at the very back of your 4 x 12 truck bed piece, connect your rear end. Make sure the edges meet with the walls of the bed of your truck and the rear end piece is firmly fastened.


Roofing Your Vehicle
-
1Roof the cabin of your truck and the front-most part of the bed.[6] Your flat, 4 x 4 piece should completely cover the top of the cabin of your vehicle. Then, stretching across the gap made by the 2 x 8 pieces:
- Attach two 2 x 4 blocks, on on top the other, so that both are flat against the back wall of your cabin.
- Attach two 1 x 4 pieces behind the 2 x 4 blocks.
- This should create an flat surface that is level with the roof of your cabin.
-
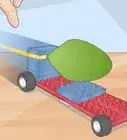
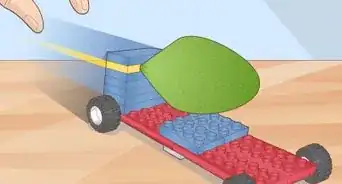
2Add a unifying roof piece and a sloped window for effect.[7] To join your cabin and bed together firmly, you should connect both by attaching your 4 x 8 piece to the top. A single row of studs should hang free the hood/window area of your truck.
- Attach your sloped window atop the 4 x 8 on the front-most studs.
-
3Fasten your hood cover and railings for the bed. The hood cover should go in the front-center of the 4 x 8 piece for the most realistic effect. Use 1 x 8 smooth pieces on the top of the walls of the bed of your truck.
- Leave two free studs on the walls of the bed of your truck closest to the cabin.


Attaching Your Truck's Wheels
-
1Construct your front wheels.[8] On a 2 x 4 axle piece, first attach a 2 x 2 block. On top of this block, add a 2 x 2 flat piece, and atop that add a 2 x 2 spinning piece. This will allow the front wheels of your car can turn left and right. Now you can press your wheels onto the circular axles on the outside of the 2 x 4 axle piece.
-
2Attach the wheel assembly of your car to the front end.[9] Make sure the studs of your spinning piece is lined up like a normal block to make sure its studs attach to the bottom of your front end. Then:
- Attach the wheel assembly so the wheels stick out under the half circles of the fenders.
-
3Construct your rear wheel assembly with half axles. You're going to need to fashion two 2 x 2 half axles into a single piece to give the rear wheels of your truck more width. Use a 2 x 2 piece attached to the underside of the two half axles to create one 2 x 4 axle.
-
4Give your rear wheels enough clearance from the bed of the truck.[10] You can do this by first adding a 2 x 4 block to the top of your rear axle. Then on the 2 x 4 block, add two 2 x 2 pieces, or a single 2 x 4 piece, so that all piece form flat sides.
-
5Attach your rear tire assembly and add wheels to the axles.[11] Now you can attach your rear wheel assembly toward the back of your truck. Then push your wheels onto the rear axle to finish the assembly.
- Attach your wheels so the back edge of your connecting block is beneath the fourth stud from the rear of the bed of your truck.
- You might also experiment with rear wheel placement to find what looks best for you.
- Do not attach your wheel assembly to the very back of the underside of the bed of your truck; you will need some space to attach the hitch of your truck.


Adding Finishing Touches
-
1Create a hitch for the rear of your truck. Your hitch begins with a 2 x 6 flat piece. Take this 2 x 6 and add to the back-most two studs a 1 x 2 hitch piece. The hitch piece should have a round, upward facing part, which is the hitch.
-
2Link your hitch by pressing its studs into the underside of the bed. You should allow your hitch to stick out from the back of your truck about three studs. This will make your truck hitch look more realistic.
-
3Close off the empty space between the bed and cabin. The bed of your truck closest to the cabin still has a slight gap. Close this off to complete the bed of your truck. Do this by attaching two 1 x 2 pieces on top of each other. Then:
- Attach your 1 x 2 pieces between the walls of the bed of your truck closest to the cabin.
-
4Make a step for your cabin.[12] Take your 2 x 4 sloped piece and on top of it add a flat 2 x 4 piece so that the rear four studs of your flat piece hang off the back of your sloped piece. Then put a 1 x 1 piece with a circular stud on the side on the rear corner of your 2 x 4 flat where it attaches to the sloped piece.
- The 1 x 1 piece with a circular side stud is where your LEGO truck can be filled up with fuel.
-
5Add your cabin step and a driver. The free hanging back four studs of your flat 2 x 4 piece should be pressed into the bottom of your car base beneath the driver's side door. Then, open the door and put a LEGO figurine inside. It's time to go truckin'!


Warnings
- Be careful you don't lose any pieces while constructing your LEGO truck. Small pieces can be especially painful when stepped on.⧼thumbs_response⧽
Things You'll Need
- 1 x 1 block (1)
- 1 x 1 orange clear flat piece (2)
- 1 x 1 red clear slope (2)
- 1 x 1 with circular center hole (1)
- 1 x 1 yellow clear slope (2)
- 1 x 2 block (3)
- 1 x 2 flat smooth with circular knob on top (1)
- 1 x 2 flat smooth with license plate sticker (1)
- 1 x 2 with grille (1)
- 1 x 3 x 4 doors (different sides; 2)
- 1 x 4 block (6)
- 1 x 4 flat smooth (1)
- 1 x 4 square window (medium size; 2)
- 1 x 8 (4)
- 1 x 8 flat smooth (2)
- 2 x 2 air intake cover (1)
- 2 x 2 block (4)
- 2 x 2 flat (2)
- 2 x 2 hood cover (1)
- 2 x 2 one sided axles (for back tires; 2)
- 2 x 2 spinning piece (1)
- 2 x 2 tire axle (1)
- 2 x 4 blocks (3)
- 2 x 4 flat (2)
- 2 x 4 ramp (1)
- 2 x 6 flat (1)
- 4 x 12 flat (1)
- 4 x 4 flat block (1)
- 4 x 4 hood (1)
- 4 x 8 flat (1)
- Hitch (1)
- License plate holder (2)
- Seat (1)
- Small car base (1)
- Steering wheel (1)
- Tires and rims (4 each)
- Wheel fender (2)


References
- ↑ http://letsbuilditagain.com/instructions/1591/
- ↑ http://letsbuilditagain.com/instructions/0107/
- ↑ http://letsbuilditagain.com/instructions/1591/
- ↑ http://letsbuilditagain.com/instructions/0107/
- ↑ http://letsbuilditagain.com/instructions/0107/
- ↑ http://letsbuilditagain.com/instructions/1591/
- ↑ http://letsbuilditagain.com/instructions/1831/
- ↑ http://letsbuilditagain.com/instructions/1831/
- ↑ http://letsbuilditagain.com/instructions/0107/
About This Article