This article was co-authored by wikiHow Staff. Our trained team of editors and researchers validate articles for accuracy and comprehensiveness. wikiHow's Content Management Team carefully monitors the work from our editorial staff to ensure that each article is backed by trusted research and meets our high quality standards.
There are 7 references cited in this article, which can be found at the bottom of the page.
wikiHow marks an article as reader-approved once it receives enough positive feedback. In this case, several readers have written to tell us that this article was helpful to them, earning it our reader-approved status.
This article has been viewed 334,981 times.
Learn more...
A light bulb is made when metal filament is heated to the point at which the wire glows. The most well-known type of light bulb is the incandescent light bulb, which is the version used in most homes. Use these steps for making a homemade light bulb.
Steps
Making a Simple Graphite Light Bulb
-
1Round up the supplies needed for your bulb. Everything here is easy to round up at a local hardware store, if you don't already have it all at home. You'll need.
- Two strands of copper wire (roughly 1-2 feet, each)
- One clear glass jar
- Small glass jar for smaller bulb
- Five or more batteries
- Four crocodile snips
-
2Find or buy some mechanical pencil lead. You should use the kind you get in mechanical pencils -- the thin, solo pieces of graphite that you can usually buy in packs. The thinner, the better -- try something like .5mm thickness.[1]
- Pencil lead actually isn't lead at all, it is graphite. Graphite is an electrical conductor, making it a good filament for homemade light bulbs.
Advertisement -
3Hook the copper wires up to the electrical clips. The ends of each wire should have a clip on it. If you don't have clips, you can still make a light-bulb. To do so, curl each end of the wire into a little round hook.
- If you are making the hooks yourself, make them big enough to fit over the end of the battery.
-
4Attach your batteries together in series. This simply means you tape them together, end to end, so that they all work together to provide power. Make sure you line them up positive end to negative end. Then use electrical tape to secure all the batteries together into a long rod.
- Wrap the tape tightly enough around the batteries so that they hold together. You may need to overlap the tape a few times.
- You must arrange the batteries so that there is a positive node on one end, and negative on the other.
-
5Clamp a copper wire to one end of the batteries. Usually, you'll have a wire with red clips and one with black. Hook one end of the red clips up to the positive end of the batteries, but leave the other clip off for now. If you hook everything up, you'll actually be turning the light bulb on before you're ready. You could get burned if you're not careful
- You can reverse the red and black if you want-- you just need different wires on each end.
- Remember you only want to hook up one wire right now.
-
6Stand up the two remaining clips, then clamp the graphite between them. Think of making an H-shape, where the two clips are the sides and the graphite is the horizontal line in the middle.[2]
- The longer the graphite, the longer your bulb will last.
- Use some tape, glue, or modeling clay to help stick the clips face up.
-
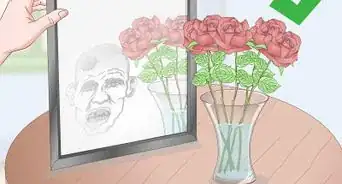
7Put the glass jar on top of the clips and graphite. This isn't strictly necessary, as the graphite would still light even without the jar. But the process creates smoke, and the graphite can shatter. Moreover, having an actual "bulb" helps create a more even light.
- The size of the jar does not matter, but the jar should be clean.
- If the jar has a label, it would be a good idea to remove it; this will make it easier to see the light.
-
8Attach the final wire to the other end of the batteries to turn the light on. You are making a simple circuit, connecting the batteries in an electrical loop. The light comes from the graphite -- as electricity flows through it, it heats up and emits energy in the form of light and heat. Thus, your light bulb!
-
9Troubleshoot to get a stronger light. If the light is weak, or isn't working, there are some things you can do to make sure you get a working light.
- Check the graphite thickness. While larger thicknesses work, 0.5 mm seems to work best.
- Add a few more batteries. Also, make sure that the ones you have are touching end to end.
- Make sure the wires are snug and well-connected to the batteries.


Using Iron Filaments
-
1Cut some copper wire into two sections, roughly 1–2 feet (0.3–0.6 m) each. Copper is a great conductor of electricity, and most wiring is copper. You need two strands about 1 ½ feet (45 cm) long.[3]
- Use small wire cable cutters to cut the copper wire.
-
2Remove 1" of shielding from each end of the wire. The shielding is the rubber that covers the copper wire. Removing it can be achieved by carefully squeezing the cable cutter so that it cuts through the shielding but not the wire. The shielding can then be stripped from the ends with your hands.
- You need to expose the end of the wire, otherwise you won't be able to complete your circuit.
-
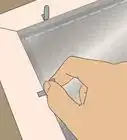
3Use the nail to pierce two holes into a cork. The holes should be in the middle of the cork about 1/2" apart. This cork will hold your wires in place. Think of it as the bottom, metal part of your light bulb.
- You can reuse an actual cork from a wine bottle, or you can buy a package of corks from the craft store.
-
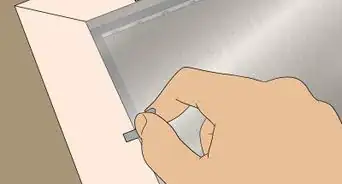
4Thread one end of each copper wire through the cork. Leave about 2" or so exposed above the top of the cork.
- If you need to, strip the shielding off of the wire to expose the metal.
-
5Bend the end of the two strands inside the cork into a hook shape. The hook of each strand should curve the same way. For example, you can have the hooks both curve to the left, or both curve to the right.
- This will hold onto your filament, which is the part of the bulb that actually lights up.
-
6Cut the iron wire into 1-1/2 to 2 inch (3.8cm to 5cm) strips. Make five strips. The thinner your wire is before beginning, the better. Thinner wire will almost always result in a better light.
- Use a pair of good wire cutters for this.
-
7Twist the five iron wire lengths together with your fingers. You want a long braid of wire. It needs to be tightly wound as well.
- You can make an actual 5-strand braid, or you can just gather the ends together, then twist them like a rope.
-
8Place the twisted iron wires onto the copper hooks, making sure it touches both copper strands. For an even better fit, you can tighten the hooks around your iron filament. The more of it touching, the better.
-
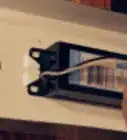
9Lay the jar on top of the cork. This is your "bulb." It will help protect from shock, but also creates a more concentrated light.
- Make sure that the jar is clean, and that the label has been removed.
-
10Wrap both ends of the wire around separate ends of a battery to turn the light on. If you have electrical clamps, they will be much safer and easier to use. If you don't, make sure you're wearing rubber-soled shoes and have safety gloves on. Attach one wire to each end of the battery to complete the circuit and "turn on" the light bulb.
- You can use any battery, but starting small is usually best. C or D batteries (1.5 V each) will do the trick.
- If you're not getting enough light, try attaching your batteries in series.
-
11Troubleshoot if you're not getting enough light. This is a simple scientific machine, so their are simple ways to test and fix bulbs that don't work. Here are some tips to get your bulb working:
- Ensure all the ends are touching. You must have a complete, unbroken circuit to get light.
- Thin out the filament. Try it with only 3-4 strands. You could also replace the iron with graphite, as mentioned in method one.
- Add more power. Use a bigger battery, or attach multiple batteries together, for more power and more light.


Community Q&A
-
QuestionCan I use a copper wire as the heating element?
 divine enowCommunity AnswerYes, but the copper wires must be thin so as to have greater resistance for more heat. But know that copper is not resistant to heat, so it may melt off after a while, provided there is sufficient current.
 -
QuestionHow do you to connect the wires with the socket?
 Community AnswerDO NOT connect your wires to an electrical socket -- there is far more energy than you can safely handle. Hook this bulb up only to batteries.
 -
QuestionWhat can I use instead of a jar?
 Community AnswerA bottle is a great resource to use instead of a jar!
Warnings
- Do not touch the filament after it has been lit. It will be very hot for at least ten minutes following its use.⧼thumbs_response⧽
- Using a battery weaker than 6 volts will not light the bulb well. Using a battery stronger than 6 volts could be dangerous because of weak construction.⧼thumbs_response⧽
- The filament (the twisted iron wire) might move when putting the cork stopper into the glass jar. Make sure the components are in place before stopping the jar completely.⧼thumbs_response⧽
Things You'll Need
- Glass jar
- Fitted cork stopper
- 1 inch (2.54 cm) nail
- 3 feet (0.9144 m) shielded copper wire
- Iron wire
- 6-volt battery
- Wire cutter


References
- ↑ https://www.youtube.com/watch?v=xre81ZuqyEg
- ↑ http://scactivities.cikeys.com/pencil-lead-lightbulb/for-teachers/
- ↑ http://www.webexhibits.org/causesofcolor/3AA.html
- http://www.popsci.com/diy/article/2005-12/make-your-own-lightbulb
- https://www.stevespanglerscience.com/lab/experiments/build-a-light-bulb-circuit-science/
- https://thekidshouldseethis.com/post/19783357736
- Videos provided by HouseholdHacker
About This Article

To make a light bulb, start by connecting 5 6-volt batteries end to end using electrical tape. Then, take a piece of copper wire and hook one end onto the positive end of the battery chain and the other end onto a piece of graphite pencil lead. Next, take a second piece of copper wire and attach one end to the graphite. Once the graphite is attached to both copper wires, place a jar over it. Finally, turn on your light bulb by touching the loose end of the second piece of copper wire to the negative end of the battery chain. To learn how to make a light bulb using iron filaments, scroll down!