This article was co-authored by wikiHow staff writer, Jack Lloyd. Jack Lloyd is a Technology Writer and Editor for wikiHow. He has over two years of experience writing and editing technology-related articles. He is technology enthusiast and an English teacher.
The wikiHow Tech Team also followed the article's instructions and verified that they work.
This article has been viewed 352,670 times.
Learn more...
This wikiHow teaches you how to use Audacity to create a new song (or "mash-up") which uses one song's vocals in conjunction with another song's instrumental. The four primary components of creating a clean mash-up include finding two songs which work well together, adjusting the pitch of the vocals to fit the beat, adjusting the tempo of the two songs to align, and synchronizing the vocals with the proper point in the instrumental.
Steps
Gathering Audio Materials
-
1Determine which two songs you want to mash up. To make a mash-up, you'll need the vocals from one song and the instrumental from another. You'll need to figure out which two songs you want to use, as well as which song you want to use for vocals and which song you want to use for the background.
-
2Download an a cappella version of one song. Downloading MP3 files from YouTube is a good way to get an a cappella version of a song, though you should always credit any artists and YouTube creators from whom you use audio.
- Using copyrighted audio for your own music is fine but selling or using the music in any commercial sense (or any context other than personal enjoyment) is not.
Advertisement -
3Download an instrumental version of the other song. Again, YouTube is a good resource for song instrumentals.
- If you can't find an instrumental version of the song in question, try looking for a "karaoke" version instead.
-
4Open Audacity. Click or double-click the Audacity app icon, which resembles a pair of blue headphones around an orange wavelength.
-
5Import both songs into Audacity. Once your audio files have been imported into Audacity, you can begin working on your mash-up. To import files, do the following:
- Click File
- Click Import
- Click Import Audio...
- Hold down Ctrl (or ⌘ Command) while clicking your music files.
- Click Open


Changing the Vocals' Pitch
-
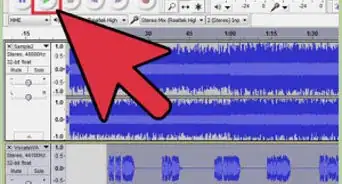
1Select the vocals-only track. Click and drag your mouse cursor from left to right across the a capella track until the whole thing is selected.
-
2Click Effect. It's a tab at the top of the Audacity window (or the screen on a Mac). A drop-down menu will appear.
-
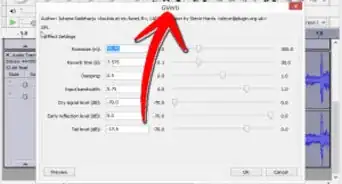
3Click Change Pitch…. This option is near the top of the drop-down menu. Clicking it opens a new window.
-
4Click the "Semitones (half-steps)" text box. You'll find this near the middle of the window.
-
5Raise or lower your song's pitch. Each octave is represented by the number "0.12", meaning that you'd type in 0.12 to raise the song's pitch by one octave (or -0.12 to lower the song's pitch by one octave). Using increments of 0.12 is the cleanest, most accurate way to increase or decrease pitch.[1]
- You can also use half-octaves (0.06) if you need to finesse your vocals' pitch further, but you shouldn't otherwise deviate from the 0.12 increment.
-
6Click OK. It's at the bottom of the window. This will apply your pitch adjustment to the selected audio.
-
7Listen to the song. With both tracks unmuted, listen to the pitch of the song in conjunction with the instrumental. If the song sounds in-key with the beat, you're all set.
- Keep in mind that the song most likely won't synchronize with the beat just yet.
-
8Adjust the pitch as needed. Much of creating a mash-up consists of trial-and-error, and this part is no exception. If your song is still out of key, click Edit, click Undo Change Pitch, and adjust the pitch again. Once your song's vocals' pitch matches your instrumental, you can proceed with synchronizing the files' beats-per-minute.


Synchronizing the Tempo
-
1Find out each track's tempo. In order for your tracks to line up with each other, they have to have the same beats per minute (BPM) number. You can find out each track's BPM number by doing the following:
- Go to https://songbpm.com/
- Type your song's name and artist name into the search bar at the top of the page.
- Press ↵ Enter
- Review the "BPM" number on the right side of the page next to the correct song.
- Repeat with your other song.
-
2Determine which track to alter. If you want to speed up your mash-up, you'll want to bump up the BPM of the slower song to match the faster one; otherwise, you'll need to lower the BPM of the faster song to match that of the slower one.
-
3Select a song. Click and drag your mouse cursor across the song for which you want to alter the BPM.
-
4Click Effect. The Effect drop-down menu will appear.
-
5Click Change Tempo…. You'll find this option near the top of the drop-down menu. Doing so opens the Change Tempo window.
-
6Enter the track's original BPM. In the "from" text box that's on the left side of the "Beats per minute" section, type in the BPM for the track that you're currently changing.
- For example, if the song's current BPM is 112, you'd type that into the "from" box.
-
7Enter the second track's BPM. Type the second track's BPM into the "to" text box that's on the right side of the window.
- For example, if the other track's BPM is 124, you'd type that into the "to" box.
-
8Click OK. It's at the bottom of the window. Doing so applies your BPM settings to the selected track.
-
9Listen to the track. As always, you can undo your changes from the Edit menu and change the other track's BPM if you aren't satisfied with the results.
- Keep in mind that you still have to line up the vocals with the beat.


Lining up the Vocals with the Beat
-
1Select the point at which you want your vocals to start. Find the point in the instrumental's soundwave where you want to insert the vocals, then click this point on the instrumental's soundwave to mark it.
-
2Click ↔. It's in the upper-left side of the Audacity window. This tool allows you to move a track back and forth, which will help you position the track.
-
3Drag your vocals left or right. The beginning of the vocals should align with the vertical line which represents the point that you clicked earlier.
- You can click the + magnifying glass icon near the top of the Audacity window to zoom in if you're having trouble getting the location as precise as you want it.
-
4Play your track. Click the green "Play" button in the upper-left side of the window. Your track should begin playing right at the point at which the vocals are supposed to come in.
-
5Adjust the vocals' track's position as needed. Once your vocals are where you want them to be, you can finally move on to exporting your project to its own sound file.


Exporting the Mash-Up
-
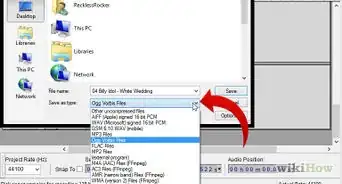
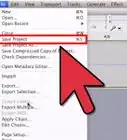
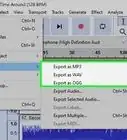
1Click File. It's in the upper-left side of Audacity. Clicking it prompts a drop-down menu.
-
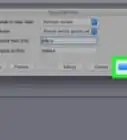
2Click Export Audio…. This option is in the File drop-down menu. A window will appear.
-
3Enter a file name. Type in whatever you want to name your mash-up.
-
4Select a save location. Click a folder in which you want to save the file (e.g., Desktop).
- On Mac, you may first have to click a Where drop-down box before you can select a save location.
-
5Click Save. It's near the bottom of the window.
-
6Enter any tags you wish to include. When prompted, add the artist name, album, and so on if you like.
-
7Click OK. It's at the bottom of the window. This will save your project in your selected location as an MP3 file, which can be played virtually anywhere.


Community Q&A
-
QuestionHow can I save my songs on my computer?
 Community AnswerGo to File -> Import. Select your extension, file name and file location on your preferred drive. Click OK.
 -
QuestionWould you consider this application easy to use? I want to know before I download it.
 Community AnswerYes. It's much like Premiere Pro in that sense. When you start out, you can figure out the basics in a matter of minutes. Over time you learn more and more. It's a great program, I highly recommend it.
 -
QuestionHow can I use Audacity on my laptop and on my Mac computer?Community AnswerJust download the specific versions; there are Mac, Windows and Linux versions of Audacity at the official website.
Warnings
- Some songs may simply not be compatible with certain beats, even if you perfectly synchronize their BPM rates and pitches.⧼thumbs_response⧽
- Sometimes, editing a track will prompt it to move forward a few millimeters. This can throw your whole track out of alignment, though you can move the track back with the ↔ tool.⧼thumbs_response⧽
- Many songs are subject to copyright; upload your songs on the internet with caution or get the rights to use the song from the producer.⧼thumbs_response⧽


.webp)