This article was co-authored by wikiHow staff writer, Travis Boylls. Travis Boylls is a Technology Writer and Editor for wikiHow. Travis has experience writing technology-related articles, providing software customer service, and in graphic design. He specializes in Windows, macOS, Android, iOS, and Linux platforms. He studied graphic design at Pikes Peak Community College.
The wikiHow Tech Team also followed the article's instructions and verified that they work.
This article has been viewed 779,576 times.
Learn more...
This wikiHow teaches you how to edit Minecraft textures and use them in-game on both Windows and Mac computers. To do this, you'll need a copy of Minecraft Java Edition, an archive program such as WinRAR or 7-zip, and a graphics editing program that can do transparent graphics. You can use Adobe Photoshop, or GIMP which is a free alternative to Photoshop.
Steps
Extracting the Files You Need
-
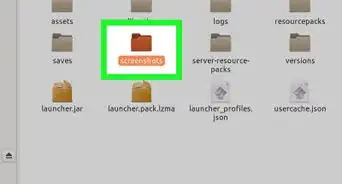
1Open the Minecraft directory folder. There are three ways you can navigate to the Minecraft directory folder. They are as follows:
- Windows: Type "%AppData%" in the search bar next to the Start menu and press "Enter". Then open the ".minecraft" folder.
- Mac: Open the Finder. Click Go in the menu bar at the top. Hold Option and click Library. Click the "Application Support" folder. Click the "minecraft" folder.
- Within Minecraft: Launch Minecraft: Click Options on the title screen. Click Resource Packs. Click Open Pack Folder. Navigate back one folder.
-
2Double-click the "versions" folder. You'll find this in the middle of the ".minecraft" folder.Advertisement
-
3Double-click the most recent version's folder. As of July 2022, the most recent version of Minecraft is 1.19. This means that you'll double-click the "1.19" folder.
- When in doubt, look for the biggest number here.
-
4Copy the JAR file. The Jar file has an icon with a coffee cup on it. The filename is the latest Minecraft version number. Right-click the Jar file and click Copy.
- If your mouse or trackpad doesn't have right and left buttons, use two fingers to tap on the trackpad (or press the trackpad's button), or press the right side of the button, to simulate a right-click.
-
5Navigate back to the Minecraft directory folder. On Windows, simply click ".minecraft" in the address bar at the top of File Explorer to go back one folder. On Mac, click the back arrow twice in the upper-left corner of the Finder.
-
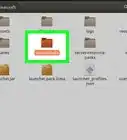
6Create a new folder for your texture pack. Use the following steps to create a new folder for your texture pack:
- RIght-click a blank area in the Minecraft directory folder.
- Click New (Windows only)
- Click New folder
- Type in a name.
- Press Enter.
-
7Open your texture pack folder and paste the JAR file in it. Double-click the folder that you just created to open it. Then right-click and click Paste.
-
8Extract the JAR file using WinRAR or 7-zip. The Jar file works a lot like a zip file.
- Right-click the JAR file.
- Click 7-zip (if you are using 7-zip).
- Click Extract to [JAR name]\ (do not click "Extract Here".)

Creating a Texture Pack
-
1Navigate to the "Textures" folder. It's in the new folder you created when you extracted the JAR file. Use the following steps to navigate to the "Textures" folder inside the new folder you just create when you extracted the Jar file:
- Open the folder with the version number on it.
- Open the "assets" folder.
- Open the "minecraft" folder.
- Open the "textures" folder.
-
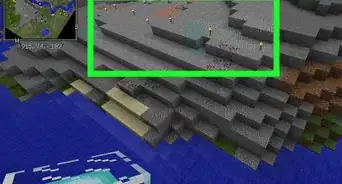
2Find a texture category that you want to edit and open its folder. Each folder has a different texture category. You can find some textures in the following folders:
- The various blocks are listed in the "Blocks" folder.
- Mobs, animals, villagers, and illagers are listed under the "Entity" folder.
- Items can be found in the "Item" folder.
- Clouds, rain, snow, and the sun can be found in the "Environment" folder.
- Various effects, such as smoke, explosions, dripping, etc can be found in the "Particle" folder.
-
3Open a texture in an image editing program. Find a texture that you want to edit, right-click it, select Open with. Then select an image editing program such as Photoshop or GIMP.
- The image will be very tiny. You'll need to zoom in on it to be able to edit it.
-
4Edit your texture. Use Paint to make any color changes to your texture. This step is up to you in terms of how you want to redesign the textures.
-
5Save over the image file. When you are finished making your changes the image file, just save over it. Make sure you save it as a PNG file, using the same file name and location.
-
6Edit any other textures that you want to change. Edit as many textures as you want to edit. When you are finished, you can move on to the next step.
-
7Go back to the folder with the version number. After you are done editing all the textures and you are ready to test them, return to the folder you create when you extracted the Jar file. It has the version of Minecraft you are currently using.
-
8Create and open a new text file. Use the following steps to create a new text file:
- Windows:
- Click Home
- Click New item
- Click Text Document
- Press "Enter".
- Open the text document.
- Mac:
- Click the spotlight icon that resembles a magnifying glass in the upper-right corner in the menu bar.
- Type in textedit in the search bar.
- Click TextEdit.
-
9Enter the resource pack code. Type the following code into your text document. You can add whatever description you want for your texture pack after "Description". Making sure that each line of code is on its own line:[1]
{
  "pack": {
    "pack_format": 12,
    "description": "[Any description you want to give your pack]"
  }
}
- The number behind
pack_formatis different for different versions of Minecraft:pack_formatMinecraft version 1 1.6.1 – 1.8.9 2 1.9 – 1.10.2 3 1.11 – 1.12.2 4 1.13 – 1.14.4 5 1.15 – 1.16.1 6 1.16.2 – 1.16.5 7 1.17x 8 1.18.x 9 1.19 – 1.19.2 11 22w42a – 22w44a 12 1.19.3
- The number behind
-
10Save your text file as a ".mcmeta" file. Use the following steps to save the file as a ".mcmeta" file:
- Windows:
- Click File
- Click Save As...
- Type pack.mcmeta into the "File name" text field.
- Click the "Save as type" drop-down box.
- Select All files next to "Save as Type".
- Click Save
- Mac:
- Click File
- Click Save
- Type pack.mcmeta into the "Save As" text field.
- Click Save
- Locate the "pack.mcmeta" (in your Documents folder by default).
- Click the file name.
- Remove ".rft" from the end.
- Move the file to the file you created when you extracted the JAR file.
-
11Create your resource pack. Use the following steps to create a resource pack zip file:[2]
- Hold "Ctrl" or "Option" and select the "assets" folder and the "mcmeta" file.
- Right-click either file
- Click Compress 2 items (Mac only).
- Click 7-zip (if you are using 7-zip.)
- Click Add to Archive
- Change the file name to whatever you want to name the texture pack.
- Ensure "ZIP" is selected under "Archive format".
- Click Ok.
-
12Copy the resource pack zip file to the "resourcepacks" folder. Once you copy the zip file over, you are ready to access the texture pack in Minecraft. Use the following steps to copy the zip file over to the Resource Packs folder:
- Right-click your resource pack zip file.
- Navigate back to the ".minecraft" folder on PC or "minecraft" folder on Mac.
- Open the "resourcepacks" folder.
- Right-click any black space.
- Click Paste.
Accessing Texture Packs In-Game
-
1Open Minecraft. Re-open the launcher if you closed it, then click PLAY.
- If you didn't close the launcher, click the News tab before clicking PLAY.
-
2Click Options…. It's in the bottom-left corner of the Minecraft start screen.
-
3Click Resource Packs…. You'll find this option in the lower-left side of the page.
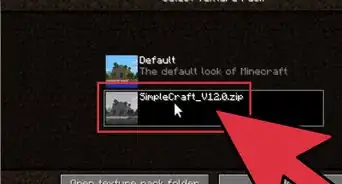
-
4Click your resource pack's image. Doing so will move it from the left-hand column into the right-hand column.
-
5Click Done. It's at the bottom of the page. This will load your resource pack into the game, after which point you can play any existing (or new) world to experience your updated texture pack.
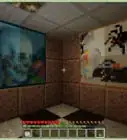
-
6Play a game. Once the resource pack is activated, you can start any game of Minecraft. Your texture packs will be active in the game.
Community Q&A
-
QuestionWill this work on a 12-year-old computer?
 Community AnswerMost likely, yes, but if you are making big changes and you want the FPS to run smoothly you will most likely want to use it on a newer computer to avoid lag/crash issues.
 -
QuestionCan I make a Minecraft texture pack without owning Minecraft?
 Community AnswerYes, you can. Just run the demo, close the demo, and then look in the game directory. Open the version jarfile (versions\1.11.2\1.11.2.jar etc.) with WinRar or some archive opener. Then extract the assets folder from the archive to a folder, where you will edit the textures. Then copy the whole folder into gamedirectory\resourcepacks\, go into the game, go to options, go to resource packs, and it should work.
 -
QuestionCan something go wrong and cause me to lose the original textures?
 Goodvillain034Community AnswerYes, but it's unlikely. One thing you can do is copy the texture file/folder and save it somewhere else on your PC in case the texture file or folder accidently gets deleted, destroyed, or improperly edited.


References
About This Article

1. Click Launch options and select Latest release.
2. Go to the Minecraft directory → versions → (current version).
3. Copy the JAR file.
4. Open the .minecraft. folder
5. Create a new folder and open it.
6. Extract the copied JAR into the folder using WinRAR or 7-Zip.
7. Navigate to assets → minecraft → textures in the JAR folder.
8. Edit and save your textures.
9. Create a text file and copy and paste the following code: { "pack": { "pack_format": 5, "description": "[Your Description]"