This article was co-authored by wikiHow Staff. Our trained team of editors and researchers validate articles for accuracy and comprehensiveness. wikiHow's Content Management Team carefully monitors the work from our editorial staff to ensure that each article is backed by trusted research and meets our high quality standards.
The wikiHow Video Team also followed the article's instructions and verified that they work.
This article has been viewed 323,822 times.
Learn more...
Buried treasure, pirate ships, “X” marks the spot—pirate themed treasure maps are full of fun! You can create an authentic looking map using materials from home, plant pirate treasure at different landmarks, and lead your kids on a fun hunt for buried treasure!
Steps
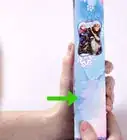
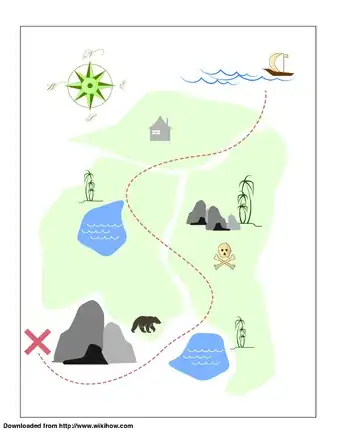
Sample Treasure Map
Aging the Paper
-
1Cut off a large section of brown parchment paper to create your map. You can make your map as large or as little as you like, just as long as you have enough space to write and draw. It will be ripped and crumpled, so it’s okay if you cut crookedly.[1]
- If you don’t have parchment paper, you could also use heavy duty stock paper or a brown paper bag.
-
2Rip or cut the edges of the paper to make it look ragged and old. Use your scissors to cut wavy lines across the edges of the paper, or rip small section out by hand. Make the paper look like it has been well-used and rescued from a burning ship.
- Even if you just cut out 1 or 2 small semicircles from each side of the paper, that’ll help it to look torn up.
Advertisement -
3Crinkle the paper until it looks beaten up. Bunch, crumple, and twist the paper into as tight of a ball as you can. You could even put it on the ground and stomp on it a few times. After you’ve crinkled the paper, spread it back out on a flat working surface.[2]
- Crumpling the paper makes it look old and weak, which is how you would imagine an old pirates’ treasure map to look.
-
4Mix a little bit of brown paint in a cup with water and dab it onto the map. Use a styrofoam or plastic cup or bowl to mix together 1 cup (240 mL) of water and a small squirt of paint, just enough to color the water. Then take a sponge, dip it in the water and squeeze it out so it’s not dripping wet, and dab it all over the paper. Make the sponge paint uneven across the surface of the paper. You want it to look dirty and discolored, but you also don’t want to have to wait a long time for the water to dry![3]
- If you don’t have paint at home, make a really strong cup of tea or use cold coffee to blot the paper.
-
5Burn the edges of the map using a lighter or matches. Be very careful when burning your map—you don’t want to burn your fingers or accidentally catch the entire sheet of paper on fire. Lightly run a lit match or lighter next to the edge of the paper until it starts to blacken. Move on to the next section before the paper actually catches flame.[4]
- If you’re nervous about this step, take your map to the kitchen sink and burn the edges there so that you can easily turn on the faucet in case things get a little too smoky.
- You could also sponge black paint onto the edges of the map to create a “burned” look if you don’t want to mess around with an open flame.

Choosing Landmarks and Designing the Map
-
1Pick a location for the treasure hunt. You could make the hunt span through the basement up through the main floor of a house, or you could use trees and bushes in the yard as landmarks on your map. You could even have the treasure hunt take place inside and outside, depending on how much space you need or what time of year it is.
- It’s best to avoid public places for a treasure hunt because you never know who else might stumble upon your buried treasure.
-
2Pair 4-5 “landmarks” from home to 4-5 pirate themed designs. If you’re doing an indoor hunt, you could use a couch, lamp, microwave, fridge, and picture for your landmarks. For outdoor ideas, you could use a large tree, trampoline, swing set, rose bush, and large rock fixtures. Then, think of ways you can creatively label those items on your map. For example, the bathtub could be the “waterfalls of doom” or a large outdoor rock could be “skull island.” Other fun pairings are:
- Monster mountain = laundry pile
- Skeleton jungle = front bushes
- Serpent pass = hallway leading to the next room
- Bloody beach = outdoor patio area[5]
-
3Draw a large island on the paper, leaving room around the edges. Create jutting areas for a “look out point,” and make wavy lines for the edges of the island. Use a blue marker, colored pencil, or crayon to shade around the outside of the island to create the ocean.[6]
- You could always create several mini-islands to designate different rooms or areas of home, like an island for the indoor hunt and a separate island for the outdoor hunt.
-
4Create a compass in one corner of the map. You may not actually end up using the compass for directions, but it adds a look of authenticity to the map. Add something simple, like a cross labeled “N,” “S,” “E,” and “W,” or get really detailed and draw a compass rose.
- If you can, align your compass and map so that your kids can actually use those directions to find the hidden treasure! Most phones have compasses on them, so you can check it to see in which directions the different landmarks are.
-
5Add your landmarks to the map and label them. Use markers or crayons, and get creative! In addition to the landmarks you chose earlier, you can add palm trees, parrots, coves, and sand. Depending on the ages of the kids who will be doing the treasure hunt, label the landmarks with their pirate names and maybe a clue about the correlating treasure spot in the home, like “Waterfalls of Doom” could have “where you shower” written in small print underneath of it.[7]
- You can also take inspiration from pirate movies and include other fun details on your map.
-
6Use a red marker to draw a dotted-line path to guide the hunt. From the starting point to the end, make a red dotted-line to designate the path the kids will need to take to search for the buried treasure. Add in some circling sections to make it look more authentic.
- If you don’t have a red marker, you could also use paint or another darkly colored marker. You just want to make sure the path is clearly visible.
-
7Make a large “X” to designate where the buried treasure is located. This is the best part of the hunt! Place a big, red “X” on the map at the final location and draw a small treasure chest next to it.
- If you’re really artistic, you could even draw a pirate holding the treasure chest next to the “X.”


Hiding the Treasure and Starting the Hunt
-
1Hide pirate booty or clues at each landmark to prepare for the hunt. For example, if on your map you’ve drawn “skull island,” you could leave a small bag of candy or an inexpensive pirate trinket at the large outdoor rock to let the kids know they are on the right path.[8]
- If you didn’t want to write actual clues on the map, you could use separate scraps of paper to write out clues you can hand out as the kids progress along the hunt.
-
2Hide pirates’ booty where “X” marks the spot. Use a shoebox or small toy chest and fill it with treats and small pirate themed toys. You can find chocolate “pirate doubloons,” inexpensive eyepatches, small stuffed parrots, and mini toy ships at party supply stores.
- If you’re a babysitter, make sure that the kids are allowed to have snacks or sweets before including them in the treasure chest.
- If you have time, you could even make your own treasure chest.
-
3Roll up the map and hide it. Use twine or string to tie the map, or put it into a used toilet paper or paper towels roll. Then hide the map somewhere in the house for the first part of the treasure hunt. Just make sure you can give a good clue to set the kids on the right path to finding it![9]
- After you roll up the map, you could burn the edges one more time to increase the authenticity.
-
4Help the kids on their hunt if they are young. If you’re playing with younger children, you may need to give them hints or add additional labels to your map so they know which direction to head in. For example, you could tell them that the parrot along the dotted line on the map indicates they should look in the room where there is a painting of birds.
- The goal is to have fun, so don’t make the treasure hunt so hard that it becomes frustrating for anyone! Give hints, travel along, and you could even dress up and talk like a pirate!

Community Q&A
-
QuestionHow do you make a treasure chest?
 Community AnswerWikiHow has a great article on how to make a pirate treasure chest. Simply type "pirate treasure chest" into the search bar for detailed directions.
Things You’ll Need
Aging the Paper
- Parchment paper or other heavy-duty paper
- Scissors
- Bowl
- Water
- Black or brown paint
- Sponge
- Lighter/matches
Choosing Landmarks and Designing the Map
- Markers or colored pencils/crayons
Hiding the Treasure and Starting the Hunt
- Twine or string
- Candy or small toys for “treasure”
- Shoebox or small toy chest

References
- ↑ https://theimaginationtree.com/diy-pirate-map-and-treasure-hunt-games/
- ↑ http://www.dltk-kids.com/crafts/pirates/mmap.html
- ↑ https://youtu.be/jnMbGFKsj3s?t=109
- ↑ https://youtu.be/jnMbGFKsj3s?t=188
- ↑ http://www.dltk-kids.com/crafts/pirates/mmap.html
- ↑ http://www.dltk-kids.com/crafts/pirates/mmap.html
- ↑ https://theimaginationtree.com/diy-pirate-map-and-treasure-hunt-games/
- ↑ https://theimaginationtree.com/diy-pirate-map-and-treasure-hunt-games/
- ↑ http://www.dltk-kids.com/crafts/pirates/mmap.html
About This Article