This article was co-authored by wikiHow Staff. Our trained team of editors and researchers validate articles for accuracy and comprehensiveness. wikiHow's Content Management Team carefully monitors the work from our editorial staff to ensure that each article is backed by trusted research and meets our high quality standards.
This article has been viewed 129,781 times.
Learn more...
Snow cones are a fun and delicious treat in hot summer weather. If you have access to an ice crusher, all you need in order to make snow cones at home is syrup. Fortunately, making your own snow cone syrup is a simple and easy process that almost anyone can do. By simmering sugar, water, and your choice of drink mix or mashed fruit in a saucepan, you can make homemade snow cone syrup in no time!
Ingredients
- 2 cups (200 g) of granulated sugar
- 1 cup (240 mL) of water
- 16 ounces (450 g) of drink mix
- 20 ounces (570 g) of chopped or mashed fruit
Steps
Using Powdered Drink Mix
-
1Combine the sugar and water in a saucepan and bring them to a boil. Stir 2 cups (200 g) of granulated sugar and 1 cup (240 mL) of water together in a small saucepan and place the pan over medium high heat. Continually stir the mixture until it begins to boil, which should take around 3-5 minutes.[1]
- Medium high heat on a stovetop is the number that is roughly ¾ of the way between the lowest and highest settings. For example, on a dial that went from 1 (low) to 8 (high), medium high would be 6.
-
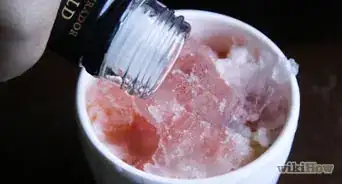
2Boil the water for 1 minute, then remove it from heat and add the mix. Let the water boil until the sugar is completely dissolved, which shouldn’t take longer than 1 minute. Slowly sprinkle the drink mix into the water once you’ve taken the saucepan off of the stove. Don’t dump the whole packet of drink mix into the water all at once, since this will cause it to clump.[2]
- 16 ounces (450 g) of drink mix is normally the amount that comes in a single-serving packet. These can be bought at any grocery store or supermarket.
Advertisement -
3Stir the drink mix into the water and allow it to cool. Stir the mix into the water until it’s completely dissolved, which normally takes 1-2 minutes. Then, allow the water to cool to room temperature.[3]
- The water probably won’t take more than 10 minutes to sufficiently cool down.
-
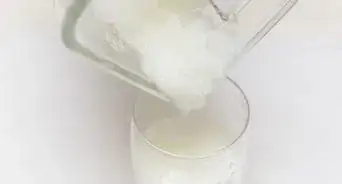
4Use a funnel to pour the syrup into your dispenser. If you plan to pour the syrup onto snow cones using a dispenser bottle, then you’ll definitely need to use a funnel to transfer the syrup from the saucepan to the bottle to avoid making a mess. Don’t be alarmed if the syrup seems thicker at this point than it was in the saucepan; it’s perfectly normal for it to thicken as it cools.[4]
- If you have any leftover syrup that won’t fit in your dispenser, transfer it into a separate airtight container you can place inside the refrigerator.
-
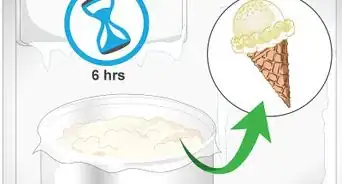
5Store the syrup in the refrigerator until you use it. The syrup is ready to use immediately, if you have your shaved ice at the ready. However, it will keep in the fridge for up to 1 month if you decide not to use it immediately.[5]

Making Fruit Syrup
-
1Combine the sugar and chopped or mashed fruit in a saucepan. Use about 2 cups (200 g) of granulated sugar and 20 ounces (570 g) of chopped or mashed fruit for the best results. The fruit can be frozen or fresh, although fresh fruit will cook more quickly. Whether you chop it or mash it, make sure the pieces of your fruit aren't larger than 1 inch (2.5 cm) across to ensure that they cook properly.[6]
- Some good examples of different fruit to use for your syrup include raspberries, mangoes, blueberries, and pineapples.
-
2Place the fruit over medium heat and simmer it for 3-4 minutes. You’ll want to simmer the fruit and sugar until all the fruit has softened and the sugar has completely dissolved. This process usually takes 3-4 minutes, although it may take a few minutes longer if you used frozen fruit. Remove the pan from heat after 4 minutes and allow the fruit to cool.[7]
- Medium heat is the middle setting on your stovetop dial. For example, if the numbers on your dial ran from 1 (low) to 8 (high), medium heat would be 4.
- It should take the fruit 15-20 minutes to cool down.
-
3Move the fruit over to a food processor and blend it into a smooth puree. Even if the fruit has already been mashed and then softened in the saucepan, it will still need to be even more processed before it can be used on a snow cone. It should take about 30 seconds for the fruit and sugar concoction to be blended into a smooth syrup.[8]
- If you don’t have a food processor or blender, you can also try running the concoction through a sieve.
-
4Pour the syrup into a strainer to remove any seeds. If you come across large chunks of fruit in the syrup, take these out as well or run the syrup through the food processor again until the chunks are gone. If the syrup is so thick that it doesn’t easily pour, add a little water to it to thin it out.[9]
- Note that if the syrup is too thick to easily pour into a strainer, it’ll probably also be too thick to easily use on snow cones.
-
5Use your syrup immediately or store it in the refrigerator. Snow cone syrup made from real fruit is at its best when you use it immediately. However, if you’d rather store it and use it later, simply transfer it to an airtight container and place it in the refrigerator.[10]
- If you store the syrup in the refrigerator, aim to use it within 4-7 days of making it.

Community Q&A
-
QuestionWhy do I have to boil it?
 Community AnswerIt thickens it as it evaporates some of the water.
 -
QuestionCan I microwave it instead of using the stove?
 CaeiiaTop AnswererNo, it'll be uneven and probably make a mess.
 -
QuestionCan I make it with soda instead of Kool-Aid?Community AnswerAbsolutely! I own a snow cone machine and we have plenty of flavors, including "root beer" and "Pepsi." Hi-C works well too!
Warnings
- The process of making snow cone syrup can be pretty messy. Make sure you have a dry towel on hand in case you need to clean up any spills.⧼thumbs_response⧽
Things You’ll Need
- Saucepan
- Funnel
- Food processor
- Strainer
- Dispenser bottle


References
- ↑ https://www.allrecipes.com/recipe/73492/snow-cone-syrup-ii/
- ↑ https://hoosierhomemade.com/homemade-snow-cones-3-ingredient-syrup-recipe/
- ↑ http://tastefullyfrugal.org/2015/08/3-ingredient-homemade-snow-cone-syrup.html
- ↑ https://hoosierhomemade.com/homemade-snow-cones-3-ingredient-syrup-recipe/
- ↑ https://hoosierhomemade.com/homemade-snow-cones-3-ingredient-syrup-recipe/
- ↑ https://www.biggerbolderbaking.com/homemade-snow-cones/
- ↑ https://www.biggerbolderbaking.com/homemade-snow-cones/
- ↑ https://www.biggerbolderbaking.com/homemade-snow-cones/
- ↑ https://www.biggerbolderbaking.com/homemade-snow-cones/
About This Article

To make snow cone syrup, start by bringing 2 cups of granulated sugar and 1 cup of water to a boil over medium-high heat, stirring continuously. Then, let the mixture boil for 1 minute before removing it from the heat and gradually adding a packet of flavored drink mix. Next, stir the drink mix into the water and let the mixture cool for around 10 minutes. Finally, use a funnel to pour the syrup into a dispenser bottle. To learn how to make snow cone syrup using fruit, scroll down!