X
wikiHow is a “wiki,” similar to Wikipedia, which means that many of our articles are co-written by multiple authors. To create this article, volunteer authors worked to edit and improve it over time.
This article has been viewed 10,645 times.
Learn more...
If you love shopping in real life, then you might find the board game Mall Madness to be thrilling. If you've picked up a copy of the game, this article should be able to quench your thirst for the knowledge of how to play this game.
Steps
Part 1
Part 1 of 6:
Assembling the Game
-
1Ensure that the batteries in the electronic console are current. The electronic console takes a total of two double-A batteries. [1] However, older consoles will require three or more double-A batteries.[2]
- Only the old consoles have On-Off switches, so if you have an older console, ensure the electronic console is set to "OFF" before refreshing the batteries in the console.[3] [4]
- To open this console's battery case, you will need a Phillips head screwdriver about the size of an eyeglass fix-it screwdriver.
-
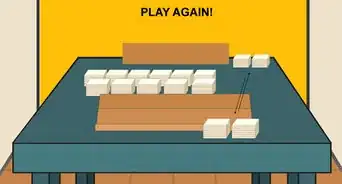
2Open the game board. Take the game board out of the game box and place it down on a flat surface so all players can reach it.Advertisement
-
3Set down each of the plastic and cardboard pieces. This includes the electronic console, four plastic walls, and four cardboard pieces to create the two-story mall and top-level flooring.
- Older versions of this game included many more plastic pieces and decorations that were felt to be unneeded for the game's 2020 version. This included escalators, fountains, and other pieces that connected the sides to the console and across the mall from side to side.
-
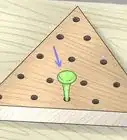
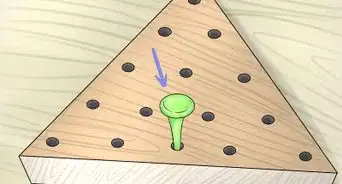
4Match up the console with the shaped-outline on the board and place it down into the matching holes in the center of the board.
- Don't worry about the escalators in the 2020 version, since they are no longer included. In older versions, the escalators would attach to the console.
-
5Place down all the mall walls containing the stores that can be shopped at. In older versions, stores used to have a more cardboard-like look. Now, these store signs look like plastic credit cards that fit into a holder.
- You will need to attach each store card to the mall wall. However, they slide into their designated slots very easily. Stores fitting into their slots are mentioned on each board piece. Press the bottom tab into the gameboard hole's purple wall around the game's outer edges to insert the card.
-
6Place the storecards into their proper holds. On the bottom level of the mall, the stores that are denoted on the gameboard must match the order in which the cards are placed into the plastic divider, simpler side facing outwards (more graphical side facing inwards). On the top, they must match the order in which your cardboard pieces were put down and can be slipped right into the top slots provided.
- The bottom-level stores include Bling Depot Jewelry Store, Noah's Arcade, Nice Pad Home Decor, The Pencil Case Craft Store, Hair-Do Hair Salon, Sgt. Snuggles Pet Store, Nerdburger Science Store, and the What's Cookin' Kitchen Store.
-
7Attach the second-floor flooring pieces to the mall walls. You'll see a marked color space on the bottom of the cardboard cut-outs, which should match the corner on the gameboard where that color's parking lot is.
-
8Place the top-level cards into their proper locations - based on the locations of the markings on the cardboard floor pieces. The top-level stores include PlayItCool Toy Shop, Get Dressed, Get Played Game Store, Daisy's Perfume, ATM, Flying Discs Records, Yas Queen Beauty Supply, Throwing Shade Sunglasses, Nails Nail Salon, Sugar Shack Candy Store, Wicked Fit Athletics, and Deep Shoe Sea Shoe Store.
-
9Attach the two elevator cards as they are shown to the plastic frame. These elevators help bring you up to the second floor and will be placed in the holes for the bottom level. These will help you get up to the second floor. Placement of these will be indicated on the board when the mall walls get set up, but for clarification, in this article, they go between Sgt Snuggles and Pencil Case for the first one, and between Nerdburger and Noah's Arcade for the other.
- Windows are no longer needed and no longer supplied with the game. Players tend to hunch over into the playing space in a more open-aired area to see where they are moving to while playing, so it was decided to eliminate these "windows" from play.
- Older pathways and ramps to cross from one side of the second floor to the other through the console are no longer being supplied for simplification. However, they formerly needed to be bent to be placed down, and this only needed to be done once.
-
10Set up any remaining cards into the plastic pieces as they are shown on the gameboard.
- The restrooms go-between Bling Depot and Hair-Do. The Movie Theater goes between What's Cookin' and Nice Pad.
-
11Set up the shoppers and signs into their pawn stands. Signs include the two sale signs and one clearance sign in the black pawn stands. The positioning of these signs will come later. For now, get these signs ready for use in the setup steps.
- If you were supplied with extra pawn stands, they may be set aside, when another pawn's stand breaks.
Advertisement
Part 2
Part 2 of 6:
Setting Up to Play
-
1Pick a Shopper's color pawn, matching-color shopping list, and matching-color cash card. The colors you have will be dependent on where your pawn's parking lot will begin. You'll have to choose between blue, red, green and orange. All unused pawns should be placed back into the game box.
- The backs of the shopping list cards lists the names of the players, and the players you use must match the player name and color on the back. These names include Avery (in blue), Dax (in green), Sage (in yellow), Gwen (in red).
- A description of the customer's normal shopping styles is provided below the shopper's name, though that won't come into play at any time in the game.
- In the 2004 game version, there were so many shoppers. There was Rachael and Bryan (red), Tameka and Kara (blue), Sarah and Vanessa (green), and Megan and Scott (yellow). In the 1989 and 1994 versions, these Shoppers were unnamed. [5]
- The backs of the shopping list cards lists the names of the players, and the players you use must match the player name and color on the back. These names include Avery (in blue), Dax (in green), Sage (in yellow), Gwen (in red).
-
2Retrieve six plastic "checkmarks" and place them near you. These mark the items you have bought in the game, but they need to be pre-retrieved and used throughout the game. Unused "checkmarks" get saved in the game box.
-
3Let the banker distribute a total of $150 in cash. The user's guide says to distribute 1-$50, 3-$20, 3-$10, and 2-$5. Bankers only have the job of collecting and distributing the money over the course of the game.
Advertisement
Part 3
Part 3 of 6:
Playing the Game
-
1Activate the console. Turn on the device using the on-off switch (if you have an older console), then press the aqua (blue) Enter button at the top of the device. For those on the newer consoles, tap the console's Enter button on the top of the device.
-
2Listen for the device to begin naming Shopper colors. You will need to "log in" to play the game. When you hear the color that designates the color spot for your Shopper, make sure to press the Enter button within a few seconds.
- If you can't press it in time, let it cycle through the other colors, then it will repeat the missing colors a second time.
-
3Listen for directions on where to place the Clearance and Sales signs. Place them, then push the Enter button again.
- At random times, your console may tell you that there are changes in the positions of the sales and clearance prices. Move the signs and proceed.[6]
-
4Wait for the console to announce the first color that will begin the game.
-
5Let the colored Shopper move. Your console may either tell you to move a set number of spaces, or it may tell you to move to a certain store. If you did not reach a store, press the Enter button on the console. Moving from the parking lot to the entrance costs you one space. The entrance space can be found directly underneath the cardboard insert and is correlated to your shopper's color.[7]
- Move in any direction, as long as you don't move diagonally.
- Sharing spaces with other shoppers are allowed, though this isn't very common.
- For stores on the second floor, you must reach the elevators to access them, but moving up the elevator will cost you one space. In older Mall Madness games, escalators would allow you to get upstairs through the console in the middle, but they would also cost you one space.
- Only enter stores via the door - the place where there's no colored strip (colored strips are walls, no colored areas designate doors for stores.
- If you need the console to repeat what was said, press the button on the side of the console marked "?".
-
6Learn about the Mall Madness food tokens. Get them when you reach the Food Court (in the center of the bottom level of the board (2020 version) or as a shop (in the top-level center for older versions)) or Movie Theater. You can use these to add up to three extra space moves on one move mentioned (only on a space move) by the console. However, you can't keep any more than two food tokens at a time. There's a total of eight food tokens that look like: a pretzel, Chinese meal box, pizza, chocolate (or coffee) shake, cinnamon bun, soda, hot dog, and melting ice cream in a cone.
- In older versions of the game, you'd also get them when you reached "Jimmie's Ice Cream Shop."
- The food tokens are round and are originally found on the cardboard cutout, and are easy to miss if you don't recognize them.
- You also can't use them to get out if you are held to remove a security tag.
Advertisement
Part 4
Part 4 of 6:
Taking a Purchase Action
-
1Buy something, if necessary. The shopping list cards will tell you the regular price, sale price, and clearance price, and that money must be in your area to make the purchase. If you can't make the purchase, press the Enter button. Your turn then "passes" to the next person. If you want to make the purchase, insert your card into the slot that looks like a hand holding onto a pair of cash without a drawer.
- The unit doesn't watch for where you are. However, it will announce what it finds, as things change. You will still have to play using what you were told and moving the right number of spaces. Inserting the card just tells you if it's available or at a discounted price - it doesn't keep track of where you are at any time.
- The information provided below lists the regular price then the sale price then the clearance price for the item - all within the parentheticals.
Shop Blue Item Green Item Orange Item Red Item Bling Depot Bangle Bracelets (120/80/50) Leather Bracelets (50/30/20) Amethyst Necklace (200/100/30) Nose Ring (120/80/50) Daisy's Perfume Bath Bombs (50/30/15) Aftershave (80/50/20) Incense (20/15/10) Rose Water (25/15/10) Deep Shoe Sea Running Shoes (80/50/20) Snow Boots (20/15/10) Flip Flops (25/15/10) Combat Boots (50/30/15) Flying Disc Records Wireless Speaker (40/30/15) Headphones (175/125/75) Meditation Record (60/45/30) Punk Anthology (60/40/20) Get Dressed Hoodie (175/125/75) Black Jeans (60/45/30) Rain Jacket (60/40/20) Beanie (40/30/15) Get Played Comic Books (150/90/60) Action Figure (20/15/10) Telescope (60/45/30) Giant Water Gun (175/125/75) Hair-Do Undercut (60/45/30) Eyebrow Wax (100/75/50) Pink Highlights (150/90/60) Bang Trim (20/15/10) Nails Pedicure (25/15/10) Pedicure (50/30/15) Henna Tattoo (80/50/20) Get Set (20/15/10) Nerdburger Healing Crystals (20/15/10) Soldering Iron (60/45/30) Lava Lamp (100/75/50) Helmet Camera (150/90/60) Nice Pad Bonzai Tree (200/100/30) Computer Desk (120/80/50) Tapestry (50/30/20) Bean Bag Chair (200/100/30) The Pencil Case Molding Clay (50/30/20) 3D Printer (200/100/30) Oil Paints (120/80/50) Spray Paint (50/30/20) Play It Cool Party Game (50/25/10) Strategy Game (45/30/15) Chess Set (30/20/10) Magic Card Game (50/25/10) Sgt Snuggles Tarantula (100/75/50) Hedgehog (150/90/60) Gold Fish (20/15/10) Kitten (60/45/30) Sugar Shack Chocolate Truffles (60/45/30) Root Beer Float (60/40/20) 20 Lbs of Fudge (40/30/15) Giant Chocolate Unicorn (175/125/75) Throwing Shade Tortoise Shell Glasses (45/30/15) Aviators (30/20/10) Heart Shaped Glasses (50/25/10) Cat Glasses (45/30/10) What's Cookin' Tea Kettle (60/40/20) French Press (40/30/15) Juicer (175/75/50) Waffle Iron (65/45/30) Wicked Fit Free Weights (20/15/10) Gym Socks (25/15/10) Yoga Pants (50/30/15) Skate Shoes (80/50/20) Yas Kween Purple Lipstick (30/20/10) Hair Gel (50/25/10) Mud Mask (45/30/15) Black Eyeliner (30/20/10) -
2Swipe your Mall Madness ATM card to buy something, if you'd like, and have the money available to buy it. If you want to purchase something from the store and have the money available, insert your Mall Madness card with the fake chip down into the spot that looks like a hand taking cash out of a drawer (on older units, this was marked as BUYING). When you do so, you'll either be told that it's able to be bought (with a Cha-ching cash register sound) or will say: "Try again later!" or "Ooh, we're out of stock. Sorry, try again later," but you must continue by pressing "Enter." If the item is available, pay the banker the payment for the item.
- All cards have the same card number (1234 5678 0000 0000) and expiration date (00/00), but although each card is color-coded to your shopper, they each have their own color code inside the fake "chip" on the front of the ATM card.
- At times, unexpected clearances pop up, and you'll be in luck and able to pay the clearance price instead.
- Cancel a purchase if you inadvertently bought something you didn't expect to buy or have figured out you didn't have enough money to buy it after swiping the card. As long as you haven't already touched "Enter," swiping your card into the BUYING slot a second time will signal a cancelation, and you'll hear "Try again later." signifying your cancellation. Once you've done this, press the Enter button.
-
3Mark the purchase as complete. Take the checkmarks and place them in the blank box next to the purchased item - then press the Enter button.
-
4Learn about the Mall Madness ATM. Move to the ATM spot, and press your card into the ATM slot of the console. You may stay at the ATM for as many turns as you'd like, but each time after the second time you stay, you can only receive $20 until you head off to make a purchase. Complete the turn by pressing "Enter."
- If you accidentally placed your card in the wrong slot, insert it into the BUYING slot to move forward and cancel the ATM transaction, then press Enter.
Advertisement
Part 5
Part 5 of 6:
Attending to Special Instructions
-
1Report to the Rest Rooms spot on the board with your shopper if you are told to "Go to the Rest Rooms." Take your shopper, place them at the door to the Rest Rooms spot, and press the Enter button.
-
2Take your pawn and place it on the Movie Theater space if you are told to "Meet a Friend at the Movies." Pick a shopper and move them to the Movie Theater space too. Remember to take a food token (each) upon arriving there. Press Enter at the end of your turn.
-
3Follow the given directions. If you are given a "Move (number of spaces) and send a friend to ..." command, follow it. If it says anywhere, you can even move your friend back to the parking lots if you'd like. [8]
- You may either get told to "send a friend to anywhere" or "send a friend to "Noah's Arcade" (formerly called just "the Arcade" or "send a friend to Funny Lickin'"[9]
(formerly called just "ice cream").
- In the case of Funny Lickin, remember to take a food token - since this is a food shop.
- Learn about the one situation on older consoles that no longer applies to the newer consoles. The console might have said "Meet a Friend at the Food Court," to which you'd place yourself at the food court, then grab your friend's token and bring them to the food court too. Take a food token and press Enter.
- You may either get told to "send a friend to anywhere" or "send a friend to "Noah's Arcade" (formerly called just "the Arcade" or "send a friend to Funny Lickin'"[9]
(formerly called just "ice cream").
-
4Stay put if told to. You may hear at one point: "You set off the security alarm! Stay put while they remove the tag." Don't make a single move and just press Enter.
-
5Take all Shoppers involved and bring them to the ATM space if you are told: "Meet all Shoppers at the ATM!" Each shopper - starting with you - should enter your card into the ATM and take your cash. After everybody has done so, press the Enter button.
Advertisement
Part 6
Part 6 of 6:
Finishing Up
-
1Win the game. Purchase a total of six items from six stores (one item per store) and exit back out to your parking lot before any of your Shopper friends do to win the game.
- During the 2004 game, to win the game, you had to get to a specific "final destination" and the win was determined not by who arrived at their parking lot.[10]
-
2
Advertisement


References
- ↑ https://instructions.hasbro.com/download/E9827_en-us_Mall-Madness-Electronic-Shopping-Spree-Board-Game-for-Kids-Ages-9-and-Up.pdf
- ↑ https://www.hasbro.com/common/instruct/Mall_Madness_Electronic.pdf
- ↑ https://www.hasbro.com/common/instruct/Mall_Madness_Electronic.pdf
- ↑ https://instructions.hasbro.com/download/E9827_en-us_Mall-Madness-Electronic-Shopping-Spree-Board-Game-for-Kids-Ages-9-and-Up.pdf
- ↑ https://boardgamemanuals.fandom.com/wiki/Mall_Madness#Shoppers
- ↑ https://instructions.hasbro.com/download/E9827_en-us_Mall-Madness-Electronic-Shopping-Spree-Board-Game-for-Kids-Ages-9-and-Up.pdf
- ↑ https://www.hasbro.com/common/instruct/Mall_Madness_Electronic.pdf
- ↑ https://www.hasbro.com/common/instruct/Mall_Madness_Electronic.pdf
- ↑ https://instructions.hasbro.com/download/E9827_en-us_Mall-Madness-Electronic-Shopping-Spree-Board-Game-for-Kids-Ages-9-and-Up.pdf
About This Article
Advertisement