This article was co-authored by Moe Draper and by wikiHow staff writer, Eric McClure. Moe Draper is a Shoe Care and Repair Specialist and the Owner of Detroit Shoe Shine and Shoe Repair. With over 20 years of personal experience, Moe specializes in shoe shining, cosmetic restorations for quality leather goods, and minor/major shoe repair services. Moe and his staff at Detroit Shoe Shine and Repair have over 30 years of combined experience and knowledge.
There are 13 references cited in this article, which can be found at the bottom of the page.
This article has been viewed 26,871 times.
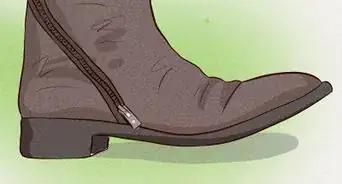
There’s nothing more frustrating than looking down and seeing an obnoxious crease in your brand new boots. Since it can be kind of hard to remove creases—especially if your boots are made of synthetic materials—you’re better off keeping the creases from forming in the first place. In general, if you treat your shoes right and use boot trees when you aren’t wearing them, the only reason for your boots to wrinkle up is if they don’t fit your feet. If this is the case, your shoes will keep creasing over and over no matter how many times you remove those unsightly wrinkles.
Steps
Protecting the Exterior of Your Boots
-
1Apply a waterproofing product to keep your boots from absorbing moisture. Get a waterproofing wax if your shoes are suede or leather. Otherwise, get a waterproofing spray for plastic, synthetic, or vinyl boots. Either work the wax into the exterior of your boots by hand or spray your boots in a thin layer of waterproofing spray. The more water you can keep off of your boots, the less likely they are to crease.[1]
- This likely won’t do a whole lot for winter boots. Most winter boots are designed to handle a fair amount of moisture from snow.
Tip: How often you apply the waterproofing product depends on the specific product you’re using. Waterproofing sprays typically need to be applied every 2-4 weeks, while waxes only need to be applied once every 2-4 months.
-
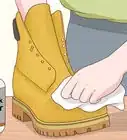
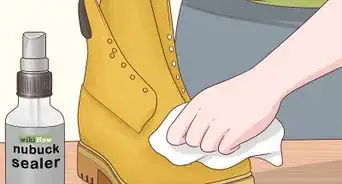
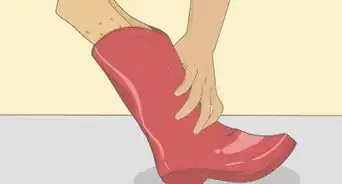
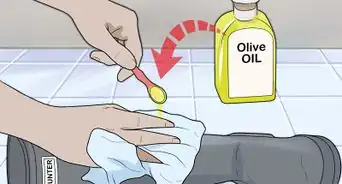
2Rub leather conditioner into leather boots to soften them and prevent damage. Leather conditioner won’t give you as much protection from water, but it will coat your boots in a protective layer and soften the material to make your boots less likely to crease. Work the conditioner directly into the leather with a clean cloth. Reapply the conditioner every 6 months to keep your boots clean and comfortable.[2]
- Leather conditioner is basically an oil that coats your boots and keeps them from drying out or absorbing moisture. It’s not as good at the latter as a waterproofing wax, so choose a product for your leather boots based on how often you wear them in the rain.
Advertisement -
3Stay out of puddles and keep your boots dry, especially if they’re leather. If you wear your boots in the rain, walk over or around puddles, avoid stepping in the gutter, and bring an umbrella with you to keep the water off of your feet. The more water you can keep off your boots, the better![3]
- Water is especially dangerous for leather boots, since the natural oils in leather end up drying out when the water soaks into the material.
- Boots are a popular choice when the weather gets nasty, but you may be better off saving your nicer boots for drier weather.
-
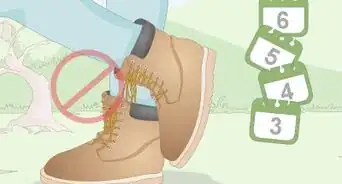
4Alternate between multiple pairs of shoes to give your boots a break. Boots need a break every once in a while and your boots are more likely to crease if you wear them every single day. To avoid creases, wear your boots only 2-3 times a week (or less). Alternate between your favorite pair and another 1-2 sets of shoes to keep them from getting worn out.[4]
- If your boots get heavy creases after one wear, it’s a sign that they either don’t fit right or aren’t particularly well made.


Preserving Your Boot Shape
-
1Use a shoe horn to put your boots on and take them off to keep their shape. A shoe horn is a thin, rounded piece of plastic or wood that keeps you from damaging the heels on your shoe when you put them on or take them off. To put your boots on, slide the horn inside your shoe against the heel and use the curved edge to slide your foot in. To take the boots off, slide the horn between your ankle and the heel to scoop your foot out.[5]
- The shoe horn protects the heel from bending when you’re putting your shoes on or taking them off. This prevents creasing in the back half of your boots. It can also prevent creasing near the toes as well, since the boots will be more structurally sound.
-
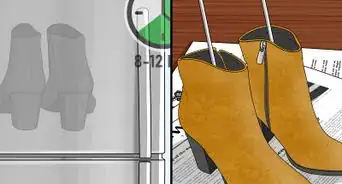
2Put boot trees in the boots when you aren’t wearing them. Whenever you take your boots off, slide a boot tree into each foot before putting them away. This will really cut down on wear and tear over time since your boots won’t lose their shape.[6]
- Boot trees are boot-shaped wood or metal blocks that help your boots keep their shape when you aren’t wearing them. They’re basically the same thing as plain old shoe trees. The only difference is that the heel portion of the tree is taller and thicker.
Tip: If you’re looking for the optimal boot tree, get boot trees made out of cedar. This wood will absorb any moisture that gets trapped in your shoes and keep your footwear smelling great.[7]
-
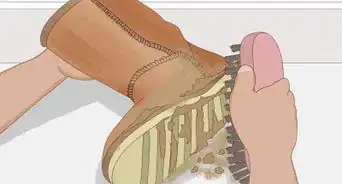
3Stuff your boots with newspaper if you don’t have boot trees. If you have some extra newspaper sitting around or you don’t want to buy a set of boot trees, stuff your boots with newspaper when you aren’t wearing them. This will work just like a boot tree and the paper has the added benefit of absorbing moisture that gets trapped in your boots.[8]
- You can cut a pool noodle with a utility knife to make a DIY boot tree.[9]
-
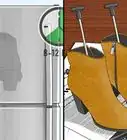
4Store socks in your boots when traveling to save space and prevent creases. Packing boot trees is going to take up crucial space if you’re taking your boots on the road. Instead, roll up your socks and stuff 1-2 pairs inside of your boots to help them keep their shape. This will work just as well as newspaper and help your boots stay crease-free in your bag.[10]
- After you stuff some socks in your boots, toss them in a plastic bag. This will keep any dirt on your soles from rubbing off on your clothes.


Choosing Durable Boots
-
1Buy non-leather boots to reduce the risk of creasing. If you’re looking at a new pair of boots and you’re worried about creases, skip the leather. Silk, felt, fur, or plastic-vinyl boots are much less likely to crease—especially if they’re on the thicker side.[11]
-
2Purchase boots that fit perfectly to avoid natural creases. Only buy boots that fit your foot correctly. For boots, your feet should fit snug, but comfortable, and the ball of your foot should sit at the widest part of your shoe. If there’s more than 1 in (2.5 cm) of space between the tips of your toes and your boots, they’re very likely to crease when you walk.[12]
- If your boots are just a little too big and they’re made of leather, you may be able to shrink them down a size.
-
3Opt for steel-toe boots to minimize the odds they crease at all. They may not always be work-appropriate, but steel-toe boots are great if you’re just running errands or going out in colder weather. These boots have a layer of reinforced metal built into the front of the toe which can cut down on the odds you develop a crease.[13]
Tip: There are boot guards you can buy to replicate the structure of steel-toe boots. Buy boot guards online in your shoe size and slide them inside of your boots to add a hard shell to the front of the toes.[14]


Ironing Creases Out
-
1Stuff newspaper inside of your boots to help maintain their shape. If you develop a crease and your shoes are made of suede, leather, or nubuck (the material used to make Timberland boots), you can iron the crease out. Set your shoes down on an ironing board and fill them with newspaper.[15]
- If your shoes aren’t made out of suede, nubuck, or leather, you can use boot trees and let your boots rest for a month to see if the crease dissipates a little. Some people report success with a soap massage and a rinse. There aren’t really a ton of great options for plastic or vinyl creases, though.
- You may burn your wood boot trees if you iron your shoes with those inside. Plastic boot trees may end up melting and ruining your beautiful shoes.
-
2Fill an iron with water and set it to medium heat. Load your iron’s steam tank with lukewarm water. Turn the iron on to medium heat and set it vertically on your iron. Wait 1-2 minutes for your iron to heat up.[16]
Variation: You can still do this if your iron doesn’t have a steam tank. You just need to fill an empty spray bottle with water and mist your shoes while you iron them.
-
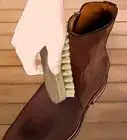
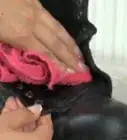
3Unlace your boots and lay a moist cloth over the crease. Untie your boots and pull your laces out of each foot. Set the laces aside to keep them from being damaged by the iron. Take a clean cloth and hold it under warm water to soak it. Wring the excess water out and fold the cloth into a thin rectangle. Lay it down directly over the crease on your boot.[17]
- Use two cloths and lay one over each boot if both of them are creased.
-
4Iron the cloth using a liberal amount of steam for 30-45 seconds. Brace your first boot at the heel with your nondominant hand. Hold the iron against the cloth and press the steam button while sliding the iron back and forth over the cloth. Do this for 30-45 seconds to remove each crease.[18]
- The more steam the better. The moisture will get absorbed in the boot as you heat it up and stretch the area out. This will soften the crease and remove it entirely.
-
5Let the leather cool for 45 minutes and repeat as needed. Leave the warm cloth on top of your boots and let it cool for 45 minutes. The boots will absorb the moisture, soften up, and the crease should be gone. If the creases are still there after 45 minutes, repeat this process again. You can reasonably do this 2-3 times without damaging or ruining your boots.[19]
- If you do this too many times, the oils in the leather will completely disappear and your boots will start cracking and drying out.


Things You’ll Need
Protecting the Exterior of Your Boots
- Waterproofing wax
- Leather conditioner
- Waterproofing spray
- Shoe horn
Preserving Your Boot Shape
- Boot trees
- Newspaper
- Socks
- Pool noodle
- Utility knife
Choosing Durable Boots
- Boot guard
Ironing Creases Out
- Iron
- Ironing board
- Cloth
- Water
- Spray bottle (optional)
References
- ↑ https://www.artofmanliness.com/articles/waterproofing-shoes/
- ↑ https://www.ohscanada.com/overtime/breaking-in-work-boots-dos-and-donts/
- ↑ https://www.artofmanliness.com/articles/waterproofing-shoes/
- ↑ https://youtu.be/uXYmdzZT4nk?t=204
- ↑ https://www.chicagotribune.com/consumer-reviews/sns-bestreviews-fashion-the-best-shoe-horn-20191217-o4phud4wpbah5biq67dq2scryq-story.html
- ↑ https://youtu.be/uXYmdzZT4nk?t=157
- ↑ Moe Draper. Shoe Care & Repair Specialist. Expert Interview. 5 April 2021.
- ↑ https://youtu.be/uXYmdzZT4nk?t=170
- ↑ https://www.fox17online.com/2017/01/16/how-to-keep-boots-crease-free
- ↑ https://www.business2community.com/travel-leisure/how-to-pack-your-boots-for-travel-0431187
- ↑ https://parisiangentleman.co.uk/academy/4-things-to-look-for-in-a-good-pair-of-mens-shoes/
- ↑ https://shoegazing.com/2018/12/09/in-depth-how-shoes-crease/
- ↑ https://www.ohscanada.com/overtime/breaking-in-work-boots-dos-and-donts/
- ↑ https://www.businessinsider.com/forcefield-insert-review-prevent-sneaker-creases
- ↑ https://sea.mashable.com/article/3305/this-ingenious-twitter-hack-teaches-you-how-to-remove-creases-out-of-sneakers
- ↑ https://sea.mashable.com/article/3305/this-ingenious-twitter-hack-teaches-you-how-to-remove-creases-out-of-sneakers
- ↑ https://sea.mashable.com/article/3305/this-ingenious-twitter-hack-teaches-you-how-to-remove-creases-out-of-sneakers
- ↑ https://sea.mashable.com/article/3305/this-ingenious-twitter-hack-teaches-you-how-to-remove-creases-out-of-sneakers
- ↑ https://sea.mashable.com/article/3305/this-ingenious-twitter-hack-teaches-you-how-to-remove-creases-out-of-sneakers
About This Article